Getting Started With AuthorIT - instructional media + magic
Getting Started With AuthorIT - instructional media + magic
Getting Started With AuthorIT - instructional media + magic

You also want an ePaper? Increase the reach of your titles
YUMPU automatically turns print PDFs into web optimized ePapers that Google loves.
100 <strong>Getting</strong> <strong>Started</strong> <strong>With</strong> <strong>AuthorIT</strong><br />
Create a Hypertext Link<br />
A Hypertext Link object represents one or more links between individual characters in<br />
a Topic object and other Topic objects and/or Internet URL locations. When published<br />
these links become hypertext jumps in the Help and HTML, and page number cross<br />
references or footnotes in the printed documentation.<br />
Hyperlinks exist in the Library as objects. Hyperlink objects contains more<br />
information than just the target of the link. Because all the content in our Library can<br />
be published to printed, help and web outputs, the Hypertext link object holds<br />
information on how the link will appear in all outputs. When you print a document<br />
out, having an underlined word (like on a website) isnʹt any use. Therefore, in printed<br />
output, the default Hypertext Link objects in the sample library will insert text beside<br />
the anchor text, giving a page reference.<br />
To Create a Hypertext Link to a Topic within the same Book (by<br />
dragging and dropping).<br />
1) Click the Show Topic Pane button from the Book Contents toolbar.<br />
2) Open (double‐click) the Introduction Topic.<br />
3) In the first paragraph, highlight the text Find and Replace. This will be the anchor<br />
text for our new Hypertext Link.<br />
4) In the Book Contents, select (single‐click) the To find and replace specific text<br />
Topic. This Topic is to be the target of the Hypertext Link object.<br />
In hypertext link terminology; ʺanchor textʺ is the text you click on, ʺtargetʺ is the<br />
location the link goes to.<br />
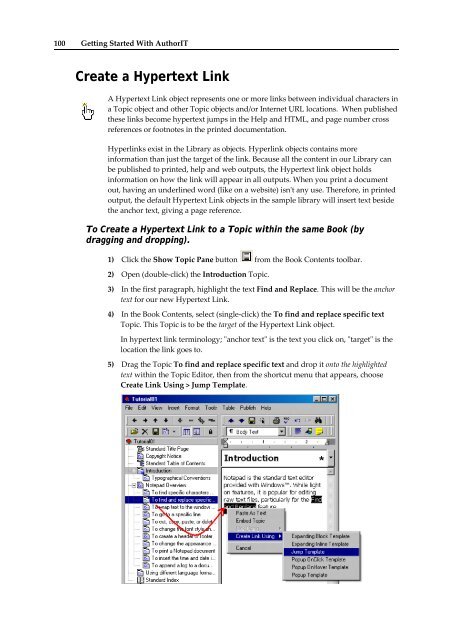
5) Drag the Topic To find and replace specific text and drop it onto the highlighted<br />
text within the Topic Editor, then from the shortcut menu that appears, choose<br />
Create Link Using > Jump Template.