position / speed mode - Harmonic Drive LLC
position / speed mode - Harmonic Drive LLC
position / speed mode - Harmonic Drive LLC

You also want an ePaper? Increase the reach of your titles
YUMPU automatically turns print PDFs into web optimized ePapers that Google loves.
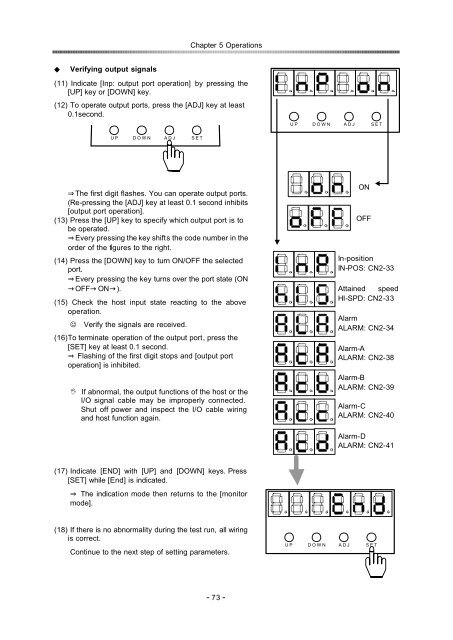
Chapter 5 Operations<br />
Verifying output signals<br />
(11) Indicate [Inp: output port operation] by pressing the<br />
[UP] key or [DOWN] key.<br />
(12) To operate output ports, press the [ADJ] key at least<br />
0.1second.<br />
U P D O W N A D J S E T<br />
U P D O W N A D J S E T<br />
The first digit flashes. You can operate output ports.<br />
(Re-pressing the [ADJ] key at least 0.1 second inhibits<br />
[output port operation].<br />
(13) Press the [UP] key to specify which output port is to<br />
be operated.<br />
Every pressing e thkey shifts the code number in the<br />
order of the figures to the right.<br />
(14) Press the [DOWN] key to turn ON/OFF the selected<br />
port.<br />
Every pressing e thkey turns over the port state (ON<br />
OFF ON).<br />
(15) Check the host input state reacting to the above<br />
operation.<br />
JVerify the signals are received.<br />
(16)To terminate operation of the output port, press the<br />
[SET] key at least 0.1 second.<br />
Flashing of the first digit stops and [output port<br />
operation] is inhibited.<br />
IIf abnormal, the output functions of the host or the<br />
I/O signal cable may be improperly connected.<br />
Shut off power and inspect the I/O cable wiring<br />
and host function again.<br />
ON<br />
OFF<br />
In-<strong>position</strong><br />
IN-POS: CN2-33<br />
Attained <strong>speed</strong><br />
HI-SPD: CN2-33<br />
Alarm<br />
ALARM: CN2-34<br />
Alarm-A<br />
ALARM: CN2-38<br />
Alarm-B<br />
ALARM: CN2-39<br />
Alarm-C<br />
ALARM: CN2-40<br />
Alarm-D<br />
ALARM: CN2-41<br />
(17) Indicate [END] with [UP] and [DOWN] keys. Press<br />
[SET] while [End] is indicated.<br />
The indicat ion <strong>mode</strong> then returns to the [monitor<br />
<strong>mode</strong>].<br />
(18) If there is no abnormality during the test run, all wiring<br />
is correct.<br />
Continue to the next step of setting parameters.<br />
U P D O W N A D J S E T<br />
- 73 -