Smartline Autosampler 3900 Manual / Handbuch V 1508 03/2007
Smartline Autosampler 3900 Manual / Handbuch V 1508 03/2007
Smartline Autosampler 3900 Manual / Handbuch V 1508 03/2007

You also want an ePaper? Increase the reach of your titles
YUMPU automatically turns print PDFs into web optimized ePapers that Google loves.
Installation 21<br />
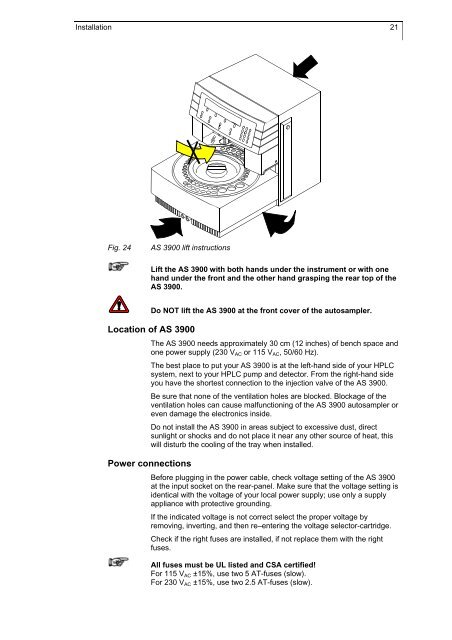
Fig. 24 AS <strong>3900</strong> lift instructions<br />
Lift the AS <strong>3900</strong> with both hands under the instrument or with one<br />
hand under the front and the other hand grasping the rear top of the<br />
AS <strong>3900</strong>.<br />
Do NOT lift the AS <strong>3900</strong> at the front cover of the autosampler.<br />
Location of AS <strong>3900</strong><br />
The AS <strong>3900</strong> needs approximately 30 cm (12 inches) of bench space and<br />
one power supply (230 VAC or 115 VAC, 50/60 Hz).<br />
The best place to put your AS <strong>3900</strong> is at the left-hand side of your HPLC<br />
system, next to your HPLC pump and detector. From the right-hand side<br />
you have the shortest connection to the injection valve of the AS <strong>3900</strong>.<br />
Be sure that none of the ventilation holes are blocked. Blockage of the<br />
ventilation holes can cause malfunctioning of the AS <strong>3900</strong> autosampler or<br />
even damage the electronics inside.<br />
Do not install the AS <strong>3900</strong> in areas subject to excessive dust, direct<br />
sunlight or shocks and do not place it near any other source of heat, this<br />
will disturb the cooling of the tray when installed.<br />
Power connections<br />
Before plugging in the power cable, check voltage setting of the AS <strong>3900</strong><br />
at the input socket on the rear-panel. Make sure that the voltage setting is<br />
identical with the voltage of your local power supply; use only a supply<br />
appliance with protective grounding.<br />
If the indicated voltage is not correct select the proper voltage by<br />
removing, inverting, and then re–entering the voltage selector-cartridge.<br />
Check if the right fuses are installed, if not replace them with the right<br />
fuses.<br />
All fuses must be UL listed and CSA certified!<br />
For 115 VAC ±15%, use two 5 AT-fuses (slow).<br />
For 230 VAC ±15%, use two 2.5 AT-fuses (slow).