Viessmann Katalog 2019/2020/2021
Viessmann Gesamtkatalog DE/EN 2019/2020/2021
Viessmann Gesamtkatalog DE/EN 2019/2020/2021

Erfolgreiche ePaper selbst erstellen
Machen Sie aus Ihren PDF Publikationen ein blätterbares Flipbook mit unserer einzigartigen Google optimierten e-Paper Software.
Leuchten mit<br />
patentiertem Kontaktstecksockel<br />
Lampen stehen beim Basteln immer im Weg<br />
Wann baut man normalerweise eine Modellleuchte in die Anlage oder das Diorama ein? Genau, wenn man sich gerade um alle anderen<br />
Bohr- und Anschlussarbeiten kümmert. Dann nämlich, wenn ein bisschen Bohrstaub mehr oder weniger nichts ausmacht. Anschließend<br />
geht es dann an die weitere Landschaftsgestaltung, das Begrünen und die Feindetaillierung. Dumm nur, dass die Lampe<br />
dann immer irgendwie im Weg steht und man Gefahr läuft, sie unbeabsichtigt beim Arbeiten umzuknicken oder zu beschädigen...<br />
<strong>Viessmann</strong> hat aber genau für solche Fälle die passende Lösung: Leuchten mit Kontaktstecksockel! Bereits eine ganze Reihe an Lampen<br />
für den Bahnhofs- und Straßenbereich ist mit dieser innovativen Idee ausgestattet, die dem Modellbahner das Arbeiten erheblich erleichtert.<br />
Das Prinzip ist ganz einfach<br />
Leuchte und Sockel sind getrennte Bauteile. Montiert wird die Leuchte ganz normal wie jede andere <strong>Viessmann</strong> Leuchte auch: Loch<br />
im jeweiligen Durchmesser an der vorgesehenen Stelle bohren, Leuchte mithilfe des bequemen Patentsteckfußes in die Grundplatte<br />
einbauen, anschließen – fertig! Halt nein, Sie wollen ja auch noch die Landschaft drumherum gestalten. Aber kein Problem: Jetzt<br />
einfach den Lampenmast vorsichtig nach oben aus dem Sockel herausziehen und sicher zur Seite legen. Damit nun aber bei den<br />
weiteren Bauarbeiten nicht der stromführende Kontakt im Sockel verschmutzt wird, liefert <strong>Viessmann</strong> eine praktische Abdeckkappe<br />
aus Kunststoff mit; sie passt genau in den Kontaktstecksockel und verschließt diesen exakt und sauber, sodass kein Dreck oder<br />
Staub eindringen und später die Funktion der Lampe beeinträchtigen kann. Nun können Sie nach Belieben Ihre Landschaft gestalten<br />
und mit Farben und Begrünungsmaterial arbeiten so viel Sie möchten – ohne dass der Lampenmast im Weg ist! Dank der hohen<br />
Schutzabdeckung ist der Leuchtenstandort später auch im hohen Gras leicht zu finden. Sind alle „dreckigen“ Arbeiten erledigt, wird<br />
die Abdeckung einfach wieder gegen den Lampenmast getauscht.<br />
Alle <strong>Viessmann</strong> Kontaktstecksockel-Leuchten haben den gleichen Sockel und den gleichen Mastdurchmesser. Ein Austausch untereinander<br />
ist daher problemlos möglich. Oder Sie möchten Ihre Lampen einfach mal ganz flexibel an unterschiedlichen Stellen auf der<br />
Anlage platzieren oder verschiedene Dioramen damit ausstatten, ohne jedes Mal neue Leuchten kaufen zu müssen? Das Kontaktstecksockel-Set<br />
Art. macht auch dies möglich. Die 6 Kontaktstecksockel in 3 Farben werden ganz normal eingebaut und nach Bedarf<br />
mit den gewünschten Leuchten bestückt. Flexibilität ist alles!<br />
Lamps with patented plug-in socket<br />
Streetlights are usually an obstacle when working on the layout<br />
At which point in time does one normally install lighting on the layout or diorama? Exactly, it usually happens when one is busy with<br />
drilling holes and wiring other things. In other words, at a time when a little dust from drilling does not matter. After that attention shifts<br />
towards scenery, applying vegetation and adding fine details. It is too bad that the streetlights are always where you do not need them<br />
while working on the layout and thus running the risk of breaking them or causing some other damage to them …<br />
The solution<br />
<strong>Viessmann</strong> offers the best solution just for such instances: Lanterns with plug-in socket! This innovative idea has already been applied<br />
to many of our lanterns for station and for street lighting which makes working on your layout much easier. And, of course, we continue<br />
to convert the remaining lanterns and to equip them with the plug-in socket!<br />
The principle is quite simple<br />
Lantern and socket are separate components. The lantern is installed like any other <strong>Viessmann</strong> lamp: Drill a hole, insert the lantern with<br />
its pole into the comfortable patented quick installation socket on your layout, connect the cables – that’s it! Well, not quite. You also<br />
want to finish detailing the scenery around. No problem: Carefully remove the lighting pole by pulling it from the socket and put it aside<br />
at a safe place. In order to avoid getting any dirt into the contacts of the socket during your scenery work, simply insert the <strong>Viessmann</strong><br />
protective cover into the socket. It fits perfectly into the socket and prevents any dirt or dust from entering, which may impair the functionality<br />
later on. Now you are well set for your scenery work and you may apply as much paint and grass fibres as you like – without<br />
having to worry about any lighting poles! Due to the high protective cover the location of the sockets can easily be found later on – even<br />
in high grass. Once all “dirty work” has been completed you simply exchange the protective cover with the lighting pole.<br />
All <strong>Viessmann</strong> lanterns with the plug-in socket have the same pole diameter and base. Therefore, it is quite simple to swap lanterns<br />
from one location to another. Or perhaps you want to place your lanterns at different locations of your layout or use them in several<br />
dioramas, without having to purchase new lanterns every time. The plug-in socket set item 6806 allows you to do this. The 6 plug-in<br />
sockets in 3 colours are installed normally and can be equipped with the desired lanterns as required. Flexibility is the name of the game!<br />
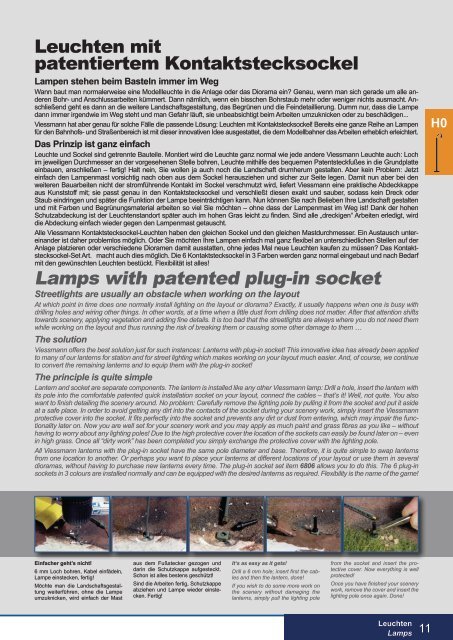
Einfacher geht’s nicht!<br />
6 mm Loch bohren, Kabel einfädeln,<br />
Lampe einstecken, fertig!<br />
Möchte man die Landschaftsgestaltung<br />
weiterführen, ohne die Lampe<br />
umzu knicken, wird einfach der Mast<br />
aus dem Fußstecker gezogen und<br />
darin die Schutzkappe aufgesteckt.<br />
Schon ist alles bestens geschützt!<br />
Sind die Arbeiten fertig, Schutzkappe<br />
abziehen und Lampe wieder einstecken.<br />
Fertig!<br />
It‘s as easy as it gets!<br />
Drill a 6 mm hole; insert first the cables<br />
and then the lantern, done!<br />
If you wish to do some more work on<br />
the scenery without damaging the<br />
lanterns, simply pull the lighting pole<br />
from the socket and insert the protective<br />
cover. Now everything is well<br />
protected!<br />
Once you have finished your scenery<br />
work, remove the cover and insert the<br />
lighting pole once again. Done!<br />
Leuchten<br />
Lamps<br />
11 H0