

Digital Mailing System DM400,TM DM500TM and DM550TM
Digital Mailing System DM400,TM DM500TM and DM550TM
Digital Mailing System DM400,TM DM500TM and DM550TM

You also want an ePaper? Increase the reach of your titles
YUMPU automatically turns print PDFs into web optimized ePapers that Google loves.
3 • Mail in a Minute<br />
Run the Mail<br />
3-4<br />
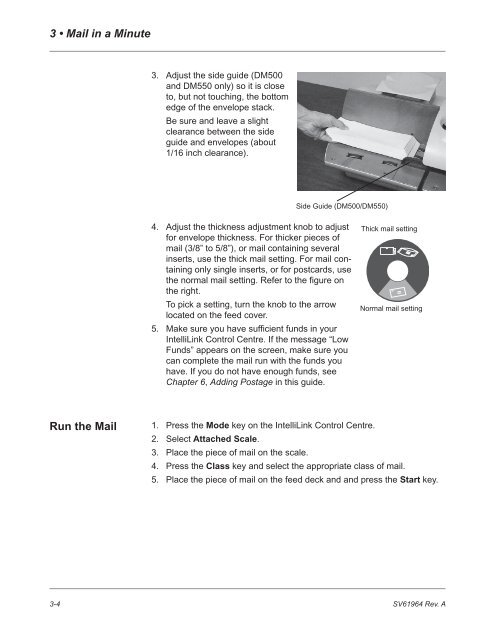
3. Adjust the side guide (DM500<br />
<strong>and</strong> DM550 only) so it is close<br />
to, but not touching, the bottom<br />
edge of the envelope stack.<br />
Be sure <strong>and</strong> leave a slight<br />
clearance between the side<br />
guide <strong>and</strong> envelopes (about<br />
1/16 inch clearance).<br />
Side Guide (DM500/DM550)<br />
4. Adjust the thickness adjustment knob to adjust<br />
for envelope thickness. For thicker pieces of<br />
mail (3/8” to 5/8”), or mail containing several<br />
inserts, use the thick mail setting. For mail containing<br />
only single inserts, or for postcards, use<br />
the normal mail setting. Refer to the figure on<br />
the right.<br />
To pick a setting, turn the knob to the arrow<br />
located on the feed cover.<br />
5. Make sure you have sufficient funds in your<br />
IntelliLink Control Centre. If the message “Low<br />
Funds” appears on the screen, make sure you<br />
can complete the mail run with the funds you<br />
have. If you do not have enough funds, see<br />
Chapter 6, Adding Postage in this guide.<br />
1. Press the Mode key on the IntelliLink Control Centre.<br />
2. Select Attached Scale.<br />
3. Place the piece of mail on the scale.<br />
Thick mail setting<br />
Normal mail setting<br />
4. Press the Class key <strong>and</strong> select the appropriate class of mail.<br />
5. Place the piece of mail on the feed deck <strong>and</strong> <strong>and</strong> press the Start key.<br />
SV61964 Rev. A


