

Humminbird - Fish Finders and GPS
Humminbird - Fish Finders and GPS
Humminbird - Fish Finders and GPS

Create successful ePaper yourself
Turn your PDF publications into a flip-book with our unique Google optimized e-Paper software.
3<br />
2<br />
1<br />
hole, then use it to mark the position of the two mounting screws.<br />
Remove the hole cover, drill the two mounting holes using a 9/64"<br />
bit. Do not install the hole cover at this time.<br />
6b. If the cables cannot be routed directly beneath the mounting<br />
bracket, mark <strong>and</strong> drill a 1" (25 mm) hole that will allow you to run<br />
the cables close to the bracket. Pass the cables through the 1" (25<br />
mm) hole, routing the cables through the grommet <strong>and</strong> pressing the<br />
grommet into place. Place the hole cover over the mounting surface<br />
hole, then use it to mark the position of the two mounting screws.<br />
Remove the hole cover, drill the two mounting holes using a 9/64"<br />
(3.5 mm) bit, fill them with marine-grade silicone, then replace the<br />
hole cover <strong>and</strong> insert the #8 Phillips countersink wood screws.<br />
H<strong>and</strong>-tighten only.<br />
1<br />
2<br />
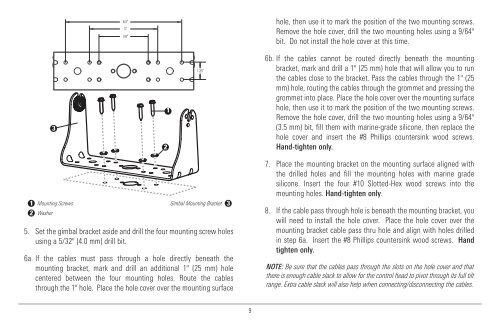
Mounting Screws<br />
Washer<br />
Gimbal Mounting Bracket 3<br />
5. Set the gimbal bracket aside <strong>and</strong> drill the four mounting screw holes<br />
using a 5/32" (4.0 mm) drill bit.<br />
6a. If the cables must pass through a hole directly beneath the<br />
mounting bracket, mark <strong>and</strong> drill an additional 1" (25 mm) hole<br />
centered between the four mounting holes. Route the cables<br />
through the 1" hole. Place the hole cover over the mounting surface<br />
7. Place the mounting bracket on the mounting surface aligned with<br />
the drilled holes <strong>and</strong> fill the mounting holes with marine grade<br />
silicone. Insert the four #10 Slotted-Hex wood screws into the<br />
mounting holes. H<strong>and</strong>-tighten only.<br />
8. If the cable pass through hole is beneath the mounting bracket, you<br />
will need to install the hole cover. Place the hole cover over the<br />
mounting bracket cable pass thru hole <strong>and</strong> align with holes drilled<br />
in step 6a. Insert the #8 Phillips countersink wood screws. H<strong>and</strong><br />
tighten only.<br />
NOTE: Be sure that the cables pass through the slots on the hole cover <strong>and</strong> that<br />
there is enough cable slack to allow for the control head to pivot through its full tilt<br />
range. Extra cable slack will also help when connecting/disconnecting the cables.<br />
9


