

Humminbird - Fish Finders and GPS
Humminbird - Fish Finders and GPS
Humminbird - Fish Finders and GPS

Create successful ePaper yourself
Turn your PDF publications into a flip-book with our unique Google optimized e-Paper software.
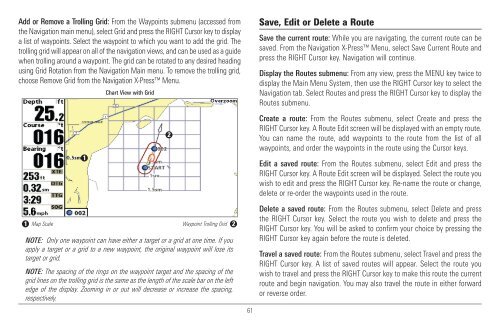
Add or Remove a Trolling Grid: From the Waypoints submenu (accessed from<br />
the Navigation main menu), select Grid <strong>and</strong> press the RIGHT Cursor key to display<br />
a list of waypoints. Select the waypoint to which you want to add the grid. The<br />
trolling grid will appear on all of the navigation views, <strong>and</strong> can be used as a guide<br />
when trolling around a waypoint. The grid can be rotated to any desired heading<br />
using Grid Rotation from the Navigation Main menu. To remove the trolling grid,<br />
choose Remove Grid from the Navigation X-Press Menu.<br />
1<br />
Chart View with Grid<br />
1 Map Scale<br />
Waypoint Trolling Grid 2<br />
NOTE: Only one waypoint can have either a target or a grid at one time. If you<br />
apply a target or a grid to a new waypoint, the original waypoint will lose its<br />
target or grid.<br />
NOTE: The spacing of the rings on the waypoint target <strong>and</strong> the spacing of the<br />
grid lines on the trolling grid is the same as the length of the scale bar on the left<br />
edge of the display. Zooming in or out will decrease or increase the spacing,<br />
respectively.<br />
2<br />
61<br />
Save, Edit or Delete a Route<br />
Save the current route: While you are navigating, the current route can be<br />
saved. From the Navigation X-Press Menu, select Save Current Route <strong>and</strong><br />
press the RIGHT Cursor key. Navigation will continue.<br />
Display the Routes submenu: From any view, press the MENU key twice to<br />
display the Main Menu System, then use the RIGHT Cursor key to select the<br />
Navigation tab. Select Routes <strong>and</strong> press the RIGHT Cursor key to display the<br />
Routes submenu.<br />
Create a route: From the Routes submenu, select Create <strong>and</strong> press the<br />
RIGHT Cursor key. A Route Edit screen will be displayed with an empty route.<br />
You can name the route, add waypoints to the route from the list of all<br />
waypoints, <strong>and</strong> order the waypoints in the route using the Cursor keys.<br />
Edit a saved route: From the Routes submenu, select Edit <strong>and</strong> press the<br />
RIGHT Cursor key. A Route Edit screen will be displayed. Select the route you<br />
wish to edit <strong>and</strong> press the RIGHT Cursor key. Re-name the route or change,<br />
delete or re-order the waypoints used in the route.<br />
Delete a saved route: From the Routes submenu, select Delete <strong>and</strong> press<br />
the RIGHT Cursor key. Select the route you wish to delete <strong>and</strong> press the<br />
RIGHT Cursor key. You will be asked to confirm your choice by pressing the<br />
RIGHT Cursor key again before the route is deleted.<br />
Travel a saved route: From the Routes submenu, select Travel <strong>and</strong> press the<br />
RIGHT Cursor key. A list of saved routes will appear. Select the route you<br />
wish to travel <strong>and</strong> press the RIGHT Cursor key to make this route the current<br />
route <strong>and</strong> begin navigation. You may also travel the route in either forward<br />
or reverse order.


