

Humminbird - Fish Finders and GPS
Humminbird - Fish Finders and GPS
Humminbird - Fish Finders and GPS

You also want an ePaper? Increase the reach of your titles
YUMPU automatically turns print PDFs into web optimized ePapers that Google loves.
<strong>GPS</strong> Receiver Installation<br />
To optimize performance of the <strong>GPS</strong> receiver, mount it in an area that has full<br />
exposure to the sky. The effective area of reception is 10° above the horizon.<br />
Different circumstances determine the mounting method appropriate for<br />
your <strong>GPS</strong> receiver.<br />
Stem Mounting with an Existing 1" - 14 Thread Stem<br />
Follow these steps to stem mount the <strong>GPS</strong> receiver:<br />
NOTE: If you have an existing stem for mounting the <strong>GPS</strong> receiver, proceed<br />
directly to step 2 of the following procedure.<br />
If you have…<br />
An existing antenna stem with<br />
st<strong>and</strong>ard 1" – 14 thread stem<br />
Access for cable routing under<br />
the mounting location<br />
No access under the mounting<br />
location<br />
Then use:<br />
Stem Mount with Existing 1” -<br />
14 Thread Stem<br />
Access Under Mounting<br />
Location<br />
No Access Under Mounting<br />
Location<br />
1. Determine the best location to mount your <strong>GPS</strong> receiver. Preplan<br />
<strong>and</strong> test the cable routing to your control head before any drilling or<br />
cutting of your boat surfaces. If you have purchased hardware to<br />
stem mount your <strong>GPS</strong> receiver, follow the instructions included with<br />
that hardware to mount the stem (antenna pole).<br />
NOTE: AS-EC10 10' extension cables are available from <strong>Humminbird</strong>® if your<br />
planned routing exceeds 20', (6 m). Maximum cable length, including extensions,<br />
should not exceed 50' (16 m).<br />
NOTE: Remember to caulk or seal screw holes <strong>and</strong> drilled holes as needed to<br />
protect your boat from water damage.<br />
The pinouts of the pigtail cable are as follows:<br />
• Red Wire, +12V (output voltage only)<br />
• Black Wire, Ground<br />
• White Wire, NMEA Out.<br />
CAUTION! Please use caution before connecting the red +12V wire to any other<br />
NMEA device. This is an output voltage provided by the <strong>Fish</strong>finder unit <strong>and</strong><br />
<strong>GPS</strong> receiver <strong>and</strong> should only be connected to those NMEA devices that need a<br />
12 volt input.<br />
1<br />
2<br />
3<br />
1<br />
2<br />
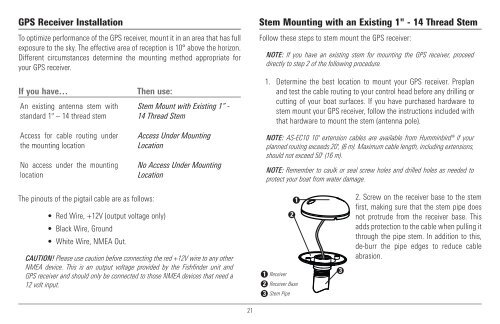
Receiver<br />
Receiver Base<br />
Stem Pipe<br />
3<br />
2. Screw on the receiver base to the stem<br />
first, making sure that the stem pipe does<br />
not protrude from the receiver base. This<br />
adds protection to the cable when pulling it<br />
through the pipe stem. In addition to this,<br />
de-burr the pipe edges to reduce cable<br />
abrasion.<br />
21


