

Humminbird - Fish Finders and GPS
Humminbird - Fish Finders and GPS
Humminbird - Fish Finders and GPS

Create successful ePaper yourself
Turn your PDF publications into a flip-book with our unique Google optimized e-Paper software.
• The hydrodynamic shape of your transducer allows it to point straight<br />
down without deadrise adjustment.<br />
• On boats with stepped hulls, it may be possible to mount the transducer<br />
on the step. Do not mount the transducer on the transom<br />
behind a step to avoid popping the transducer out of the water at<br />
higher speeds; the transducer must remain in the water for the<br />
control head to maintain the sonar signal.<br />
• If the transom is behind the propeller(s), it may be impossible to find<br />
an area clear from turbulence, <strong>and</strong> a different mounting technique or<br />
transducer type should be considered (see Trolling Motor<br />
Transducer Installation).<br />
• The Side Imaging transducer must NOT have anything obstructing<br />
the ‘view’ of the side looking beams, i.e. nothing can be in the line<br />
of sight of these beams (not a hull, motor, or other transducer, etc).<br />
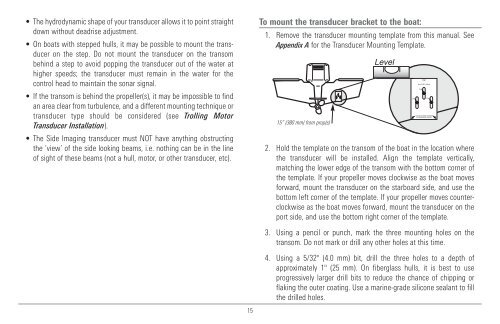
To mount the transducer bracket to the boat:<br />
1. Remove the transducer mounting template from this manual. See<br />
Appendix A for the Transducer Mounting Template.<br />
15” (380 mm) from prop(s)<br />
2. Hold the template on the transom of the boat in the location where<br />
the transducer will be installed. Align the template vertically,<br />
matching the lower edge of the transom with the bottom corner of<br />
the template. If your propeller moves clockwise as the boat moves<br />
forward, mount the transducer on the starboard side, <strong>and</strong> use the<br />
bottom left corner of the template. If your propeller moves counterclockwise<br />
as the boat moves forward, mount the transducer on the<br />
port side, <strong>and</strong> use the bottom right corner of the template.<br />
3. Using a pencil or punch, mark the three mounting holes on the<br />
transom. Do not mark or drill any other holes at this time.<br />
4. Using a 5/32" (4.0 mm) bit, drill the three holes to a depth of<br />
approximately 1" (25 mm). On fiberglass hulls, it is best to use<br />
progressively larger drill bits to reduce the chance of chipping or<br />
flaking the outer coating. Use a marine-grade silicone sealant to fill<br />
the drilled holes.<br />
15


