

Humminbird - Fish Finders and GPS
Humminbird - Fish Finders and GPS
Humminbird - Fish Finders and GPS

Create successful ePaper yourself
Turn your PDF publications into a flip-book with our unique Google optimized e-Paper software.
Transducer Installation<br />
There are two different installation methods for your transducer:<br />
• Transom Transducer<br />
• Trolling Motor Transducer.<br />
Find the section that describes the method of installation you will be using.<br />
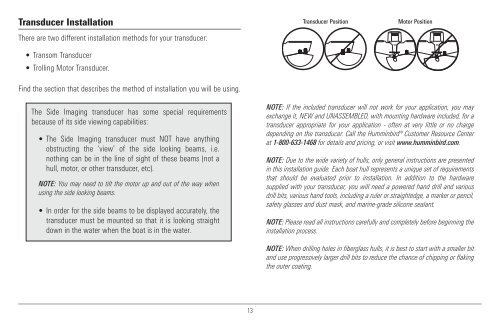
Transducer Position<br />
Motor Position<br />
The Side Imaging transducer has some special requirements<br />
because of its side viewing capabilities:<br />
• The Side Imaging transducer must NOT have anything<br />
obstructing the ‘view’ of the side looking beams, i.e.<br />
nothing can be in the line of sight of these beams (not a<br />
hull, motor, or other transducer, etc).<br />
NOTE: You may need to tilt the motor up <strong>and</strong> out of the way when<br />
using the side looking beams.<br />
• In order for the side beams to be displayed accurately, the<br />
transducer must be mounted so that it is looking straight<br />
down in the water when the boat is in the water.<br />
NOTE: If the included transducer will not work for your application, you may<br />
exchange it, NEW <strong>and</strong> UNASSEMBLED, with mounting hardware included, for a<br />
transducer appropriate for your application - often at very little or no charge<br />
depending on the transducer. Call the <strong>Humminbird</strong>® Customer Resource Center<br />
at 1-800-633-1468 for details <strong>and</strong> pricing, or visit www.humminbird.com.<br />
NOTE: Due to the wide variety of hulls, only general instructions are presented<br />
in this installation guide. Each boat hull represents a unique set of requirements<br />
that should be evaluated prior to installation. In addition to the hardware<br />
supplied with your transducer, you will need a powered h<strong>and</strong> drill <strong>and</strong> various<br />
drill bits, various h<strong>and</strong> tools, including a ruler or straightedge, a marker or pencil,<br />
safety glasses <strong>and</strong> dust mask, <strong>and</strong> marine-grade silicone sealant.<br />
NOTE: Please read all instructions carefully <strong>and</strong> completely before beginning the<br />
installation process.<br />
NOTE: When drilling holes in fiberglass hulls, it is best to start with a smaller bit<br />
<strong>and</strong> use progressively larger drill bits to reduce the chance of chipping or flaking<br />
the outer coating.<br />
13


