

Chapter 1. Color Management Background - Kodak
Chapter 1. Color Management Background - Kodak
Chapter 1. Color Management Background - Kodak

You also want an ePaper? Increase the reach of your titles
YUMPU automatically turns print PDFs into web optimized ePapers that Google loves.
<strong>Chapter</strong> 2. Using <strong>Color</strong>Wise Pro Tools<br />
Workflow - Corrected CMYK Data<br />
Workflow - Corrected CMYK Data<br />
If you have data that has already been corrected for your <strong>Kodak</strong><br />
Versamark <strong>Color</strong> Press and you wish to print it using the CS600 as a<br />
CS400 would print it, follow this workflow.<br />
<strong>1.</strong> Launch the <strong>Color</strong>Wise Pro Tools toolbar.<br />
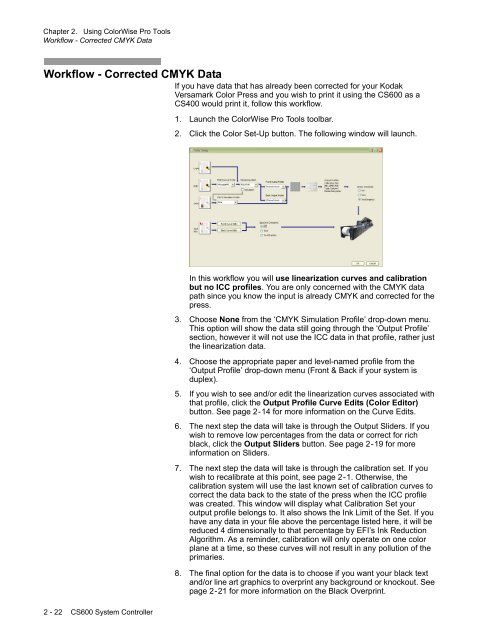
2. Click the <strong>Color</strong> Set-Up button. The following window will launch.<br />
In this workflow you will use linearization curves and calibration<br />
but no ICC profiles. You are only concerned with the CMYK data<br />
path since you know the input is already CMYK and corrected for the<br />
press.<br />
3. Choose None from the ‘CMYK Simulation Profile’ drop-down menu.<br />
This option will show the data still going through the ‘Output Profile’<br />
section, however it will not use the ICC data in that profile, rather just<br />
the linearization data.<br />
4. Choose the appropriate paper and level-named profile from the<br />
‘Output Profile’ drop-down menu (Front & Back if your system is<br />
duplex).<br />
5. If you wish to see and/or edit the linearization curves associated with<br />
that profile, click the Output Profile Curve Edits (<strong>Color</strong> Editor)<br />
button. See page 2-14 for more information on the Curve Edits.<br />
6. The next step the data will take is through the Output Sliders. If you<br />
wish to remove low percentages from the data or correct for rich<br />
black, click the Output Sliders button. See page 2-19 for more<br />
information on Sliders.<br />
7. The next step the data will take is through the calibration set. If you<br />
wish to recalibrate at this point, see page 2-<strong>1.</strong> Otherwise, the<br />
calibration system will use the last known set of calibration curves to<br />
correct the data back to the state of the press when the ICC profile<br />
was created. This window will display what Calibration Set your<br />
output profile belongs to. It also shows the Ink Limit of the Set. If you<br />
have any data in your file above the percentage listed here, it will be<br />
reduced 4 dimensionally to that percentage by EFI’s Ink Reduction<br />
Algorithm. As a reminder, calibration will only operate on one color<br />
plane at a time, so these curves will not result in any pollution of the<br />
primaries.<br />
8. The final option for the data is to choose if you want your black text<br />
and/or line art graphics to overprint any background or knockout. See<br />
page 2-21 for more information on the Black Overprint.<br />
2 - 22 CS600 System Controller


