

Chapter 1. Color Management Background - Kodak
Chapter 1. Color Management Background - Kodak
Chapter 1. Color Management Background - Kodak

Create successful ePaper yourself
Turn your PDF publications into a flip-book with our unique Google optimized e-Paper software.
<strong>Chapter</strong> 2. Using <strong>Color</strong>Wise Pro Tools<br />
Workflow - Normal CMYK and/or RGB Data<br />
Workflow - Normal CMYK and/or RGB Data<br />
If you have a typical job that contains CMYK and/or RGB data and wish to<br />
use ICC profiles to correct this data for your press, follow this workflow.<br />
<strong>1.</strong> Launch the <strong>Color</strong>Wise Pro Tools toolbar.<br />
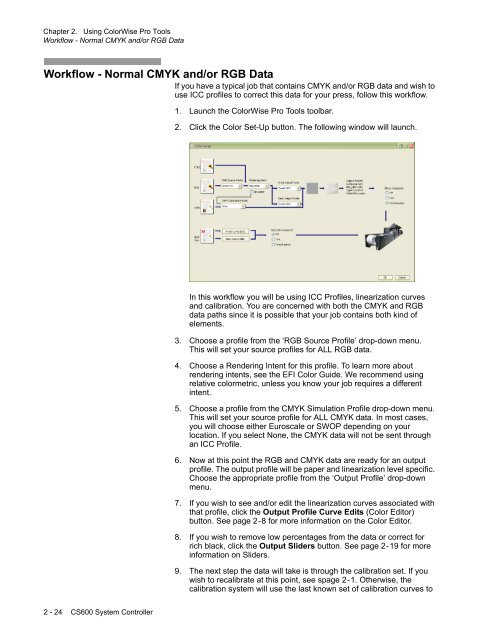
2. Click the <strong>Color</strong> Set-Up button. The following window will launch.<br />
In this workflow you will be using ICC Profiles, linearization curves<br />
and calibration. You are concerned with both the CMYK and RGB<br />
data paths since it is possible that your job contains both kind of<br />
elements.<br />
3. Choose a profile from the ‘RGB Source Profile’ drop-down menu.<br />
This will set your source profiles for ALL RGB data.<br />
4. Choose a Rendering Intent for this profile. To learn more about<br />
rendering intents, see the EFI <strong>Color</strong> Guide. We recommend using<br />
relative colormetric, unless you know your job requires a different<br />
intent.<br />
5. Choose a profile from the CMYK Simulation Profile drop-down menu.<br />
This will set your source profile for ALL CMYK data. In most cases,<br />
you will choose either Euroscale or SWOP depending on your<br />
location. If you select None, the CMYK data will not be sent through<br />
an ICC Profile.<br />
6. Now at this point the RGB and CMYK data are ready for an output<br />
profile. The output profile will be paper and linearization level specific.<br />
Choose the appropriate profile from the ‘Output Profile’ drop-down<br />
menu.<br />
7. If you wish to see and/or edit the linearization curves associated with<br />
that profile, click the Output Profile Curve Edits (<strong>Color</strong> Editor)<br />
button. See page 2-8 for more information on the <strong>Color</strong> Editor.<br />
8. If you wish to remove low percentages from the data or correct for<br />
rich black, click the Output Sliders button. See page 2-19 for more<br />
information on Sliders.<br />
9. The next step the data will take is through the calibration set. If you<br />
wish to recalibrate at this point, see spage 2-<strong>1.</strong> Otherwise, the<br />
calibration system will use the last known set of calibration curves to<br />
2 - 24 CS600 System Controller


