STX Signal Transmitter Installation and Operation ... - Kistler-Morse
STX Signal Transmitter Installation and Operation ... - Kistler-Morse
STX Signal Transmitter Installation and Operation ... - Kistler-Morse
Create successful ePaper yourself
Turn your PDF publications into a flip-book with our unique Google optimized e-Paper software.
Chapter 6. MVS-<strong>STX</strong> Inputs <strong>and</strong> Outputs Menu<br />
Setting Up Current Output<br />
on the <strong>STX</strong> PCB<br />
Follow this procedure to set up the current<br />
output on the <strong>STX</strong> PCB. To set up the current<br />
output on the Current Output PCB in the<br />
MVS, refer to Setting Up Current Outputs on<br />
the Current Output PCB above.<br />
1. If in Auto Mode (Auto LED illuminated),<br />
press the Auto/Man Key to put the MVS<br />
in Manual Mode. The Auto LED turns off.<br />
2. Use the Arrow Keys to scroll to the<br />
desired channel .<br />
3. Press the Menu Key to display the Main<br />
Menu. The display shows:<br />
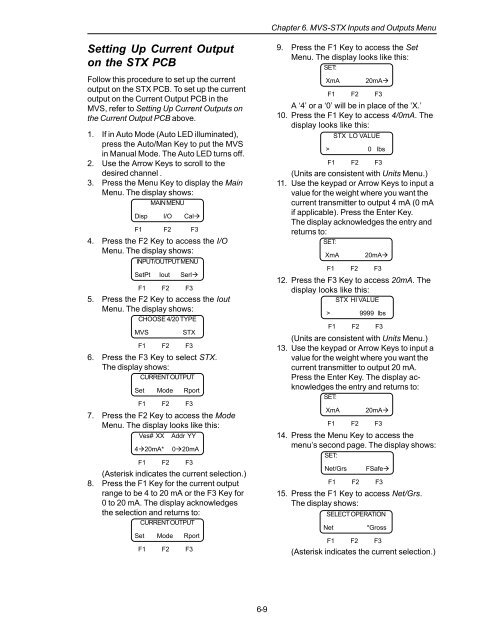
MAIN MENU<br />
Disp I/O Cal<br />
F1 F2 F3<br />
4. Press the F2 Key to access the I/O<br />
Menu. The display shows:<br />
INPUT/OUTPUT MENU<br />
SetPt Iout Serl<br />
F1 F2 F3<br />
5. Press the F2 Key to access the Iout<br />
Menu. The display shows:<br />
CHOOSE 4/20 TYPE<br />
MVS<br />
<strong>STX</strong><br />
F1 F2 F3<br />
6. Press the F3 Key to select <strong>STX</strong>.<br />
The display shows:<br />
CURRENT OUTPUT<br />
Set Mode Rport<br />
F1 F2 F3<br />
7. Press the F2 Key to access the Mode<br />
Menu. The display looks like this:<br />
Ves# XX Addr YY<br />
420mA*<br />
020mA<br />
F1 F2 F3<br />
(Asterisk indicates the current selection.)<br />
8. Press the F1 Key for the current output<br />
range to be 4 to 20 mA or the F3 Key for<br />
0 to 20 mA. The display acknowledges<br />
the selection <strong>and</strong> returns to:<br />
CURRENT OUTPUT<br />
Set Mode Rport<br />
F1 F2 F3<br />
9. Press the F1 Key to access the Set<br />
Menu. The display looks like this:<br />
SET:<br />
XmA<br />
A ‘4’ or a ‘0’ will be in place of the ‘X.’<br />
10. Press the F1 Key to access 4/0mA. The<br />
display looks like this:<br />
<strong>STX</strong> LO VALUE<br />
(Units are consistent with Units Menu.)<br />
11. Use the keypad or Arrow Keys to input a<br />
value for the weight where you want the<br />
current transmitter to output 4 mA (0 mA<br />
if applicable). Press the Enter Key.<br />
The display acknowledges the entry <strong>and</strong><br />
returns to:<br />
SET:<br />
XmA<br />
12. Press the F3 Key to access 20mA. The<br />
display looks like this:<br />
<strong>STX</strong> HI VALUE<br />
> 9999 lbs<br />
F1 F2 F3<br />
(Units are consistent with Units Menu.)<br />
13. Use the keypad or Arrow Keys to input a<br />
value for the weight where you want the<br />
current transmitter to output 20 mA.<br />
Press the Enter Key. The display acknowledges<br />
the entry <strong>and</strong> returns to:<br />
SET:<br />
XmA<br />
20mA<br />
F1 F2 F3<br />
> 0 lbs<br />
F1 F2 F3<br />
20mA<br />
F1 F2 F3<br />
20mA<br />
F1 F2 F3<br />
14. Press the Menu Key to access the<br />
menu’s second page. The display shows:<br />
SET:<br />
Net/Grs<br />
15. Press the F1 Key to access Net/Grs.<br />
The display shows:<br />
SELECT OPERATION<br />
Net<br />
FSafe<br />
F1 F2 F3<br />
*Gross<br />
F1 F2 F3<br />
(Asterisk indicates the current selection.)<br />
6-9


