STX Signal Transmitter Installation and Operation ... - Kistler-Morse
STX Signal Transmitter Installation and Operation ... - Kistler-Morse
STX Signal Transmitter Installation and Operation ... - Kistler-Morse
Create successful ePaper yourself
Turn your PDF publications into a flip-book with our unique Google optimized e-Paper software.
Chapter 7. MVS-<strong>STX</strong> Calibration Menu<br />
errors in channel monitoring. The greater the<br />
error in the estimated Hi Span, the greater the<br />
resulting error. The ‘location’ of the line can be<br />
adjusted to the solid line by setting zero<br />
[point (3) in Figure 7-3] (see Refining the<br />
Calibration by Setting Zero in this section).<br />
Similar to the other calibration methods, the<br />
greater the known quantity of material moved<br />
during the calibration procedure, the greater the<br />
accuracy. Removing 50% of the total capacity<br />
results in greater accuracy than removing 25%<br />
of the total capacity.<br />
Follow this procedure to calibrate by<br />
subtracting a known quantity of material:<br />
1. If in Auto Mode (Auto LED illuminated),<br />
press the Auto/Man Key to put the MVS in<br />
Manual Mode. The Auto LED turns off.<br />
2. Use the Arrow Keys to scroll to the<br />
desired channel.<br />
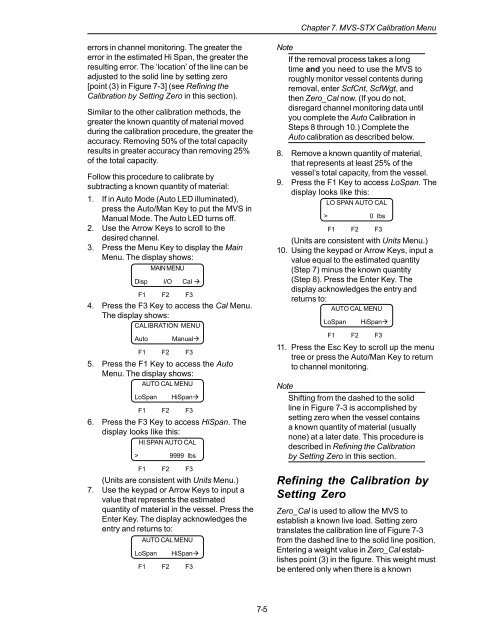
3. Press the Menu Key to display the Main<br />
Menu. The display shows:<br />
MAIN MENU<br />
Disp I/O Cal <br />
F1 F2 F3<br />
4. Press the F3 Key to access the Cal Menu.<br />
The display shows:<br />
CALIBRATION MENU<br />
Auto<br />
Manual<br />
F1 F2 F3<br />
5. Press the F1 Key to access the Auto<br />
Menu. The display shows:<br />
AUTO CAL MENU<br />
LoSpan<br />
HiSpan<br />
F1 F2 F3<br />
6. Press the F3 Key to access HiSpan. The<br />
display looks like this:<br />
HI SPAN AUTO CAL<br />
> 9999 lbs<br />
F1 F2 F3<br />
(Units are consistent with Units Menu.)<br />
7. Use the keypad or Arrow Keys to input a<br />
value that represents the estimated<br />
quantity of material in the vessel. Press the<br />
Enter Key. The display acknowledges the<br />
entry <strong>and</strong> returns to:<br />
AUTO CAL MENU<br />
LoSpan<br />
HiSpan<br />
F1 F2 F3<br />
Note<br />
If the removal process takes a long<br />
time <strong>and</strong> you need to use the MVS to<br />
roughly monitor vessel contents during<br />
removal, enter ScfCnt, ScfWgt, <strong>and</strong><br />
then Zero_Cal now. (If you do not,<br />
disregard channel monitoring data until<br />
you complete the Auto Calibration in<br />
Steps 8 through 10.) Complete the<br />
Auto calibration as described below.<br />
8. Remove a known quantity of material,<br />
that represents at least 25% of the<br />
vessel’s total capacity, from the vessel.<br />
9. Press the F1 Key to access LoSpan. The<br />
display looks like this:<br />
LO SPAN AUTO CAL<br />
> 0 lbs<br />
F1 F2 F3<br />
(Units are consistent with Units Menu.)<br />
10. Using the keypad or Arrow Keys, input a<br />
value equal to the estimated quantity<br />
(Step 7) minus the known quantity<br />
(Step 8). Press the Enter Key. The<br />
display acknowledges the entry <strong>and</strong><br />
returns to:<br />
AUTO CAL MENU<br />
LoSpan<br />
HiSpan<br />
F1 F2 F3<br />
11. Press the Esc Key to scroll up the menu<br />
tree or press the Auto/Man Key to return<br />
to channel monitoring.<br />
Note<br />
Shifting from the dashed to the solid<br />
line in Figure 7-3 is accomplished by<br />
setting zero when the vessel contains<br />
a known quantity of material (usually<br />
none) at a later date. This procedure is<br />
described in Refining the Calibration<br />
by Setting Zero in this section.<br />
Refining the Calibration by<br />
Setting Zero<br />
Zero_Cal is used to allow the MVS to<br />
establish a known live load. Setting zero<br />
translates the calibration line of Figure 7-3<br />
from the dashed line to the solid line position.<br />
Entering a weight value in Zero_Cal establishes<br />
point (3) in the figure. This weight must<br />
be entered only when there is a known<br />
7-5


