

STX Signal Transmitter Installation and Operation ... - Kistler-Morse
STX Signal Transmitter Installation and Operation ... - Kistler-Morse
STX Signal Transmitter Installation and Operation ... - Kistler-Morse

You also want an ePaper? Increase the reach of your titles
YUMPU automatically turns print PDFs into web optimized ePapers that Google loves.
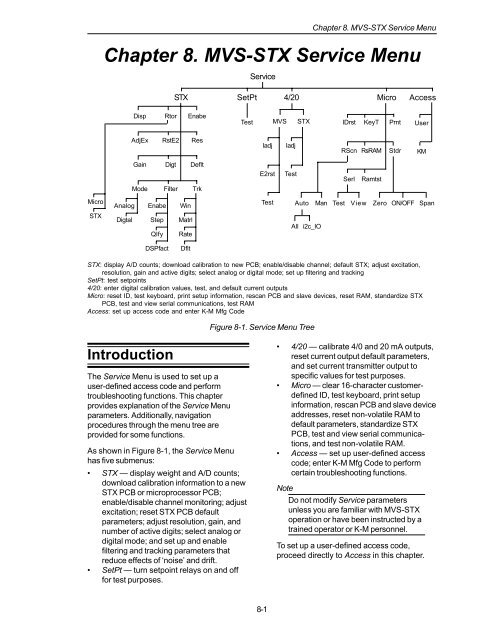
Chapter 8. MVS-<strong>STX</strong> Service Menu<br />
Chapter 8. MVS-<strong>STX</strong> Service Menu<br />
Service<br />
<strong>STX</strong> SetPt 4/20 Micro<br />
Access<br />
Disp<br />
Rtor<br />
Enabe<br />
Test<br />
MVS<br />
<strong>STX</strong><br />
IDrst<br />
KeyT<br />
Prnt<br />
User<br />
AdjEx<br />
RstE2<br />
Res<br />
Iadj<br />
Iadj<br />
RScn<br />
RsRAM<br />
Stdr<br />
KM<br />
Gain<br />
Digt<br />
Deflt<br />
E2rst<br />
Test<br />
Serl<br />
Ramtst<br />
Mode<br />
Filter<br />
Trk<br />
Micro<br />
Analog<br />
Enabe<br />
Win<br />
Test<br />
Auto Man Test View Zero ON/OFF<br />
Span<br />
<strong>STX</strong><br />
Digtal<br />
Step<br />
Qlfy<br />
Matrl<br />
Rate<br />
All i2c_IO<br />
DSPfact<br />
Dflt<br />
<strong>STX</strong>: display A/D counts; download calibration to new PCB; enable/disable channel; default <strong>STX</strong>; adjust excitation,<br />
resolution, gain <strong>and</strong> active digits; select analog or digital mode; set up filtering <strong>and</strong> tracking<br />
SetPt: test setpoints<br />
4/20: enter digital calibration values, test, <strong>and</strong> default current outputs<br />
Micro: reset ID, test keyboard, print setup information, rescan PCB <strong>and</strong> slave devices, reset RAM, st<strong>and</strong>ardize <strong>STX</strong><br />
PCB, test <strong>and</strong> view serial communications, test RAM<br />
Access: set up access code <strong>and</strong> enter K-M Mfg Code<br />
Figure 8-1. Service Menu Tree<br />
Introduction<br />
The Service Menu is used to set up a<br />
user-defined access code <strong>and</strong> perform<br />
troubleshooting functions. This chapter<br />
provides explanation of the Service Menu<br />
parameters. Additionally, navigation<br />
procedures through the menu tree are<br />
provided for some functions.<br />
As shown in Figure 8-1, the Service Menu<br />
has five submenus:<br />
• <strong>STX</strong> — display weight <strong>and</strong> A/D counts;<br />
download calibration information to a new<br />
<strong>STX</strong> PCB or microprocessor PCB;<br />
enable/disable channel monitoring; adjust<br />
excitation; reset <strong>STX</strong> PCB default<br />
parameters; adjust resolution, gain, <strong>and</strong><br />
number of active digits; select analog or<br />
digital mode; <strong>and</strong> set up <strong>and</strong> enable<br />
filtering <strong>and</strong> tracking parameters that<br />
reduce effects of ‘noise’ <strong>and</strong> drift.<br />
• SetPt — turn setpoint relays on <strong>and</strong> off<br />
for test purposes.<br />
• 4/20 — calibrate 4/0 <strong>and</strong> 20 mA outputs,<br />
reset current output default parameters,<br />
<strong>and</strong> set current transmitter output to<br />
specific values for test purposes.<br />
• Micro — clear 16-character customerdefined<br />
ID, test keyboard, print setup<br />
information, rescan PCB <strong>and</strong> slave device<br />
addresses, reset non-volatile RAM to<br />
default parameters, st<strong>and</strong>ardize <strong>STX</strong><br />
PCB, test <strong>and</strong> view serial communications,<br />
<strong>and</strong> test non-volatile RAM.<br />
• Access — set up user-defined access<br />
code; enter K-M Mfg Code to perform<br />
certain troubleshooting functions.<br />
Note<br />
Do not modify Service parameters<br />
unless you are familiar with MVS-<strong>STX</strong><br />
operation or have been instructed by a<br />
trained operator or K-M personnel.<br />
To set up a user-defined access code,<br />
proceed directly to Access in this chapter.<br />
8-1


