STX Signal Transmitter Installation and Operation ... - Kistler-Morse
STX Signal Transmitter Installation and Operation ... - Kistler-Morse
STX Signal Transmitter Installation and Operation ... - Kistler-Morse
You also want an ePaper? Increase the reach of your titles
YUMPU automatically turns print PDFs into web optimized ePapers that Google loves.
Chapter 7. MVS-<strong>STX</strong> Calibration Menu<br />
High-Accuracy Calibration<br />
This procedure provides the highest accuracy,<br />
but requires that the vessel be completely<br />
empty to start. The principle behind the<br />
calibration follows.<br />
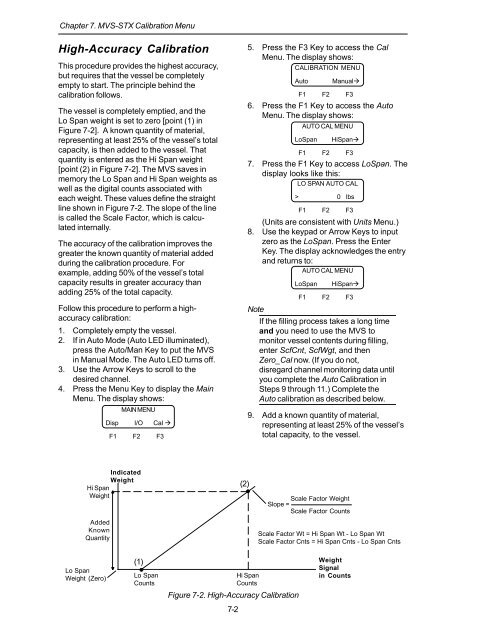
The vessel is completely emptied, <strong>and</strong> the<br />
Lo Span weight is set to zero [point (1) in<br />
Figure 7-2]. A known quantity of material,<br />
representing at least 25% of the vessel’s total<br />
capacity, is then added to the vessel. That<br />
quantity is entered as the Hi Span weight<br />
[point (2) in Figure 7-2]. The MVS saves in<br />
memory the Lo Span <strong>and</strong> Hi Span weights as<br />
well as the digital counts associated with<br />
each weight. These values define the straight<br />
line shown in Figure 7-2. The slope of the line<br />
is called the Scale Factor, which is calculated<br />
internally.<br />
The accuracy of the calibration improves the<br />
greater the known quantity of material added<br />
during the calibration procedure. For<br />
example, adding 50% of the vessel’s total<br />
capacity results in greater accuracy than<br />
adding 25% of the total capacity.<br />
Follow this procedure to perform a highaccuracy<br />
calibration:<br />
1. Completely empty the vessel.<br />
2. If in Auto Mode (Auto LED illuminated),<br />
press the Auto/Man Key to put the MVS<br />
in Manual Mode. The Auto LED turns off.<br />
3. Use the Arrow Keys to scroll to the<br />
desired channel.<br />
4. Press the Menu Key to display the Main<br />
Menu. The display shows:<br />
MAIN MENU<br />
Disp I/O Cal <br />
F1 F2 F3<br />
5. Press the F3 Key to access the Cal<br />
Menu. The display shows:<br />
CALIBRATION MENU<br />
6. Press the F1 Key to access the Auto<br />
Menu. The display shows:<br />
AUTO CAL MENU<br />
7. Press the F1 Key to access LoSpan. The<br />
display looks like this:<br />
LO SPAN AUTO CAL<br />
(Units are consistent with Units Menu.)<br />
8. Use the keypad or Arrow Keys to input<br />
zero as the LoSpan. Press the Enter<br />
Key. The display acknowledges the entry<br />
<strong>and</strong> returns to:<br />
AUTO CAL MENU<br />
Note<br />
Auto<br />
Manual<br />
F1 F2 F3<br />
LoSpan<br />
HiSpan<br />
F1 F2 F3<br />
> 0 lbs<br />
F1 F2 F3<br />
LoSpan<br />
HiSpan<br />
F1 F2 F3<br />
If the filling process takes a long time<br />
<strong>and</strong> you need to use the MVS to<br />
monitor vessel contents during filling,<br />
enter ScfCnt, ScfWgt, <strong>and</strong> then<br />
Zero_Cal now. (If you do not,<br />
disregard channel monitoring data until<br />
you complete the Auto Calibration in<br />
Steps 9 through 11.) Complete the<br />
Auto calibration as described below.<br />
9. Add a known quantity of material,<br />
representing at least 25% of the vessel’s<br />
total capacity, to the vessel.<br />
Indicated<br />
Weight<br />
Hi Span<br />
Weight<br />
Added<br />
Known<br />
Quantity<br />
(2)<br />
Scale Factor Weight<br />
Slope =<br />
Scale Factor Counts<br />
Scale Factor Wt = Hi Span Wt - Lo Span Wt<br />
Scale Factor Cnts = Hi Span Cnts - Lo Span Cnts<br />
Lo Span<br />
Weight (Zero)<br />
(1)<br />
Lo Span<br />
Counts<br />
Hi Span<br />
Counts<br />
Figure 7-2. High-Accuracy Calibration<br />
Weight<br />
<strong>Signal</strong><br />
in Counts<br />
7-2


