

M-Maxâ„¢ Series Adjustable Frequency Drive - Eaton Corporation
M-Maxâ„¢ Series Adjustable Frequency Drive - Eaton Corporation
M-Maxâ„¢ Series Adjustable Frequency Drive - Eaton Corporation

Create successful ePaper yourself
Turn your PDF publications into a flip-book with our unique Google optimized e-Paper software.
Fixing<br />
You can mount an M-Max frequency inverter on screw<br />
mounts or on a mounting rail.<br />
Install the frequency inverter only on a nonflammable<br />
mounting base (for example, on a metal plate).<br />
Dimensions and weights of the M-Max frequency inverter<br />
are located in the appendix.<br />
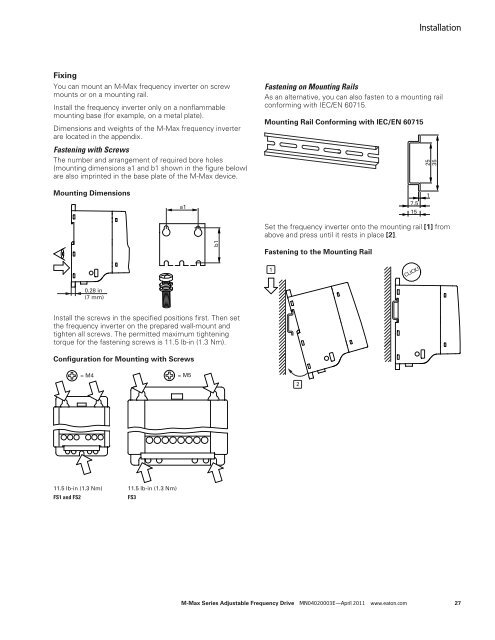
Fastening with Screws<br />
The number and arrangement of required bore holes<br />
(mounting dimensions a1 and b1 shown in the figure below)<br />
are also imprinted in the base plate of the M-Max device.<br />
Mounting Dimensions<br />
0.28 in<br />
(7 mm)<br />
Install the screws in the specified positions first. Then set<br />
the frequency inverter on the prepared wall-mount and<br />
tighten all screws. The permitted maximum tightening<br />
torque for the fastening screws is 11.5 lb-in (1.3 Nm).<br />
Configuration for Mounting with Screws<br />
11.5 lb-in (1.3 Nm)<br />
FS1 and FS2<br />
a1<br />
= M4 = M5<br />
11.5 lb-in (1.3 Nm)<br />
FS3<br />
b1<br />
Installation<br />
Fastening on Mounting Rails<br />
As an alternative, you can also fasten to a mounting rail<br />
conforming with IEC/EN 60715.<br />
Mounting Rail Conforming with IEC/EN 60715<br />
Set the frequency inverter onto the mounting rail [1] from<br />
above and press until it rests in place [2].<br />
Fastening to the Mounting Rail<br />
1<br />
2<br />
M-Max <strong>Series</strong> <strong>Adjustable</strong> <strong>Frequency</strong> <strong>Drive</strong> MN04020003E—April 2011 www.eaton.com 27<br />
7.5<br />
15<br />
CLICK!<br />
25<br />
35<br />
1


