Create successful ePaper yourself
Turn your PDF publications into a flip-book with our unique Google optimized e-Paper software.
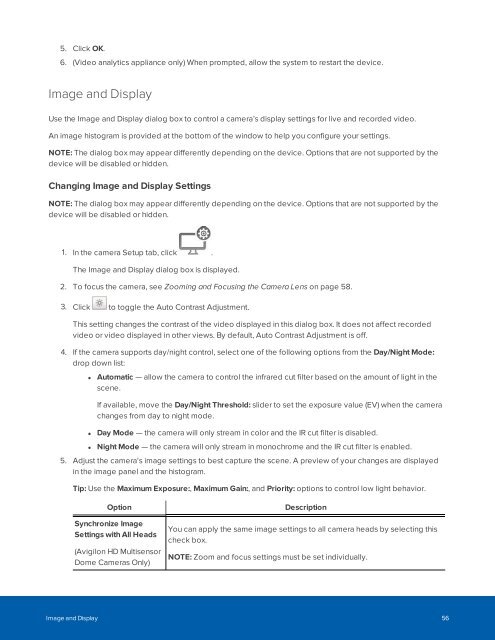
5. Click OK.<br />
6. (Video analytics appliance only) When prompted, allow the system to restart the device.<br />
Image and Display<br />
Use the Image and Display dialog box to control a camera’s display settings for live and recorded video.<br />
An image histogram is provided at the bottom of the window to help you configure your settings.<br />
NOTE: The dialog box may appear differently depending on the device. Options that are not supported by the<br />
device will be disabled or hidden.<br />
Changing Image and Display Settings<br />
NOTE: The dialog box may appear differently depending on the device. Options that are not supported by the<br />
device will be disabled or hidden.<br />
1. In the camera Setup tab, click .<br />
The Image and Display dialog box is displayed.<br />
2. To focus the camera, see Zooming and Focusing the Camera Lens on page 58.<br />
3. Click to toggle the Auto Contrast Adjustment.<br />
This setting changes the contrast of the video displayed in this dialog box. It does not affect recorded<br />
video or video displayed in other views. By default, Auto Contrast Adjustment is off.<br />
4. If the camera supports day/night control, select one of the following options from the Day/Night Mode:<br />
drop down list:<br />
• Automatic — allow the camera to control the infrared cut filter based on the amount of light in the<br />
scene.<br />
If available, move the Day/Night Threshold: slider to set the exposure value (EV) when the camera<br />
changes from day to night mode.<br />
• Day Mode — the camera will only stream in color and the IR cut filter is disabled.<br />
• Night Mode — the camera will only stream in monochrome and the IR cut filter is enabled.<br />
5. Adjust the camera's image settings to best capture the scene. A preview of your changes are displayed<br />
in the image panel and the histogram.<br />
Tip: Use the Maximum Exposure:, Maximum Gain:, and Priority: options to control low light behavior.<br />
Option<br />
Synchronize Image<br />
Settings with All Heads<br />
(Avigilon HD Multisensor<br />
Dome Cameras Only)<br />
Description<br />
You can apply the same image settings to all camera heads by selecting this<br />
check box.<br />
NOTE: Zoom and focus settings must be set individually.<br />
Image and Display 56


