- Page 1:
IBM TotalStorage FAStT600 Fibre Cha
- Page 4 and 5:
Note: Before using this information
- Page 6 and 7:
Antes de instalar este producto, le
- Page 8 and 9:
vi IBM TotalStorage FAStT600 Fibre
- Page 10 and 11:
Handling fiber-optic cables . . . .
- Page 12 and 13:
x IBM TotalStorage FAStT600 Fibre C
- Page 14 and 15:
54. Removing the controller battery
- Page 16 and 17:
xiv IBM TotalStorage FAStT600 Fibre
- Page 18 and 19:
FAStT documentation Figure 1. Insta
- Page 20 and 21:
Table 2. TotalStorage FAStT900 Fibr
- Page 22 and 23:
Table 4. TotalStorage FAStT600 Fibr
- Page 24 and 25:
Table 6. TotalStorage FAStT200 and
- Page 26 and 27:
- Diagnosing problems, using the IB
- Page 28 and 29: xxvi IBM TotalStorage FAStT600 Fibr
- Page 30 and 31: Table 8. Features at a glance Gener
- Page 32 and 33: Front view Figure 2 shows the compo
- Page 34 and 35: Ethernet Ethernet Host port 2 Expan
- Page 36 and 37: v To ensure correct airflow in each
- Page 38 and 39: Bezel ( Front Left) Rail assembly (
- Page 40 and 41: Installing the storage server in a
- Page 42 and 43: this step for the second controller
- Page 44 and 45: 77 Figure 14. Rail adjustment screw
- Page 46 and 47: Host-agent management method: This
- Page 48 and 49: fiber-optic cables to connect one e
- Page 50 and 51: Host system with two host adapters
- Page 52 and 53: Installing the storage subsystem co
- Page 54 and 55: v Do not overtighten the cable stra
- Page 56 and 57: Removing SFP modules To remove the
- Page 58 and 59: For examples of redundant, partiall
- Page 60 and 61: 1. Follow the instructions in your
- Page 62 and 63: 34 IBM TotalStorage FAStT600 Fibre
- Page 64 and 65: Turning off the storage server the
- Page 66 and 67: Performing an emergency shutdown At
- Page 68 and 69: General-systemerror LED Power-on LE
- Page 70 and 71: Table 11. RAID controller LEDs (con
- Page 72 and 73: Figure 37 shows the location of the
- Page 74 and 75: Figure 39. Location of hot-swap dri
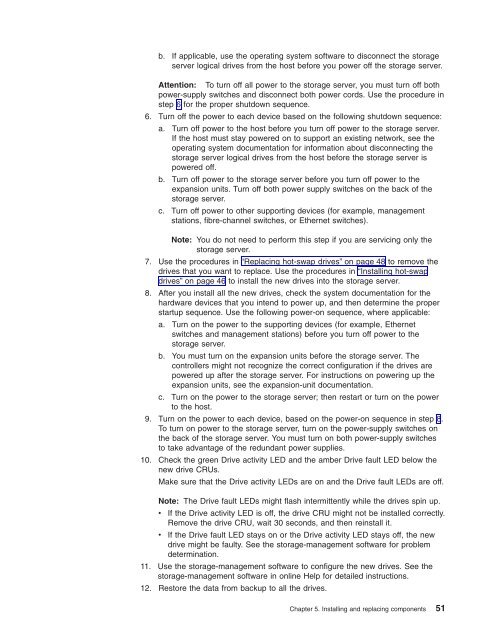
- Page 76 and 77: Replacing hot-swap drives Drive pro
- Page 80 and 81: Replacing the drives one at a time
- Page 82 and 83: Fault LED Fan CRU Latch Handle Figu
- Page 84 and 85: Lever AC power connector Fault LED
- Page 86 and 87: Figure 46. Installing a hot-swap po
- Page 88 and 89: Ethernet address label Levers Figur
- Page 90 and 91: Protective cap Wire tab 90 o SFP mo
- Page 92 and 93: 13. Slide the RAID controller botto
- Page 94 and 95: 11. Carefully flip over the RAID co
- Page 96 and 97: 68 IBM TotalStorage FAStT600 Fibre
- Page 98 and 99: Troubleshooting Always use the stor
- Page 100 and 101: Table 14. Storage server troublesho
- Page 102 and 103: 74 IBM TotalStorage FAStT600 Fibre
- Page 104 and 105: Important notes ServeRAID ServerGui
- Page 106 and 107: 55022. The limits for Class A equip
- Page 108 and 109: 80 IBM TotalStorage FAStT600 Fibre
- Page 110 and 111: idge. A SAN device that provides ph
- Page 112 and 113: Industry Standard Architecture (ISA
- Page 114 and 115: RDAC. See redundant dual active con
- Page 116 and 117: 88 IBM TotalStorage FAStT600 Fibre
- Page 118 and 119: H hard disk drive adding larger-cap
- Page 120 and 121: 92 IBM TotalStorage FAStT600 Fibre
- Page 122 and 123: IBM TotalStorage FAStT600 Fibre Cha
- Page 124 and 125: Agreement prevail to the extent of
- Page 126 and 127: CSY-2 Licenční smlouva na strojov
- Page 128 and 129:
adlandırılır) göre çalışmas
- Page 130 and 131:
El Client acorda adquirir qualsevol
- Page 132 and 133:
Bu ödemeyi yapmadan Yerleşik Sı
- Page 134 and 135:
IBM ≈XvX Z125-5468-01 6/2002 Qß
- Page 136 and 137:
Contrat de licence du Code machine
- Page 138 and 139:
Lizenzvereinbarung für Maschinenco
- Page 140 and 141:
Gépi kódra vonatkozó licenc szer
- Page 142 and 143:
Accordo di Licenza per Codice Macch
- Page 144 and 145:
Z125-5468-01 6/2002 *RM,V!#3
- Page 146 and 147:
Z125-5468-01 6/2002 IBM
- Page 148 and 149:
Umowa Licencyjna dotycząca Kodu Ma
- Page 150 and 151:
W przypadku sprzeczności między w
- Page 152 and 153:
Acordo de Licenciamento para Códig
- Page 154 and 155:
Лицензионное согла
- Page 156 and 157:
возникновении вопр
- Page 158 and 159:
Licenčná zmluva pre strojový kó
- Page 160 and 161:
Acuerdo de licencia para el Código
- Page 162 and 163:
Statement of Limited Warranty © Co
- Page 164 and 165:
Statement of Limited Warranty Z125-
- Page 166 and 167:
Limitation of Liability: The follow
- Page 168 and 169:
of Arbitration and Conciliation of
- Page 170 and 171:
Circumstances may arise where, beca
- Page 172 and 173:
Takuuehdot (rajoitettu takuu) Z125-
- Page 174 and 175:
New Yorkin osavaltion lakeja. TYYNE
- Page 176 and 177:
Luxemburgissa kaikki tämän rajoit
- Page 178 and 179:
enintään joko 1) 125 000 euroa ta
- Page 180 and 181:
Z125-4753-07 11/2002 תלבגומ
- Page 182 and 183:
תרחא המוד הקיקח וא (
- Page 184 and 185:
ללכבו ועוציבל תורו
- Page 186 and 187:
. לדחמל תורישי הרוש
- Page 188 and 189:
保証の内容と制限 Z125-4753-
- Page 190 and 191:
ニューヨーク州の法律。
- Page 192 and 193:
裁判管轄権 裁判管轄権:
- Page 194 and 195:
せ、あるいはこれに寄与
- Page 196 and 197:
a Sınırlı Garanti Bildirimi Z125
- Page 198 and 199:
New York Eyaleti kanunları. ASYA P
- Page 200 and 201:
Cumhuriyeti, Ekvator Ginesi, Frans
- Page 202 and 203:
3. kar, iş, kazanç, itibar veya t
- Page 204 and 205:
A Declaração de Garantia Limitada
- Page 206 and 207:
Para obter o serviço de garantia d
- Page 208 and 209:
Jordânia, Quênia/Quénia, Kuwait,
- Page 210 and 211:
IRLANDA O Que Esta Garantia Cobre:
- Page 212 and 213:
Ограничени гаранци
- Page 214 and 215:
Как да получим гара
- Page 216 and 217:
Вануату и Уолис и Ф
- Page 218 and 219:
Ограничение на отг
- Page 220 and 221:
Déclaration de garantie limitée Z
- Page 222 and 223:
AMÉRIQUE ARGENTINE Législation :
- Page 224 and 225:
Limitation de responsabilité : Les
- Page 226 and 227:
LES DISPOSITIONS SUIVANTES S'APPLIQ
- Page 228 and 229:
Période de garantie La période de
- Page 230 and 231:
d. budete IBM nebo příslušného
- Page 232 and 233:
FILIPÍNY Omezení odpovědnosti: N
- Page 234 and 235:
vrácení peněz ve výši odpovíd
- Page 236 and 237:
Odpojíte vadný stroj a připraví
- Page 238 and 239:
c. at sørge for, at IBM eller forh
- Page 240 and 241:
Voldgift: Følgende tilføjes under
- Page 242 and 243:
EGYPTEN Ansvarsbegrænsning: Følge
- Page 244 and 245:
Oversigt over telefonnumre i EU Dis
- Page 246 and 247:
a. suivre les procédures de demand
- Page 248 and 249:
Limitation de responsabilité : Le
- Page 250 and 251:
1. La responsabilité d’IBM, conc
- Page 252 and 253:
Pays ou Région d'acquisition Péri
- Page 254 and 255:
Sie erklären sich damit einverstan
- Page 256 and 257:
dieser von der betreffenden Partei
- Page 258 and 259:
Haftungsbegrenzung: Die Bedingungen
- Page 260 and 261:
3. Mit Ausnahme der Regelungen oben
- Page 262 and 263:
a ∆ήλωση Περιορισµ
- Page 264 and 265:
ΒΡΑΖΙΛΙΑ Εφαρµοστέ
- Page 266 and 267:
ΕΥΡΩΠΗ, ΜΕΣΗ ΑΝΑΤΟ
- Page 268 and 269:
Τι θα κάνει η IBM για
- Page 270 and 271:
1. Υπηρεσία Μονάδων
- Page 272 and 273:
4. (a) osigurati da sve informacije
- Page 274 and 275:
FILIPINI Ograničenje odgovornosti:
- Page 276 and 277:
EGIPAT Ograničenje odgovornosti: S
- Page 278 and 279:
Telefonski brojevi se mogu promijen
- Page 280 and 281:
a. követi az IBM vagy a viszontela
- Page 282 and 283:
Az ebben a szakaszban leírt jótá
- Page 284 and 285:
ADATSÉRÜLÉS; 2) JÁRULÉKOS VAGY
- Page 286 and 287:
ütemezése a hívás időpontját
- Page 288 and 289:
3. prima che venga fornito il servi
- Page 290 and 291:
Le garanzie specificate in questa s
- Page 292 and 293:
IMMEDIATA CONSEGUENZA DALL'EVENTO C
- Page 294 and 295:
I livelli di servizio si basano sul
- Page 296 and 297:
3. 해당되는 경우, 서비스
- Page 298 and 299:
뉴질랜드 뉴질랜드 보증이
- Page 300 and 301:
가져온 기계에 대해 귀하
- Page 302 and 303:
기계 기계 취득 취득 국가
- Page 304 and 305:
2. wanneer de Machine niet uw eigen
- Page 306 and 307:
MALEISIË Beperking van aansprakeli
- Page 308 and 309:
Deze beperking geldt niet voor lich
- Page 310 and 311:
2. uitsluitend op onderdelen, op ba
- Page 312 and 313:
4. (a) sørge for at all informasjo
- Page 314 and 315:
Voldgift: Følgende tilføyes under
- Page 316 and 317:
EGYPT Ansvarsbegrensning: Følgende
- Page 318 and 319:
Belgia -- 02-718-4339 Luxemburg --
- Page 320 and 321:
Klient zobowiązuje się ponadto: 1
- Page 322 and 323:
przewodniczącego wyznaczy go preze
- Page 324 and 325:
Ograniczenie odpowiedzialności: Pa
- Page 326 and 327:
3. Z wyjątkiem sytuacji przewidzia
- Page 328 and 329:
Declaração de Garantia Limitada Z
- Page 330 and 331:
1. danos pessoais (incluindo morte)
- Page 332 and 333:
mesma, incluindo a sua existência,
- Page 334 and 335:
Cobertura da Garantia: O texto segu
- Page 336 and 337:
有限保证声明 Z125-4753-07 11/
- Page 338 and 339:
适用法律:在第一句后添加
- Page 340 and 341:
由本有限保证声明引起或
- Page 342 and 343:
2. 无论何种情形,IBM 及其供
- Page 344 and 345:
1. 对于以下各项,IBM 将承担
- Page 346 and 347:
Заявление об Огран
- Page 348 and 349:
Часть 2 - Особые Пол
- Page 350 and 351:
Арбитраж : В раздел
- Page 352 and 353:
1. Ответственность I
- Page 354 and 355:
Пункты, по Которым I
- Page 356 and 357:
Prehlásenie o obmedzenej zodpovedn
- Page 358 and 359:
Uplatniteľné právo: Za prvú vet
- Page 360 and 361:
Rozhodcovské konanie: Za tento nad
- Page 362 and 363:
2. SPOLOČNOSŤ IBM, JEJ DODÁVATEL
- Page 364 and 365:
Časť 3 - Informácie o záruke V
- Page 366 and 367:
Izjava o omejeni garanciji Z125-475
- Page 368 and 369:
Kaj pokriva ta garancija: Temu pogl
- Page 370 and 371:
V Albaniji, Armeniji, Azerbajdžanu
- Page 372 and 373:
1. IBM prevzema neomejeno odgovorno
- Page 374 and 375:
Declaración de Garantía Limitada
- Page 376 and 377:
leyes de la Provincia de Ontario. E
- Page 378 and 379:
Zambia y Zimbabue todas las disputa
- Page 380 and 381:
Limitación de la responsabilidad:
- Page 382 and 383:
a Garantivillkor Z125-4753-07 11/20
- Page 384 and 385:
De garantier som anges i denna para
- Page 386 and 387:
Skiljedom: Följande läggs till un
- Page 388 and 389:
SYDAFRIKA, NAMIBIA, BOTSWANA, LESOT
- Page 390 and 391:
IB M M 有限保證聲明 Z125-4753
- Page 392 and 393:
本節所指保證,係 貴客戶在
- Page 394 and 395:
仲裁:在本標題下加入下列
- Page 396 and 397:
英國 賠償上限:本節之各項
- Page 398 and 399:
Proof of Entitlement © Copyright I
- Page 400 and 401:
PROOF NO: 4852439785647 IBM FAStT60
- Page 402 and 403:
Readers’ Comments — We’d Like
- Page 405:
Part Number: 24P8018 Printed in U.S


