- Page 1 and 2:
Ektron CMS400.NET User Manual Versi
- Page 3 and 4:
EKTRON, INC. SOFTWARE LICENSE AGREE
- Page 5 and 6:
What’s New in the 7.5 Release Wha
- Page 7 and 8:
What’s New in the 7.5 Release •
- Page 9 and 10:
Securing Ektron CMS400.NET Security
- Page 11 and 12:
ServerControlWS.asmx password to Bu
- Page 13 and 14:
Table of Contents What’s New in t
- Page 15 and 16:
The View Content Difference Screen
- Page 17 and 18:
Blog Properties ...................
- Page 19 and 20:
Deleting a Table ..................
- Page 21 and 22:
Using Bookmarks....................
- Page 23 and 24:
Introduction to Ektron CMS400.NET W
- Page 25 and 26:
Introduction to Ektron CMS400.NET Y
- Page 27 and 28:
Introduction to Ektron CMS400.NET B
- Page 29 and 30:
Types of Content Introduction to Ek
- Page 31 and 32:
Editing Content Finding Content The
- Page 33 and 34:
Logging In and Out Prerequisites Lo
- Page 35 and 36:
Site Preview Button Appearance Togg
- Page 37 and 38:
The Workarea and Smart Desktop Acce
- Page 39 and 40:
The Workarea and Smart Desktop CMS4
- Page 41 and 42:
NOTE The Workarea and Smart Desktop
- Page 43 and 44:
From the Smart Desktop, you can als
- Page 45 and 46:
The Workarea and Smart Desktop 2. W
- Page 47 and 48:
Sending Instant Email The Workarea
- Page 49 and 50:
Modifying Instant eMail The Workare
- Page 51 and 52:
Working with Folders and Content In
- Page 53 and 54:
Each folder lists the following inf
- Page 55 and 56:
Menu Option Lets you create or uplo
- Page 57 and 58:
Menu option Lets you For more infor
- Page 59 and 60:
Dropdown Menu Options Viewing a Fol
- Page 61 and 62:
Force Check In Only appears if user
- Page 63 and 64:
Viewing Content 5. Continue reading
- Page 65 and 66:
Button or Tab Properties tab NOTE A
- Page 67 and 68:
Button or Tab View (language) Add -
- Page 69 and 70:
Viewing Content Once the content ar
- Page 71 and 72:
Adding HTML Content 2. Click View >
- Page 73 and 74:
Button Name Description Publish Pub
- Page 75 and 76:
NOTE NOTE Editing HTML Content If y
- Page 77 and 78:
5. The editor opens with the conten
- Page 79 and 80:
Deleting Content NOTE NOTE Deleting
- Page 81 and 82:
4. The following message appears. 5
- Page 83 and 84:
Button Name Description Workarea To
- Page 85 and 86:
Button Name Description Publish Sav
- Page 87 and 88:
Scheduling Content to Begin and End
- Page 89 and 90:
NOTE Scheduling Content to Begin an
- Page 91 and 92:
NOTE Scheduling Content to Begin an
- Page 93 and 94:
Option Can site visitors view conte
- Page 95 and 96:
Adding a Content Summary Adding a C
- Page 97 and 98:
Adding a Content Summary 6. Enter s
- Page 99 and 100:
Adding or Editing Metadata Adding o
- Page 101 and 102:
NOTE Adding or Editing Metadata The
- Page 103 and 104:
4. Edit the metadata. Note that Add
- Page 105 and 106:
Adding or Editing Metadata If the r
- Page 107 and 108:
Entering Title and Keywords NOTE Se
- Page 109 and 110:
Approving/Declining Content Approvi
- Page 111 and 112:
Approve/Decline One Content Item Ap
- Page 113 and 114:
Approving/Declining Content 4. To c
- Page 115 and 116:
First Approver Approving/Declining
- Page 117 and 118:
Approving/Declining Content EditorI
- Page 119 and 120:
Approving/Declining Content Ektron
- Page 121 and 122:
Tab Shows this content IMPORTANT! E
- Page 123 and 124:
• highlighting in yellow added co
- Page 125 and 126:
Toolbar Each area is explained belo
- Page 127 and 128:
Option Description Compare visual a
- Page 129 and 130:
View Description Published Displays
- Page 131 and 132:
• A Web page Viewing and Restorin
- Page 133 and 134:
Viewing and Restoring Previous Cont
- Page 135 and 136:
With XSLT Without XSLT Viewing and
- Page 137 and 138:
The Workarea search has two tabs: T
- Page 139 and 140:
Search Screen Option Documents •
- Page 141 and 142:
• proximity of search term to beg
- Page 143 and 144:
NOTE • a range of created or modi
- Page 145 and 146:
The Noise File Specifying Match Cri
- Page 147 and 148:
Content ID Additional Search Criter
- Page 149 and 150:
Result Display Options View option
- Page 151 and 152:
Column Header Description Searching
- Page 153 and 154:
Library Folder Library Folder The l
- Page 155 and 156:
Library Folder 4. The sub-folders a
- Page 157 and 158:
3. The screen displays the followin
- Page 159 and 160:
The fields are described below. Lib
- Page 161 and 162:
Field Description NOTE Displaying S
- Page 163 and 164:
• ”Copying Files to the Library
- Page 165 and 166:
Viewing Files Field Description Lib
- Page 167 and 168:
Editing a File Overwriting Files NO
- Page 169 and 170:
Library Link Searching Library Fold
- Page 171 and 172:
Adding a Library File to Content NO
- Page 173 and 174:
Images Adding Hyperlinks Viewing Hy
- Page 175 and 176:
Quicklinks and Forms Library Folder
- Page 177 and 178:
Library Folder 6. Click the Update
- Page 179 and 180:
Working with HTML Forms This chapte
- Page 181 and 182:
Creating a New Form NOTE NOTE Worki
- Page 183 and 184:
Working with HTML Forms •Display
- Page 185 and 186:
Working with HTML Forms To modify a
- Page 187 and 188:
Chart Types Chart Type Description
- Page 189 and 190:
Working with HTML Forms Note that s
- Page 191 and 192:
Inserting Form Fields Working with
- Page 193 and 194:
Working with HTML Forms After you c
- Page 195 and 196:
TIP! Form Fields Working with HTML
- Page 197 and 198:
Field Description Default value Ins
- Page 199 and 200:
Fields on the Plain Text Field Dial
- Page 201 and 202:
NOTE Working with HTML Forms Your W
- Page 203 and 204:
Fields on the Password Dialog Field
- Page 205 and 206:
Fields on the Textarea Dialog Field
- Page 207 and 208:
Inserting a Choices Field Working w
- Page 209 and 210:
Field Description Descriptive Name
- Page 211 and 212:
Inserting a Select List Field Worki
- Page 213 and 214: Field Description Working with HTML
- Page 215 and 216: Working with HTML Forms 1. Place a
- Page 217 and 218: Assigning a Task to a Form Note Wor
- Page 219 and 220: Working with HTML Forms email Autom
- Page 221 and 222: • a checkbox that lets you delete
- Page 223 and 224: List of Submitted Values • a chec
- Page 225 and 226: • - description of the form •
- Page 227 and 228: Field Description Working with HTML
- Page 229 and 230: Field Description Send data in XML
- Page 231 and 232: Working with HTML Forms 2. Go to th
- Page 233 and 234: Editing a Form’s Content Working
- Page 235 and 236: Button or Tab Working with HTML For
- Page 237 and 238: Working With Polls • ”Viewing a
- Page 239 and 240: NOTE NOTE Working with HTML Forms T
- Page 241 and 242: Working with HTML Forms 10. Once pu
- Page 243 and 244: Working with HTML Forms •Title -
- Page 245 and 246: Supported Types of Assets EXCEPTION
- Page 247 and 248: Installing FireFox Plug In Using th
- Page 249 and 250: Using the Document Management Syste
- Page 251 and 252: NOTE Using the Document Management
- Page 253 and 254: Drag and drop into CMS400.NET, from
- Page 255 and 256: NOTE 5. The following screen appear
- Page 257 and 258: NOTE You can only import files from
- Page 259 and 260: NOTE 10. The following screen appea
- Page 261 and 262: Using the Document Management Syste
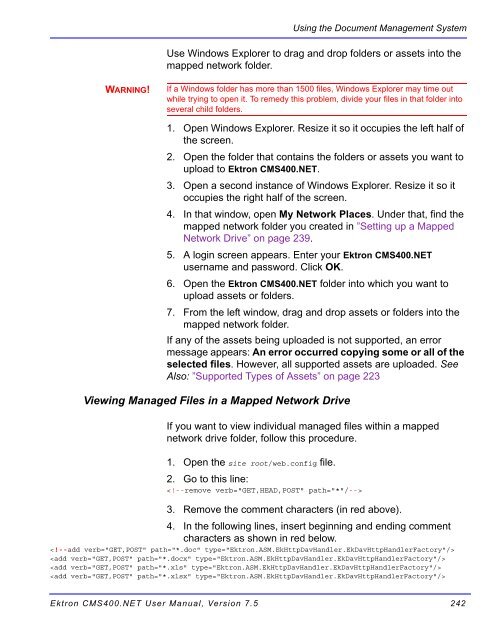
- Page 263: WARNING! Using the Document Managem
- Page 267 and 268: NOTE Using the Document Management
- Page 269 and 270: NOTE Using the Document Management
- Page 271 and 272: Saving an Office Document Using the
- Page 273 and 274: NOTE Using the Document Management
- Page 275 and 276: Using the Document Management Syste
- Page 277 and 278: Menu option Edit Overwrite a manage
- Page 279 and 280: Deleting a Managed File NOTES Using
- Page 281 and 282: See Also: Approving Assets • ”A
- Page 283 and 284: Working with Calendars Working with
- Page 285 and 286: Understanding Calendars Working wit
- Page 287 and 288: NOTE 2. Click the Calendars folder.
- Page 289 and 290: Field Description Working with Cale
- Page 291 and 292: Field Description Viewing a Calenda
- Page 293 and 294: Working with Calendars From the Vie
- Page 295 and 296: Adding a Calendar Event NOTE NOTE N
- Page 297 and 298: Field Description Event Title Enter
- Page 299 and 300: Field Description Event Type 6. Cli
- Page 301 and 302: 4. Finish your edits. For documenta
- Page 303 and 304: 3. Click the View Events ( ) button
- Page 305 and 306: Editing Recurring Events Working wi
- Page 307 and 308: Deleting a Single Recurring Event W
- Page 309 and 310: • ”Viewing a Task’s History
- Page 311 and 312: IMPORTANT! Managing Tasks The Add b
- Page 313 and 314: Field Description Managing Tasks St
- Page 315 and 316:
You should only select a content fo
- Page 317 and 318:
NOTE From this screen you can perfo
- Page 319 and 320:
4. The Edit Task Type screen appear
- Page 321 and 322:
Creating a Task from the Web Site I
- Page 323 and 324:
Task View Options Managing Tasks 1.
- Page 325 and 326:
Managing Tasks Folder Displays thes
- Page 327 and 328:
emailing Tasks Editing a Task Colum
- Page 329 and 330:
NOTE Managing Tasks Several comment
- Page 331 and 332:
Deleting a Task Managing Tasks 3. T
- Page 333 and 334:
Task Module Toolbar Managing Tasks
- Page 335 and 336:
Blogs Ektron CMS400.NET User Manual
- Page 337 and 338:
Element Description Blog Workflow T
- Page 339 and 340:
Field Description 4. The Add a Blog
- Page 341 and 342:
Property or Setting Available When
- Page 343 and 344:
Field Description Metadata Blogs Ta
- Page 345 and 346:
NOTE NOTE Editing Blog Subjects NOT
- Page 347 and 348:
NOTE NOTE 5. Click Remove Last Subj
- Page 349 and 350:
NOTE The Blog Roll • Review text
- Page 351 and 352:
Field Description Relationship Ente
- Page 353 and 354:
NOTE 3. Click the Edit Properties b
- Page 355 and 356:
NOTE To remove any blog roll link o
- Page 357 and 358:
Function Permissions that affect th
- Page 359 and 360:
NOTE Searching Blogs The following
- Page 361 and 362:
Unsubscribe to a Blog Blogs A messa
- Page 363 and 364:
Blog Posts Blogs 4. Select the Noti
- Page 365 and 366:
Item Description Title The headline
- Page 367 and 368:
See Also: ”Blog Posts” on page
- Page 369 and 370:
Blogs 3. If the user creating the p
- Page 371 and 372:
Deleting a Blog Post NOTE NOTE Blog
- Page 373 and 374:
Field Description Moderate Comments
- Page 375 and 376:
The Comment Form NOTE See ”Contro
- Page 377 and 378:
NOTE Adding a Comment NOTE This lea
- Page 379 and 380:
Deleting a Comment Approving a Comm
- Page 381 and 382:
Step Windows Live Writer Setup Scre
- Page 383 and 384:
Step Windows Live Writer Setup Scre
- Page 385 and 386:
Personalizing a Web Page IMPORTANT!
- Page 387 and 388:
Personalizing a Web Page Personaliz
- Page 389 and 390:
Editing Sequence Personalizing a We
- Page 391 and 392:
Editing Content Personalizing a Web
- Page 393 and 394:
NOTE Adding Content Personalizing a
- Page 395 and 396:
Deleting Content Minimizing a Conte
- Page 397 and 398:
The Page Catalog Personalizing a We
- Page 399 and 400:
My Workspace My Workspace A communi
- Page 401 and 402:
Documents • Message Board - see
- Page 403 and 404:
2. Click the Manage Folder Button (
- Page 405 and 406:
Deleting a Folder in My Workspace >
- Page 407 and 408:
Creating HTML Content in My Workspa
- Page 409 and 410:
My Workspace Moving and Copying Con
- Page 411 and 412:
My Workspace 8. A dialog box appear
- Page 413 and 414:
. My Workspace In the Workarea, Mes
- Page 415 and 416:
From the Inbox, you can: • view a
- Page 417 and 418:
4. Click the Reply button ( ). 5. T
- Page 419 and 420:
Message Board My Workspace The Mess
- Page 421 and 422:
My Workspace • Avatar - an image
- Page 423 and 424:
Managing Existing Colleagues To man
- Page 425 and 426:
My Workspace To invite a non-site u
- Page 427 and 428:
Performing a Basic User Search My W
- Page 429 and 430:
My Workspace filter. In the tags fi
- Page 431 and 432:
My Workspace 1. Search for a user a
- Page 433 and 434:
My Workspace 2. Place a check mark
- Page 435 and 436:
My Workspace • view community gro
- Page 437 and 438:
My Workspace 3. Click the Accept Co
- Page 439 and 440:
Photos My Workspace 5. Click OK to
- Page 441 and 442:
My Workspace 2. Click the folder’
- Page 443 and 444:
3. Click the Add Image button ( ).
- Page 445 and 446:
4. Click the Share Folder button (
- Page 447 and 448:
NOTE Finding Collections Working wi
- Page 449 and 450:
NOTE NOTE Column Title Description
- Page 451 and 452:
Working with Collections The screen
- Page 453 and 454:
Note Adding a Collection NOTE •
- Page 455 and 456:
NOTE Working with Collections the c
- Page 457 and 458:
NOTE Working with Collections • c
- Page 459 and 460:
NOTE 9. Create the content. Working
- Page 461 and 462:
Reordering Collections List Working
- Page 463 and 464:
• a foreign edition of an existin
- Page 465 and 466:
Display additional content informat
- Page 467 and 468:
NOTE Working with Menus For more in
- Page 469 and 470:
Managing Menus • the Workarea, by
- Page 471 and 472:
Working with Menus 6. Using the fol
- Page 473 and 474:
Field Description Working with Menu
- Page 475 and 476:
Adding a Menu via the Menus Module
- Page 477 and 478:
NOTE Working with Menus 3. In the V
- Page 479 and 480:
NOTE WARNING! Working with Menus 1.
- Page 481 and 482:
NOTE Working with Menus 1. Follow t
- Page 483 and 484:
Assign this type of content to the
- Page 485 and 486:
NOTE 5. Click Edit from the popup m
- Page 487 and 488:
• navigation link on a Web page S
- Page 489 and 490:
Viewing a Menu Working with Menus 1
- Page 491 and 492:
2. The Menus Report screen displays
- Page 493 and 494:
Deleting a Menu Working with Menus
- Page 495 and 496:
NOTE Working with Menus When moving
- Page 497 and 498:
These capabilities are described in
- Page 499 and 500:
Ektron CMS400.NET System Management
- Page 501 and 502:
Field Description Updating Your Use
- Page 503 and 504:
Field Description Updating Your Use
- Page 505 and 506:
Online Help Accessing Online Help O
- Page 507 and 508:
NOTE 1. Access the Workarea. 2. Fro
- Page 509 and 510:
NOTE eWebEditPro+XML Toolbar Introd
- Page 511 and 512:
Using eWebEdit400 Introduction to e
- Page 513 and 514:
Button Equivalent Keystroke Select
- Page 515 and 516:
Button Equivalent Keystroke Italic
- Page 517 and 518:
Button Equivalent Keystroke Insert
- Page 519 and 520:
Copying from Other Applications You
- Page 521 and 522:
Finding Text Finding and Replacing
- Page 523 and 524:
Considering the Case of a Search Te
- Page 525 and 526:
Checking Spelling NOTE The Spelling
- Page 527 and 528:
Checking Spelling • If you want t
- Page 529 and 530:
Working with Images 4. From the fol
- Page 531 and 532:
• border width • border color
- Page 533 and 534:
Field Description Working with Imag
- Page 535 and 536:
Setting a Border regular size enlar
- Page 537 and 538:
To align Click this Alignment optio
- Page 539 and 540:
Using Bookmarks Creating a Bookmark
- Page 541 and 542:
Using Bookmarks If you leave the Ta
- Page 543 and 544:
Using Hyperlinks NOTE Use hyperlink
- Page 545 and 546:
Testing a Hyperlink Using Hyperlink
- Page 547 and 548:
Editing a Hyperlink Removing a Hype
- Page 549 and 550:
Inserting email Links You can easil
- Page 551 and 552:
Working with HTML Viewing and Editi
- Page 553 and 554:
Working with Tables Creating a Tabl
- Page 555 and 556:
3. Click the mouse. At this point,
- Page 557 and 558:
Modifying Table Properties Working
- Page 559 and 560:
Accessibility Lets you assign acces
- Page 561 and 562:
Working with Tables Alternatively,
- Page 563 and 564:
NOTE Working with Tables To set the
- Page 565 and 566:
Specifying Table Width or Height by
- Page 567 and 568:
Alignment Example center Working wi
- Page 569 and 570:
3. Select Set Table Properties. 4.
- Page 571 and 572:
Then, click the top left choice (ci
- Page 573 and 574:
Setting Table Borders Border type U
- Page 575 and 576:
1. Click the question mark in the t
- Page 577 and 578:
NOTE Working with Tables 5. Use the
- Page 579 and 580:
Modifying a Single Cell Modifying S
- Page 581 and 582:
Deleting a Cell Working with Table
- Page 583 and 584:
5. A color selection box appears. 6
- Page 585 and 586:
Spanning More than One Row or Colum
- Page 587 and 588:
Splitting a Cell To set cell alignm
- Page 589 and 590:
Word Wrap Working with Table Cells
- Page 591 and 592:
Assigning Cell Padding and Spacing
- Page 593 and 594:
Accessibility Dialog 4. Click Set T
- Page 595 and 596:
Working with Table Cells 1. Select
- Page 597 and 598:
Working with HTML Forms This chapte
- Page 599 and 600:
NOTE NOTE NOTE Working with HTML Fo
- Page 601 and 602:
Composing the Postback Message Work
- Page 603 and 604:
Working with HTML Forms To modify a
- Page 605 and 606:
Working with HTML Forms 3. Choose w
- Page 607 and 608:
Chart Type Description Sample Combi
- Page 609 and 610:
The Form Toolbar Options Adding a F
- Page 611 and 612:
Button or Tab Description Working w
- Page 613 and 614:
Inserting a Checkbox Field Fields o
- Page 615 and 616:
3. Click the Text field button ( ).
- Page 617 and 618:
Fields on the Text Field Dialog - V
- Page 619 and 620:
Option Characteristics of Valid Res
- Page 621 and 622:
Option Characteristics of Valid Res
- Page 623 and 624:
NOTE - maximum length (usually for
- Page 625 and 626:
Working with HTML Forms 7. Click Ma
- Page 627 and 628:
Inserting a Choices Field Working w
- Page 629 and 630:
Field Description Working with HTML
- Page 631 and 632:
Field Description Inserting a Calen
- Page 633 and 634:
Field Description Fields on the Cal
- Page 635 and 636:
Toolbar Button Working with HTML Fo
- Page 637 and 638:
Implementing a Form on a Web Page A
- Page 639 and 640:
Task Information Working with HTML
- Page 641 and 642:
NOTE Working With Polls Working wit
- Page 643 and 644:
NOTE NOTE Working with HTML Forms
- Page 645 and 646:
Working with HTML Forms 10. Once pu
- Page 647 and 648:
Working with HTML Forms 5. Choose B
- Page 649 and 650:
Using eWebEditPro+XML Introduction
- Page 651 and 652:
Creating a Sample Web Page To creat
- Page 653 and 654:
Changing the Size of Text Creating
- Page 655 and 656:
Toolbar Buttons • To select a sin
- Page 657 and 658:
Button Equivalent Keystroke Copy Pa
- Page 659 and 660:
Button Equivalent Keystroke Data De
- Page 661 and 662:
Button Equivalent Keystroke Backgro
- Page 663 and 664:
Button Function Below Text Text Dir
- Page 665 and 666:
Miscellaneous Toolbar Button Equiva
- Page 667 and 668:
Customizing Your Toolbar The eWebEd
- Page 669 and 670:
Removing or Adding Menu Items NOTE
- Page 671 and 672:
Using the Customize Toolbar Dialog
- Page 673 and 674:
2. Right click the mouse. 3. A drop
- Page 675 and 676:
Changing the Menu’s Orientation T
- Page 677 and 678:
The Context Sensitive Menu Menu Opt
- Page 679 and 680:
Using eWebEditPro+XML’s Advanced
- Page 681 and 682:
Finding and Replacing Text NOTE Fin
- Page 683 and 684:
To search from the cursor location
- Page 685 and 686:
Checking Spelling The eWebEditPro+X
- Page 687 and 688:
The Spelling Dialog Box The Spellin
- Page 689 and 690:
Checking Spelling Specifically, you
- Page 691 and 692:
Editing in Microsoft Word 8. When d
- Page 693 and 694:
Inserting Images To insert a pictur
- Page 695 and 696:
Inserting Images You can also acces
- Page 697 and 698:
Inserting Images Pictures that you
- Page 699 and 700:
NOTE Inserting Images 3. Click in t
- Page 701 and 702:
You can also use the Picture Proper
- Page 703 and 704:
Aligning the Picture dialog box. He
- Page 705 and 706:
To align Click this in the Alignmen
- Page 707 and 708:
Inserting Images For information ab
- Page 709 and 710:
Editing Images NOTE Using WebImageF
- Page 711 and 712:
Saving the Image Editing Images Onc
- Page 713 and 714:
Toolbar Button View Menu Options To
- Page 715 and 716:
Annotation Menu Options Toolbar But
- Page 717 and 718:
Choose Color Standard Toolbar Butto
- Page 719 and 720:
Color Depth Standard Toolbar Button
- Page 721 and 722:
Copy Standard Toolbar Button Descri
- Page 723 and 724:
Dialog Box Exit Standard Toolbar Bu
- Page 725 and 726:
Horizontal Flip Standard Toolbar Bu
- Page 727 and 728:
Open Standard Toolbar Button Descri
- Page 729 and 730:
Dialog Box Paste as New Image Stand
- Page 731 and 732:
Rectangle Standard Toolbar Button D
- Page 733 and 734:
Rotate Standard Toolbar Button Desc
- Page 735 and 736:
Dialog Box Select Standard Toolbar
- Page 737 and 738:
Editing Images The following table
- Page 739 and 740:
Undo Standard Toolbar Button Descri
- Page 741 and 742:
Introduction to Tables Sometimes, t
- Page 743 and 744:
Deleting a Table When creating a ta
- Page 745 and 746:
Table Dialog Boxes and Menus This s
- Page 747 and 748:
The Table Properties Dialog Box Tab
- Page 749 and 750:
The Cell Properties Dialog Box Tabl
- Page 751 and 752:
Table Dialog Boxes and Menus All it
- Page 753 and 754:
Manipulating Your Table’s Format
- Page 755 and 756:
NOTE Manipulating Your Table’s Fo
- Page 757 and 758:
Specifying Table Width by Pixels Ma
- Page 759 and 760:
the Width field. Specifying Horizon
- Page 761 and 762:
Specifying a Table’s Background C
- Page 763 and 764:
Specifying a Background Image for a
- Page 765 and 766:
Manipulating Your Table’s Format
- Page 767 and 768:
Manipulating Your Table’s Format
- Page 769 and 770:
Inserting a Cell Working with Table
- Page 771 and 772:
Before After Setting a Cell’s Bor
- Page 773 and 774:
Working with Table Cells 2. Click T
- Page 775 and 776:
Working with Table Cells • If the
- Page 777 and 778:
Spanning More than One Row or Colum
- Page 779 and 780:
Setting Vertical Alignment Working
- Page 781 and 782:
Splitting a Cell 6. Click your choi
- Page 783 and 784:
Word Wrap 2. Click the Insert Table
- Page 785 and 786:
Assigning Cell Spacing Working with
- Page 787 and 788:
1. Select the bookmark text or imag
- Page 789 and 790:
Changing the Destination Window Usi
- Page 791 and 792:
Using a Quicklink Using Hyperlinks
- Page 793 and 794:
Testing a Hyperlink Using Hyperlink
- Page 795 and 796:
Removing a Hyperlink Using Hyperlin
- Page 797 and 798:
Working with HTML 2. The HTML code
- Page 799 and 800:
Inserting Content from MS Office Wo
- Page 801 and 802:
Using the Wiki Button Using Ektron
- Page 803 and 804:
Using Ektron CMS400.NET’s Wiki Fe
- Page 805 and 806:
Using Ektron CMS400.NET’s Wiki Fe
- Page 807 and 808:
Using eWebEditPro+XML without a Mou
- Page 809 and 810:
Section 508 Tables Section 508 Comp
- Page 811 and 812:
NOTE 3. Click the Tables button ( )
- Page 813 and 814:
Section 508 Compliance After you co
- Page 815 and 816:
Field Description Section 508 Compl
- Page 817 and 818:
WARNING! Inserting Comments within
- Page 819 and 820:
Inserting Comments within Content 1
- Page 821 and 822:
Letter Border Color D Pending Delet
- Page 823 and 824:
Appendix A: Content Statuses Button
- Page 825 and 826:
Submitted Content Appendix A: Conte
- Page 827 and 828:
Button Name Description The table b
- Page 829 and 830:
Index Note: All eWebEdit400 entries
- Page 831 and 832:
document, document management featu
- Page 833 and 834:
emoving 773 testing 771 to a bookma
- Page 835 and 836:
searchable properties creating 79 e


