[HKEY_CURRENT_USER\Software\Microsoft\Internet Explorer\Toolbar\WebBrowser] "ITBarLayout"=hex:0c,00,00,00,4c,00,00,00,74,00,00,00,18,00,00,00,1f,00,00,00,\ 74,00,00,00,01,00,00,00,e0,00,00,00,a0,0f,00,00,05,00,00,00,22,00,00,00,26,\ 00,00,00,02,00,00,00,21,00,00,00,a0,0f,00,00,04,00,00,00,01,00,00,00,e3,01,\ 00,00,03,00,00,00,01,00,00,00,67,00,00,00 ------End cut & paste here------ To turn throbbers OFF in the shell:- -----Begin cut & paste here----- REGEDIT4 [HKEY_CURRENT_USER\Software\Microsoft\Internet Explorer\Toolbar\ShellBrowser] "ITBarLayout"=hex:0c,00,00,00,4c,00,00,00,74,00,00,00,1a,00,00,00,10,00,00,00,\ 17,00,00,00,05,00,00,00,6a,00,00,00,26,00,00,00,01,00,00,00,e0,00,00,00,56,\ 00,00,00,02,00,00,00,29,00,00,00,57,00,00,00,03,00,00,00,a8,00,00,00,00,00,\ 00,00,04,00,00,00,09,00,00,00,55,01,00,00 [HKEY_CURRENT_USER\Software\Microsoft\Internet Explorer\Toolbar\Explorer] "ITBarLayout"=hex:0c,00,00,00,4c,00,00,00,74,00,00,00,1a,00,00,00,13,00,00,00,\ 33,00,00,00,05,00,00,00,6a,00,00,00,26,00,00,00,01,00,00,00,e1,00,00,00,df,\ 01,00,00,04,00,00,00,01,00,00,00,bd,00,00,00,02,00,00,00,20,00,00,00,8d,01,\ 00,00,03,00,00,00,09,00,00,00,b8,00,00,00 ------End cut & paste here------ To turn throbbers back ON in the shell:- -----Begin cut & paste here----- REGEDIT4 [HKEY_CURRENT_USER\Software\Microsoft\Internet Explorer\Toolbar\ShellBrowser] "ITBarLayout"=hex:0c,00,00,00,4c,00,00,00,74,00,00,00,18,00,00,00,1f,00,00,00,\ 74,00,00,00,01,00,00,00,e0,00,00,00,a0,0f,00,00,05,00,00,00,22,00,00,00,26,\ 00,00,00,02,00,00,00,21,00,00,00,a0,0f,00,00,04,00,00,00,01,00,00,00,77,01,\ 00,00,03,00,00,00,01,00,00,00,35,00,00,00 [HKEY_CURRENT_USER\Software\Microsoft\Internet Explorer\Toolbar\Explorer] "ITBarLayout"=hex:0c,00,00,00,4c,00,00,00,74,00,00,00,18,00,00,00,1f,00,00,00,\ 74,00,00,00,01,00,00,00,e0,00,00,00,a0,0f,00,00,05,00,00,00,22,00,00,00,26,\ 00,00,00,02,00,00,00,21,00,00,00,a0,0f,00,00,04,00,00,00,01,00,00,00,a0,0f,\ 00,00,03,00,00,00,01,00,00,00,00,00,00,00 ------End cut & paste here------ 35. Unload DLLs upon closing <strong>Windows</strong> Explorer will usually try and cache DLL's by keeping them in memory even after the application using them has been closed. This can cause performance problems on low memory systems, and can be annoying when developing on <strong>Windows</strong> and the DLL's remain in use. This applies for all versions of <strong>Windows</strong> -----Begin cut & paste here----- REGEDIT4 [HKEY_LOCAL_MACHINE\SOFTWARE\Microsoft\<strong>Windows</strong>\CurrentVersion\explorer\AlwaysUnloadDLL] @="1" ------End cut & paste here------ 36. Idle your CPU when not busy Don't do this for NT, 2000 or XP as they have somthing similar built in. -----Begin cut & paste here----- REGEDIT4 [HKEY_LOCAL_MACHINE\System\CurrentControlSet\control\CPUIdle] "Idle"=dword:00000001 ------End cut & paste here------ 37. Increase mouse rate A slow mouse sample rate can cause "frag lag" in a 3D shooter, as the mouse movement will trail the frame rate of a fast system. You need either a USB mouse or a tool like PS2Rate. PS2Rate Plus changes the refresh rate of your PS/2 Mouse from the default 40hz up to a whopping 200hz!! Perfect for gamers wanting that extra bit of precision, or just a really slick mouse for your desktop. The plus version comes with an installer and a utility for testing your current mouse rate. Goto www.students.tut.fi/~zibbo/other/ps2rate/ps2rate.zip to download this. If you have a Logitech mouse than you can increase the PS2 rate of it. This will stop your mouse from flickering and give you a better edge in online gaming ! -----Begin cut & paste here----- REGEDIT4 [HKEY_LOCAL_MACHINE\Software\Logitech\MouseWare\CurrentVersion\Technical] "PS2ReportRate"="40" ------End cut & paste here------
38. Keep IE crash free Here's a tip for keeping IE crash free. Go to the control panel start, settings, control panel and open Internet Options. Under the General tab you'll see Temporary Internet Files and two buttons called "delete files" and "settings", click the settings tab. Click View Objects. You should see 1 or more downloaded programs. Select all and delete them. Do this regulary. Also keep your temporary internet files to a minimum and clear them out regularly. 39. Save Icon positions 1 You've got all your windows sized, icons placed the way they look great.... explorer crash! (Or, the thing crashes not that much anymore, but it seems to forget sometimes...) And there you go again.. but, there's a way to recover all your settings, that's windows placing, sizing and icon positions, with just one click. First, make it all look, once more, just the way you want it to be. Now these settings are in the Registry, open it and go to: HKEY_CURRENT_USER\Software\Microsoft\<strong>Windows</strong>\CurrentVersion\Explorer - Launch RegEdit and select: HKCU\Software\Microsoft\<strong>Windows</strong>\CurrentVersion\Explorer\Streams and export it to a file called "My<strong>Windows</strong>1.reg" (don't type the quotes). - Launch RegEdit and select: HKCU\Software\Microsoft\<strong>Windows</strong>\CurrentVersion\Explorer\StreamMRUand export it to a file called "My<strong>Windows</strong>2.reg". - In Notepad, open "My<strong>Windows</strong>2.reg", select all text except the first line (REGEDIT4), and press Ctrl+C to copy the selected text to the clipboard. - In Notepad, switch to "My<strong>Windows</strong>1.reg", go to the end of the text, and press Ctrl+V to paste the text copied from "My<strong>Windows</strong>2.reg". - In Notepad, save the modified "My<strong>Windows</strong>1.reg" to a directory on the hard disk. Eventually, change its name to "My<strong>Windows</strong>.reg", or any other name you like. 40. Icon Positions 2 In <strong>Windows</strong> 95/98/ME/NT/2000/XP you can lock down the position of the Desktop icons, using a couple of files from the MS <strong>Windows</strong> NT 4.0 Resource Kit. Copy Layout.dll into C:\<strong>Windows</strong>\System for <strong>Windows</strong> 9x or into your system32 folder if using NT, 2000 or XP and doubleclick on layout.reg. Then right-click on the "Recycle Bin" or "My Computer" icon, and choose to "Save [or Restore] Desktop Icon Layout". There are several 3rd party tools that also do this, but these files are free and only 14 KB in size." http://borg.isc.ucsb.edu/ftproot/pub/windows/winnt40/RESKIT/Server-Post_Installation/ 41. Overclock your Gfx card (also see section in this guide on overclocking your gfx card) If you are using an Nvidia card or 3dfx card with the drivers v32x or v40x than this Regedit add-on will give you an additional window in your display control panel. It appears under Hardware Options under Additional Properties which is under the Advanced Controls in the display properties. Only overclock to another 10% of original values. If you have an NVIDIA card copy & paste the text below in Notepad to create a REG file, and save it for example as GeForce.REG, making sure when you goto save in notepad you change the save as type to all files and then run it. Remember to restart <strong>Windows</strong> after each change. -----Begin cut & paste here----- REGEDIT4 [HKEY_LOCAL_MACHINE\Software\NVIDIA Corporation\Global\NVTweak] "CoolBits"=dword:ffffffff ------End cut & paste here------ If you have a 3DFX copy & paste the text below in Notepad to create a REG file, and save it for example as 3DFX.REG, making sure when you goto save in notepad you change the save as type to all files and then run it. Remember to restart <strong>Windows</strong> after each change. -----Begin cut & paste here----- REGEDIT4 [HKEY_LOCAL_MACHINE\Software\3dfx Interactive\3dfx Tools\Installed\Tools\{AB040305-8AA1-11D2-8DD1-00104BB5EAD6}] "CompleteRegistration"=dword:00000001 ------End cut & paste here------ 42. Make sure your IDE Controller is set to use DMA Right click on the My Computer icon, select manage, click on device manager, expand IDE ATA/ATAPI controller, right-click on Primary IDE channel, click on properties, click on the advanced settings tab. In the Transfer Mode section, select DMA if available. Do this for both devices in both the Primary and Secondary Controllers. After you reboot you can go back in and see what the controller is now actually using. 43. Set your swap/paging file correctly Open up System monitor (Click on Start, Programs, Accessories, System Tools, System Monitor), select Edit then Add item. Add Swapfile size as shown below. These are the items that System monitor will now track for you. You can remove/add other items by clicking on Edit then Add/Remove item. Over the next few days load up System monitor & let it track your Swapfile size. Click on Options then Chart & set the update interval as you see fit I’d recommend setting it to 30 seconds or 1 minute, depending on how
- Page 1 and 2: Mr.X.'s TWEAKING AND OPTIMIZING WIN
- Page 3 and 4: -Msdownld.tmp This one needs manual
- Page 5 and 6: If you have Windows 95/NT you can e
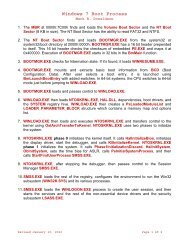
- Page 7 and 8: BootKeys=1 BootMenu=0 BootMenuDefau
- Page 9 and 10: Settings\Cache\History] "CachePath"
- Page 11 and 12: Similarly, open Internet Explorer,
- Page 13: g - Restart your computer once step
- Page 17 and 18: 44. Switch off Dos memory manager D
- Page 19 and 20: Data: D:\WIN95 58. Clear Recent Doc
- Page 21 and 22: Click on the property tab for this
- Page 23 and 24: Right-click in the right hand pane
- Page 25 and 26: By the use of this client software,
- Page 27 and 28: 8. Want Real mode DOS back in Windo
- Page 29 and 30: Recommendation: This service will f
- Page 31 and 32: detect and/or recognize your hardwa
- Page 33 and 34: It should almost certainly benefit
- Page 35 and 36: Click start. click settings. click
- Page 37 and 38: Click Analyze, click ok, click Acti
- Page 39 and 40: Nonbrowser. A nonbrowser is configu
- Page 41 and 42: Private IP Addressing (APIPA) for p
- Page 43 and 44: provides protected storage for sens
- Page 45 and 46: If the service is turned off, RIS i
- Page 47 and 48: enables NetBIOS name resolution. Pr
- Page 49 and 50: 11. Adaptive Menus Microsoft Office
- Page 51 and 52: 3. Speed up Internet Explorer 6 Fav
- Page 53 and 54: Note that in doing this, you are co
- Page 55 and 56: claimed for a ‘fixed’ page file
- Page 57 and 58: When a NTFS drive is formatted it b
- Page 59 and 60: Goto above key in registry and you
- Page 61 and 62: To get Admin account on the "Welcom
- Page 63 and 64: • Security is not opening attachm
- Page 65 and 66:
is not acceptable, and that anythin
- Page 67 and 68:
[-HKEY_LOCAL_MACHINE\System\Current
- Page 69 and 70:
exists on your NT machine (this key
- Page 71 and 72:
- Not found in a dictionary - Not d
- Page 73 and 74:
Alt - 119 = w Alt - 120 = x Alt - 1
- Page 75 and 76:
Alt - 0166 = ¦ Alt - 0167 = § Alt
- Page 77 and 78:
11. Remove the default administrato
- Page 79 and 80:
These logs can contain sensitive da
- Page 81 and 82:
Right-click in the right hand pane,
- Page 83 and 84:
57. Temporarily Assign Yourself Adm
- Page 85 and 86:
Install the appropriate post-Servic
- Page 87 and 88:
Windows XP Home Edition Configurati
- Page 89 and 90:
Caution If your computer is not in
- Page 91 and 92:
C:\inetpub\ftproot (FTP server) C:\
- Page 93 and 94:
MBR Work - www.terabyteunlimited.co
- Page 95 and 96:
Extreme Tech www.extremetech.com Fi
- Page 97 and 98:
IconFactory.com www.iconfactory.com
- Page 99 and 100:
Cable Modem Tips http://homepage.nt
- Page 101 and 102:
_Google _Google Image Search _Googl
- Page 103 and 104:
Boot other device This feature dete
- Page 105 and 106:
feature is a little different from
- Page 107 and 108:
ypass the compensation circuit and
- Page 109 and 110:
Therefore, using the latest video B
- Page 111 and 112:
So, for optimal performance, you sh
- Page 113 and 114:
second clock cycle before sending t
- Page 115 and 116:
SDRam RAS precharge time This featu
- Page 117 and 118:
The shorter the delay, the earlier
- Page 119 and 120:
CPU level 1 cache The modern proces
- Page 121 and 122:
MPS 1.1 was the original specificat
- Page 123 and 124:
Please note that even if you don't
- Page 125 and 126:
Advanced Settings tab of the associ
- Page 127 and 128:
However, this is not a surefire way
- Page 129 and 130:
This feature allows you to manually
- Page 131 and 132:
doubling the bandwidth of the proce
- Page 133 and 134:
When this feature is enabled, the s
- Page 135 and 136:
VLink 8X support V-Link refers to V
- Page 137 and 138:
You will notice that the interrupts
- Page 139 and 140:
AMD OVERCLOCKING - changing the mul
- Page 141 and 142:
Examples of terminology used You wi
- Page 143 and 144:
are much easier to use. No matter w
- Page 145 and 146:
Hard drive limitations Overclocking
- Page 147 and 148:
5.0x 500Mhz 560Mhz 620Mhz 665Mhz 5.
- Page 149 and 150:
If you see copper, you've gone too
- Page 151 and 152:
"PC" specification that SDRAM uses
- Page 153 and 154:
Benchmarks allow you to measure you