Tweaking Optimizing Windows.pdf - GEGeek
Tweaking Optimizing Windows.pdf - GEGeek
Tweaking Optimizing Windows.pdf - GEGeek

You also want an ePaper? Increase the reach of your titles
YUMPU automatically turns print PDFs into web optimized ePapers that Google loves.
It should almost certainly benefit users with more than 96MB of RAM, allowing them to more effectively use their available<br />
resources, which would otherwise be idle. The Peak Memory Limit item on the Performance tab of the Task Manager is an excellent<br />
indicator of how much memory you use on a regular basis. If that number is lower than the amount of physical memory in your<br />
computer, this tweak is for you!<br />
How To Implement:<br />
Advance down to the following registry key:<br />
HKLM\System\CurrentControlSet\Control\Session Manager\Memory Management<br />
In this key double-click on the LargeSystemCache registry value to open a DWORD editor window<br />
(default value of 0 = small cache).<br />
Change the Hex (hexadecimal) or Decimal value to 1.<br />
Reboot to implement the change.<br />
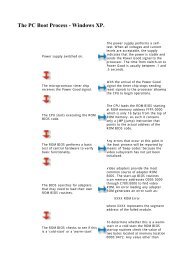
As can be seen below, the impact of enabling the large cache model is quite noticeable where one would expect it with more highend<br />
(A/V) intensive applications that are I/O intensive.<br />
Before After % difference<br />
Business Disk WinMark 99 6660 6700 0.6<br />
High-End Disk WinMark 99 15000 17000 13.3<br />
AVS/Express 3.4 17800 17400 -2.2<br />
FrontPage 98 69900 74200 6.2<br />
MicroStation SE 25400 25800 1.6<br />
Photoshop 4.0 7090 7100 0.1<br />
Premiere 4.2 12400 16100 29.8<br />
Sound Forge 4.0 14300 21800 52.4<br />
Visual C++ 5.0 15700 18700 19.1<br />
11. Enable UDMA for your hard drives:-<br />
Step 1: Be sure that you have a UDMA-capable hard drive and Motherboard. Don't know? Read the manuals! Take note of all the<br />
devices on your IDE chains and whether or not they're UDMA compatible. Most importantly: understand that UDMA can only be<br />
enabled on a per-chain basis. So, if you have a CD-ROM and a Hard Drive on your first IDE Chain, both MUST support UDMA for<br />
this to work. It's all or nothing. If possible, you might consider rearranging your devices to get your UDMA capable hardware on the<br />
same chains. Otherwise, yer broke. Also, it's been reported that CD-Rs react very poorly to this tweak. So, you might or might<br />
not be able to get this to work if you have a CD-R running off the IDE chain.<br />
Step 2: Install Service Pack 6 (and reboot). But then, you've already done that, haven't you? Haven't you? And you probably<br />
already have an update Rescue Disk, right? If not, make one.<br />
Step 3: Grab CLIBench, a small easy to use Benchmark that'll give you enough accuracy to determine if applying SP6 was enough<br />
to do the trick (and if your system came from an OEM with NT pre-installed, you can see if they'd already set it up). Run a Disk<br />
Throughput check on any hard drives that are UDMA-capable. http://www.ncpro.com/clibench/clibench.htm<br />
Step 4: Grab dmacheck.exe (from Microsoft), and run it. Enable DMA on any channels you've got DMA capable devices on.<br />
Reboot. http://support.microsoft.com/download/support/mslfiles/Dmachcki.exe<br />
Step 5: Run the Disk Throughput check again. If there's a major change (unlikely, but see Step 7 for some reference numbers),<br />
you're golden, if not, crack open regedt32.exe. See, although dmacheck.exe may report that UDMA is enabled, it's not necessarily<br />
working. But you can force it.<br />
Step 6: Head over to<br />
HKEY_LOCAL_MACHINE\SYSTEM\CurrentControlSet\Services\atapi\Parameters\Device0<br />
or<br />
HKEY_LOCAL_MACHINE\SYSTEM\CurrentControlSet\Services\atapi\Parameters\Device1<br />
(depending on which channel you want to enable UDMA) and find the DmaDetectionLevel key. It has three possible values, 0x0,<br />
0x1, and 0x2. The first value is what dmacheck sets for channels with the Disable radio button selected, and 0x1 is what dmacheck<br />
sets for channels with the Enable radio button selected. Now, here's the funky bit: 0x1 doesn't turn DMA on, but only allows for<br />
DMA to be turned on if NT detects that all the hardware is appropriate. If you know that your hardware is good, but 0x1 isn't doing<br />
it for you, you can edit the registry key to read 0x2, which forces UDMA on. Sadly enough, most people gotta force it.<br />
If at any point you find you can't boot after making your changes, load the "Last Known Good" and you'll be set (hopefully) - if not<br />
restore that last registry backup manually.<br />
Step 7: Run the Disk Throughput test on your drive one more time and see if all rox out. If you're experience was anything like<br />
mine, it'll be obvious if it worked. For reference, a Celeron 300A system with the Maxtor DiamondMax 10GB drive averages<br />
13MB/sec on average sustained transactions, with 5% CPU usage. Before modifying the registry, it was clocking in around 6MB/sec,<br />
and 90% CPU usage during intense operations. Chew on those numbers!<br />
12. Disable paging of NT executive components:-<br />
On systems with large amount of RAM this tweak can be enabled to force the core <strong>Windows</strong> NT system to be kept in memory and<br />
not paged to disk. If you have 512 megs or more of memory, you can increase system performance<br />
by having the core system kept in memory.<br />
Start Regedit<br />
Go to HKEY_LOCAL_MACHINE\SYSTEM\CurrentControlSet\Control\Session Manager\Memory Management\DisablePagingExecutive<br />
Set the value to be 1. Reboot the computer<br />
Since I've made this registry change, I've have a slight but noticeable decrease in OS caching to disk.<br />
With that said, according to Winbench 99 the "OS performance" increase is ...