Denon AVR-3313 Manual - Audio Products Australia
Denon AVR-3313 Manual - Audio Products Australia
Denon AVR-3313 Manual - Audio Products Australia

Create successful ePaper yourself
Turn your PDF publications into a flip-book with our unique Google optimized e-Paper software.
Network<br />
Setting details<br />
nn<br />
Proxy settings<br />
Make this setting when connecting to the Internet via a proxy server.<br />
Make the proxy settings only when you connect to the Internet via a proxy server that is on your<br />
internal network or provided by your provider, etc.<br />
Network<br />
Information<br />
IP Control<br />
Friendly Name<br />
Settings<br />
Maintenance Mode<br />
q<br />
Selects how configure the network settings<br />
t<br />
Network/Settings<br />
Proxy<br />
Proxy<br />
Address<br />
Port<br />
y<br />
On<br />
Address<br />
000.000.000.000<br />
00000<br />
Network/Settings<br />
DHCP<br />
Off<br />
IP Address<br />
192.168.000.001<br />
Subnet Mask<br />
255.255.255.000<br />
Default Gateway 255.255.255.000<br />
Primary DNS<br />
000.000.000.000<br />
Secondary DNS 000.000.000.000<br />
Proxy<br />
r<br />
w<br />
Enter a proxy server address<br />
i<br />
u<br />
Last.fm Display<br />
Set whether or not to display Last.fm item on the menu.<br />
Show : Display Last.fm item on the menu.<br />
Hide : Do not display Last.fm item on the menu.<br />
Maintenance Mode<br />
Setting details<br />
Use when receiving maintenance from a DENON service engineer or custom installer.<br />
Setting details<br />
NOTE<br />
Only use this function if so instructed by a DENON serviceperson or installer.<br />
Default settings are underlined.<br />
Proxy server is used<br />
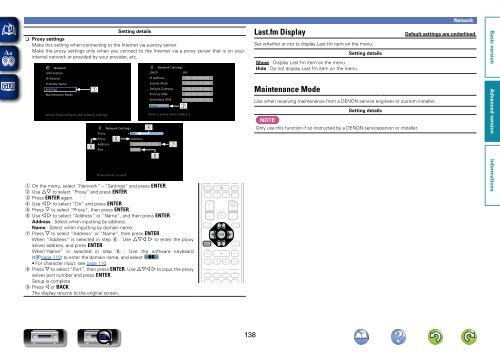
q On the menu, select “Network” – “Settings” and press ENTER.<br />
w Use ui to select “Proxy” and press ENTER.<br />
e Press ENTER again.<br />
r Use o p to select “On” and press ENTER.<br />
t Press i to select “Proxy”, then press ENTER.<br />
y Use o p to select “Address” or “Name”, and then press ENTER.<br />
Address : Select when inputting by address.<br />
Name : Select when inputting by domain name.<br />
u Press i to select “Address” or “Name”, then press ENTER.<br />
When “Address” is selected in step y : Use uio p to enter the proxy<br />
server address, and press ENTER.<br />
When“Name” is selected in step y : Use the software keyboard<br />
(vpage 110) to enter the domain name, and select O K .<br />
• For character input, see page 110.<br />
i Press i to select “Port”, then press ENTER. Use uio p to input the proxy<br />
server port number and press ENTER.<br />
Setup is complete.<br />
o Press o or BACK.<br />
The display returns to the original screen.<br />
138