Denon AVR-3313 Manual - Audio Products Australia
Denon AVR-3313 Manual - Audio Products Australia
Denon AVR-3313 Manual - Audio Products Australia

Create successful ePaper yourself
Turn your PDF publications into a flip-book with our unique Google optimized e-Paper software.
Speaker connection<br />
Here, we connect the speakers in the room to this unit.<br />
This section explains how to connect them using a typical example.<br />
nn<br />
Connecting 7.1-channel speakers using surround back, front height, and front wide<br />
speakers (vpage 85)<br />
nn<br />
Connecting 6.1-channel speakers using one surround back speaker (vpage 86)<br />
nn<br />
Connecting 5.1-channel speakers (vpage 87)<br />
nn<br />
Connecting front A/B speakers (vpage 88)<br />
nn<br />
Connecting 2.1-channel speakers (vpage 89)<br />
nn<br />
Connecting front speakers with a bi-amp connection (vpage 90)<br />
nn<br />
Connecting 5.1-channel + 2-channel speakers (vpage 91)<br />
NOTE<br />
• Disconnect this unit’s power plug from the power outlet before connecting the speakers. Also,<br />
turn off the subwoofer.<br />
• Connect so that the speaker cable core wires do not protrude from the speaker terminal. The<br />
protection circuit may be activated if the core wires touch the rear panel or if the + and – sides<br />
touch each other (vpage 170 “Protection Circuit”).<br />
• Never touch the speaker terminals while the power supply is connected. Doing so could result<br />
in electric shock. When the “Setup Assistant” is running, follow the instructions in the “Setup<br />
Assistant” screen for making connections. (Power is not supplied to the speaker terminals while<br />
the “Setup Assistant” is running.)<br />
• Use speakers with the speaker impedances shown below.<br />
Speaker terminals<br />
FRONT<br />
CENTER<br />
SURROUND<br />
SURROUND BACK<br />
FRONT HEIGHT<br />
FRONT WIDE<br />
Speaker impedance<br />
6 – 16 Ω<br />
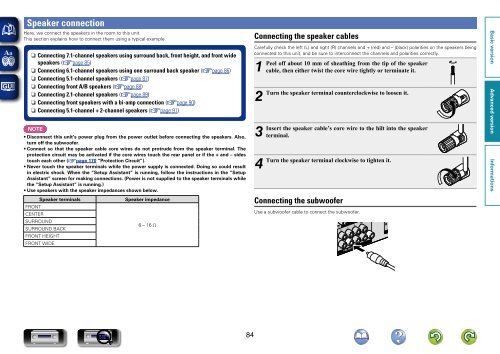
Connecting the speaker cables<br />
Carefully check the left (L) and right (R) channels and + (red) and – (black) polarities on the speakers being<br />
connected to this unit, and be sure to interconnect the channels and polarities correctly.<br />
1<br />
Peel off about 10 mm of sheathing from the tip of the speaker<br />
cable, then either twist the core wire tightly or terminate it.<br />
2<br />
Turn<br />
3<br />
Insert<br />
4<br />
Turn<br />
the speaker terminal counterclockwise to loosen it.<br />
the speaker cable’s core wire to the hilt into the speaker<br />
terminal.<br />
the speaker terminal clockwise to tighten it.<br />
Connecting the subwoofer<br />
Use a subwoofer cable to connect the subwoofer.<br />
84