Denon AVR-3313 Manual - Audio Products Australia
Denon AVR-3313 Manual - Audio Products Australia
Denon AVR-3313 Manual - Audio Products Australia

You also want an ePaper? Increase the reach of your titles
YUMPU automatically turns print PDFs into web optimized ePapers that Google loves.
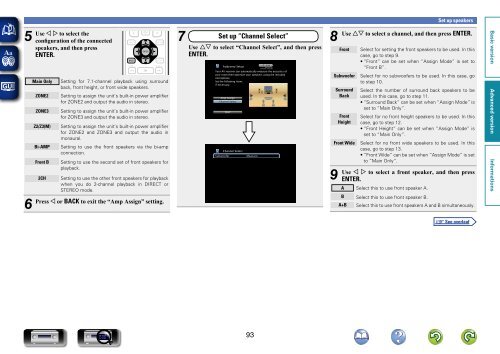
5<br />
Use<br />
o p to select the<br />
configuration of the connected<br />
speakers, and then press<br />
ENTER.<br />
Main Only<br />
ZONE2<br />
ZONE3<br />
Z2/Z3(M)<br />
Bi-AMP<br />
Front B<br />
Setting for 7.1-channel playback using surround<br />
back, front height, or front wide speakers.<br />
Setting to assign the unit’s built-in power amplifier<br />
for ZONE2 and output the audio in stereo.<br />
Setting to assign the unit’s built-in power amplifier<br />
for ZONE3 and output the audio in stereo.<br />
Setting to assign the unit’s built-in power amplifier<br />
for ZONE2 and ZONE3 and output the audio in<br />
monaural.<br />
Setting to use the front speakers via the bi-amp<br />
connection.<br />
Setting to use the second set of front speakers for<br />
playback.<br />
2CH Setting to use the other front speakers for playback<br />
when you do 2-channel playback in DIRECT or<br />
STEREO mode.<br />
6<br />
Press o or BACK to exit the “Amp Assign” setting.<br />
7 Set up “Channel Select”<br />
Use ui to select “Channel Select”, and then press<br />
ENTER.<br />
Subwoofer<br />
Audyssey Setup<br />
Your AV receiver can automatically measure the acoustics of<br />
your room then optimize your speakers using the included<br />
microphone.<br />
Set the following items<br />
if necessary.<br />
Amp Assign<br />
Channel Select<br />
Start<br />
Channel Select<br />
Measure<br />
Set up speakers<br />
8<br />
Use ui to select a channel, and then press ENTER.<br />
Front Select for setting the front speakers to be used. In this<br />
case, go to step 9.<br />
• “Front” can be set when “Assign Mode” is set to<br />
“Front B”.<br />
Subwoofer<br />
Surround<br />
Back<br />
Front<br />
Height<br />
Select for no subwoofers to be used. In this case, go<br />
to step 10.<br />
Select the number of surround back speakers to be<br />
used. In this case, go to step 11.<br />
• “Surround Back” can be set when “Assign Mode” is<br />
set to “Main Only”.<br />
Select for no front height speakers to be used. In this<br />
case, go to step 12.<br />
• “Front Height” can be set when “Assign Mode” is<br />
set to “Main Only”.<br />
Front Wide Select for no front wide speakers to be used. In this<br />
case, go to step 13.<br />
• “Front Wide” can be set when “Assign Mode” is set<br />
to “Main Only”.<br />
9<br />
Use o p to select a front speaker, and then press<br />
ENTER.<br />
A Select this to use front speaker A.<br />
B Select this to use front speaker B.<br />
A+B Select this to use front speakers A and B simultaneously.<br />
93