Architectural_Design_with_SketchUp

You also want an ePaper? Increase the reach of your titles
YUMPU automatically turns print PDFs into web optimized ePapers that Google loves.
<strong>Architectural</strong> <strong>Design</strong> <strong>with</strong> <strong>SketchUp</strong><br />
NN<br />
NN<br />
NN<br />
NN<br />
NN<br />
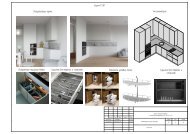
Reduce the number of polygons. Every additional polygon increases rendering time<br />
and makes your model more complex. This is true especially if you assign translucent,<br />
reflective or light-emitting materials to the polygon. Therefore, keep your model’s polygons<br />
to the necessary minimum.<br />
This is the case particularly <strong>with</strong> natural objects such as trees or grass. When they are at<br />
a certain distance from the viewer, it is often a good idea to either reduce their complexity<br />
or replace them <strong>with</strong> a photograph of the object.<br />
Also keep in mind that while <strong>SketchUp</strong> is able to handle multivertex polygons, rendering<br />
software usually uses only triangular polygons and triangulates any nontriangular face<br />
coming from <strong>SketchUp</strong>.<br />
Use fully reflective materials or fake reflections. Reflective surfaces in your scene<br />
increase rendering time, especially if they are just partially reflective (such as brushed aluminum).<br />
Unless you absolutely need this effect, try going <strong>with</strong> full reflectivity (a mirror<br />
or highly polished chrome material) or a gray gradient texture (faking blurry reflectivity)<br />
instead. This works especially well when the object is not too close to the viewer.<br />
Consider using fake caustics. If you need caustics (the light ripples that reflect off a<br />
pool, for example) but don’t want to expend the additional rendering time that caustics<br />
require, consider faking them by projecting a caustics texture image onto a wall, ceiling,<br />
or other surface.<br />
Handling depth of field, light rays, and motion blur. All of these effects increase<br />
rendering complexity. Consider adding them in postproduction using your photo-editing<br />
software’s filters.<br />
Depth of field can usually be added using Gaussian blur, and motion blur is a filter that<br />
is typically available in your editing software. Experiment <strong>with</strong> the settings and master<br />
masking techniques to perfect these effects.<br />
Light rays (as you would see coming through trees on a slightly foggy day) require your<br />
rendering software to simulate particles in the air (this is often called volume lighting).<br />
They can often be added in postproduction, especially if they are produced by simple<br />
geometry (a window, for example).<br />
Use postproduction to your advantage. Depending on your image-editing skills, it<br />
might be more efficient to add people, vegetation, sky effects, and some shadows in<br />
your favorite photo-editing software after the rendering is done.<br />
A great resource for learning and discussing techniques is this website: www.sketchupartists.org.<br />
Making Renderings Presentable<br />
While photorealistically rendered images can be produced <strong>with</strong> a quality similar to that of<br />
actual photographs, sometimes this is not desirable. For example, you might want to create<br />
sketches that have a watercolor appearance but contain effects like lighting or reflections<br />
that you can produce only using rendering software.<br />
To this end, it is often useful to expend as much effort on your renderings in postproduction<br />
as you do in setting them up. The following examples give you some ideas for paths to follow.<br />
224