


Create successful ePaper yourself
Turn your PDF publications into a flip-book with our unique Google optimized e-Paper software.
Character<br />
Refining the portrait<br />
Add finishing touches to your image<br />
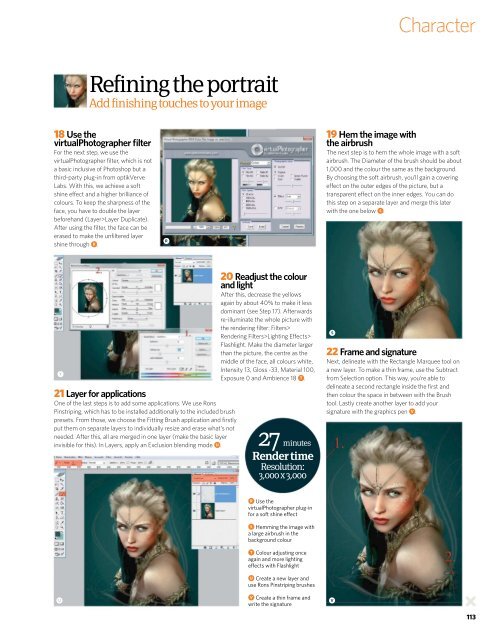
18 Use the<br />
virtualPhotographer filter<br />
For the next step, we use the<br />
virtualPhotographer filter, which is not<br />
a basic inclusive of Photoshop but a<br />
third-p<strong>art</strong>y plug-in from optikVerve<br />
Labs. With this, we achieve a soft<br />
shine effect and a higher brilliance of<br />
colours. To keep the sharpness of the<br />
face, you have to double the layer<br />
beforehand (Layer>Layer Duplicate).<br />
After using the filter, the face can be<br />
erased to make the unfiltered layer<br />
shine through r.<br />
r<br />
19 Hem the image with<br />
the airbrush<br />
The next step is to hem the whole image with a soft<br />
airbrush. The Diameter of the brush should be about<br />
1,000 and the colour the same as the background.<br />
By choosing the soft airbrush, you’ll gain a covering<br />
effect on the outer edges of the picture, but a<br />
transparent effect on the inner edges. You can do<br />
this step on a separate layer and merge this later<br />
with the one below s.<br />
T<br />
21 Layer for applications<br />
One of the last steps is to add some applications. We use Rons<br />
Pinstriping, which has to be installed additionally to the included brush<br />
presets. From those, we choose the Fitting Brush application and firstly<br />
put them on separate layers to individually resize and erase what’s not<br />
needed. After this, all are merged in one layer (make the basic layer<br />
invisible for this). In Layers, apply an Exclusion blending mode u.<br />
20 Readjust the colour<br />
and light<br />
After this, decrease the yellows<br />
again by about 40% to make it less<br />
dominant (see Step 17). Afterwards<br />
re-illuminate the whole picture with<br />
the rendering filter: Filters><br />
Rendering Filters>Lighting Effects><br />
Flashlight. Make the diameter larger<br />
than the picture, the centre as the<br />
middle of the face, all colours white,<br />
Intensity 13, Gloss -33, Material 100,<br />
Exposure 0 and Ambience 18 t.<br />
27 minutes<br />
Render time<br />
Resolution:<br />
3,000 x 3,000<br />
S<br />
22 Frame and signature<br />
Next, delineate with the Rectangle Marquee tool on<br />
a new layer. To make a thin frame, use the Subtract<br />
from Selection option. This way, you’re able to<br />
delineate a second rectangle inside the first and<br />
then colour the space in between with the Brush<br />
tool. Lastly create another layer to add your<br />
signature with the graphics pen v.<br />
U<br />
r Use the<br />
virtualPhotographer plug-in<br />
for a soft shine effect<br />
s Hemming the image with<br />
a large airbrush in the<br />
background colour<br />
t Colour adjusting once<br />
again and more lighting<br />
effects with Flashlight<br />
u Create a new layer and<br />
use Rons Pinstriping brushes<br />
v Create a thin frame and<br />
write the signature<br />
v<br />
113