


You also want an ePaper? Increase the reach of your titles
YUMPU automatically turns print PDFs into web optimized ePapers that Google loves.
Artist<br />
Showcase<br />
Daniel Schmid<br />
I have worked as a 3D <strong>art</strong>ist for nine years in several<br />
animation studios in Mexico. In the last few years, I<br />
have specialised in lighting, shading and rendering.<br />
Now I work as CG leader giving the final look to work at<br />
Exodo Digital Workshop of which I’m a co-founder.<br />
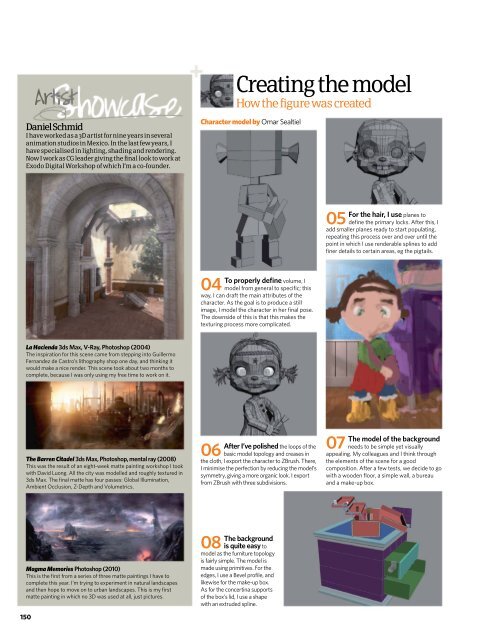
Creating the model<br />
How the figure was created<br />
Character model by Omar Sealtiel<br />
For the hair, I use planes to<br />
05 define the primary locks. After this, I<br />
add smaller planes ready to st<strong>art</strong> populating,<br />
repeating this process over and over until the<br />
point in which I use renderable splines to add<br />
finer details to certain areas, eg the pigtails.<br />
04<br />
To properly define volume, I<br />
model from general to specific; this<br />
way, I can draft the main attributes of the<br />
character. As the goal is to produce a still<br />
image, I model the character in her final pose.<br />
The downside of this is that this makes the<br />
texturing process more complicated.<br />
La Hacienda <strong>3d</strong>s Max, V-Ray, Photoshop (2004)<br />
The inspiration for this scene came from stepping into Guillermo<br />
Fernandez de Castro’s lithography shop one day, and thinking it<br />
would make a nice render. This scene took about two months to<br />
complete, because I was only using my free time to work on it.<br />
The Barren Citadel <strong>3d</strong>s Max, Photoshop, mental ray (2008)<br />
This was the result of an eight-week matte painting workshop I took<br />
with David Luong. All the city was modelled and roughly textured in<br />
<strong>3d</strong>s Max. The final matte has four passes: Global Illumination,<br />
Ambient Occlusion, Z-Depth and Volumetrics.<br />
06<br />
After I’ve polished the loops of the<br />
basic model topology and creases in<br />
the cloth, I export the character to ZBrush. There,<br />
I minimise the perfection by reducing the model’s<br />
symmetry, giving a more organic look. I export<br />
from ZBrush with three subdivisions.<br />
07<br />
The model of the background<br />
needs to be simple yet visually<br />
appealing. My colleagues and I think through<br />
the elements of the scene for a good<br />
composition. After a few tests, we decide to go<br />
with a wooden floor, a simple wall, a bureau<br />
and a make-up box.<br />
Magma Memories Photoshop (2010)<br />
This is the first from a series of three matte paintings I have to<br />
complete this year. I’m trying to experiment in natural landscapes<br />
and then hope to move on to urban landscapes. This is my first<br />
matte painting in which no 3D was used at all, just pictures.<br />
150<br />
08<br />
The background<br />
is quite easy to<br />
model as the furniture topology<br />
is fairly simple. The model is<br />
made using primitives. For the<br />
edges, I use a Bevel profile, and<br />
likewise for the make-up box.<br />
As for the concertina supports<br />
of the box’s lid, I use a shape<br />
with an extruded spline.