


You also want an ePaper? Increase the reach of your titles
YUMPU automatically turns print PDFs into web optimized ePapers that Google loves.
Transport<br />
Lighting the scene<br />
Creating the environment<br />
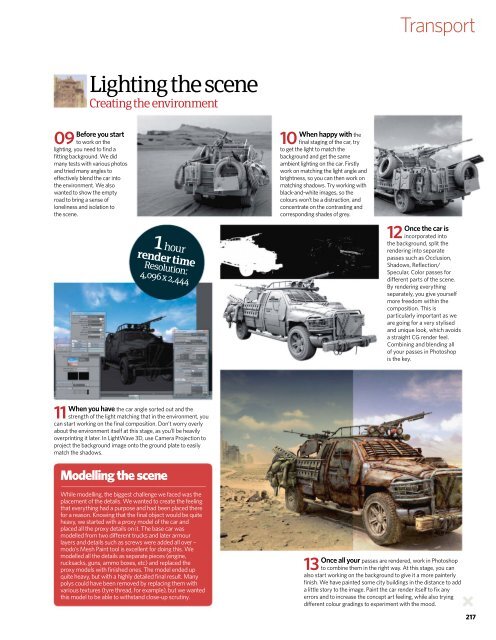
Before you st<strong>art</strong><br />
09 to work on the<br />
lighting, you need to find a<br />
fitting background. We did<br />
many tests with various photos<br />
and tried many angles to<br />
effectively blend the car into<br />
the environment. We also<br />
wanted to show the empty<br />
road to bring a sense of<br />
loneliness and isolation to<br />
the scene.<br />
1 hour<br />
render time<br />
Resolution:<br />
4,096 x 2,444<br />
When happy with the<br />
10 final staging of the car, try<br />
to get the light to match the<br />
background and get the same<br />
ambient lighting on the car. Firstly<br />
work on matching the light angle and<br />
brightness, so you can then work on<br />
matching shadows. Try working with<br />
black-and-white images, so the<br />
colours won’t be a distraction, and<br />
concentrate on the contrasting and<br />
corresponding shades of grey.<br />
Once the car is<br />
12 incorporated into<br />
the background, split the<br />
rendering into separate<br />
passes such as Occlusion,<br />
Shadows, Reflection/<br />
Specular, Color passes for<br />
different p<strong>art</strong>s of the scene.<br />
By rendering everything<br />
separately, you give yourself<br />
more freedom within the<br />
composition. This is<br />
p<strong>art</strong>icularly important as we<br />
are going for a very stylised<br />
and unique look, which avoids<br />
a straight CG render feel.<br />
Combining and blending all<br />
of your passes in Photoshop<br />
is the key.<br />
When you have the car angle sorted out and the<br />
11 strength of the light matching that in the environment, you<br />
can st<strong>art</strong> working on the final composition. Don’t worry overly<br />
about the environment itself at this stage, as you’ll be heavily<br />
overprinting it later. In LightWave 3D, use Camera Projection to<br />
project the background image onto the ground plate to easily<br />
match the shadows.<br />
Modelling the scene<br />
While modelling, the biggest challenge we faced was the<br />
placement of the details. We wanted to create the feeling<br />
that everything had a purpose and had been placed there<br />
for a reason. Knowing that the final object would be quite<br />
heavy, we st<strong>art</strong>ed with a proxy model of the car and<br />
placed all the proxy details on it. The base car was<br />
modelled from two different trucks and later armour<br />
layers and details such as screws were added all over –<br />
modo’s Mesh Paint tool is excellent for doing this. We<br />
modelled all the details as separate pieces (engine,<br />
rucksacks, guns, ammo boxes, etc) and replaced the<br />
proxy models with finished ones. The model ended up<br />
quite heavy, but with a highly detailed final result. Many<br />
polys could have been removed by replacing them with<br />
various textures (tyre thread, for example), but we wanted<br />
this model to be able to withstand close-up scrutiny.<br />
Once all your passes are rendered, work in Photoshop<br />
13 to combine them in the right way. At this stage, you can<br />
also st<strong>art</strong> working on the background to give it a more painterly<br />
finish. We have painted some city buildings in the distance to add<br />
a little story to the image. Paint the car render itself to fix any<br />
errors and to increase the concept <strong>art</strong> feeling, while also trying<br />
different colour gradings to experiment with the mood.<br />
217