


You also want an ePaper? Increase the reach of your titles
YUMPU automatically turns print PDFs into web optimized ePapers that Google loves.
Artist<br />
Showcase<br />
Antony Ward<br />
I’ve been working in the games industry for close to 16<br />
years now and have been freelance for the last three.<br />
During this time, I have worked for some of the biggest<br />
companies in the industry and have experienced<br />
nearly all areas of game development, with character<br />
modelling, animation, MEL scripting and rigging<br />
being my areas of choice.<br />
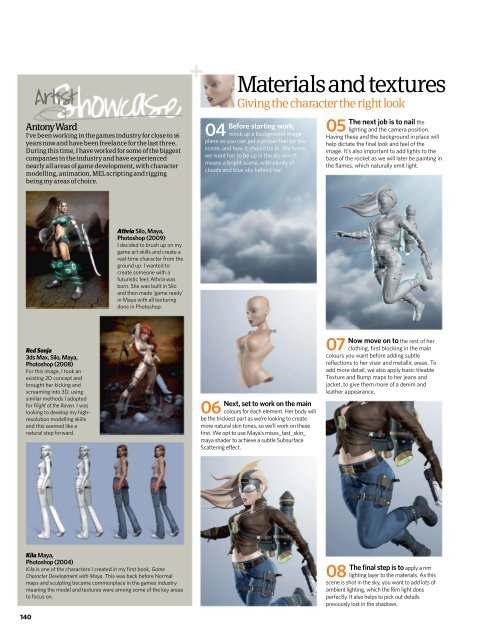
04<br />
Materials and textures<br />
Giving the character the right look<br />
Before st<strong>art</strong>ing work,<br />
mock up a background image<br />
plane so you can get a proper feel for the<br />
scene, and how it should be lit. We know<br />
we want her to be up in the air, which<br />
means a bright scene, with plenty of<br />
clouds and blue sky behind her.<br />
The next job is to nail the<br />
05 lighting and the camera position.<br />
Having these and the background in place will<br />
help dictate the final look and feel of the<br />
image. It’s also important to add lights to the<br />
base of the rocket as we will later be painting in<br />
the flames, which naturally emit light.<br />
Athria Silo, Maya,<br />
Photoshop (2009)<br />
I decided to brush up on my<br />
game <strong>art</strong> skills and create a<br />
real-time character from the<br />
ground up. I wanted to<br />
create someone with a<br />
futuristic feel; Athria was<br />
born. She was built in Silo<br />
and then made ‘game ready’<br />
in Maya with all texturing<br />
done in Photoshop.<br />
Red Sonja<br />
<strong>3d</strong>s Max, Silo, Maya,<br />
Photoshop (2008)<br />
For this image, I took an<br />
existing 2D concept and<br />
brought her kicking and<br />
screaming into 3D, using<br />
similar methods I adopted<br />
for Flight of the Raven. I was<br />
looking to develop my highresolution<br />
modelling skills<br />
and this seemed like a<br />
natural step forward.<br />
06<br />
Next, set to work on the main<br />
colours for each element. Her body will<br />
be the trickiest p<strong>art</strong> as we’re looking to create<br />
more natural skin tones, so we’ll work on these<br />
first. We opt to use Maya’s misss_fast_skin_<br />
maya shader to achieve a subtle Subsurface<br />
Scattering effect.<br />
07<br />
Now move on to the rest of her<br />
clothing, first blocking in the main<br />
colours you want before adding subtle<br />
reflections to her visor and metallic areas. To<br />
add more detail, we also apply basic tileable<br />
Texture and Bump maps to her jeans and<br />
jacket, to give them more of a denim and<br />
leather appearance.<br />
Kila Maya,<br />
Photoshop (2004)<br />
Kila is one of the characters I created in my first book, Game<br />
Character Development with Maya. This was back before Normal<br />
maps and sculpting became commonplace in the games industry<br />
meaning the model and textures were among some of the key areas<br />
to focus on.<br />
140<br />
08<br />
The final step is to apply a rim<br />
lighting layer to the materials. As this<br />
scene is shot in the sky, you want to add lots of<br />
ambient lighting, which the Rim light does<br />
perfectly. It also helps to pick out details<br />
previously lost in the shadows.