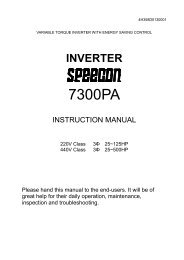
- Page 2 and 3: Preface The EQ7 product is designed
- Page 4 and 5: 7. Operation Method Configuration (
- Page 6 and 7: Wiring • If no zero-phase current
- Page 8 and 9: • Do not touch the heat sink and
- Page 10 and 11: Conformity with UL standards and CS
- Page 12 and 13: Conformity with UL standards and CS
- Page 14 and 15: 1.1 Drive Models Constant Torque (C
- Page 16 and 17: • Storage environment The storage
- Page 18 and 19: (5) Molded case circuit breaker (MC
- Page 20 and 21: • From the system's safety point
- Page 22 and 23: 1.3 Precautions in running inverter
- Page 24 and 25: Chapter 2 Mounting and Wiring the I
- Page 28 and 29: 2.3.2 Screw specifications and reco
- Page 30 and 31: Power supply voltage Single-phase/
- Page 32 and 33: Before removal of clip-off sections
- Page 34 and 35: 2.3.4 Wiring of main circuit termin
- Page 36 and 37: DC reactor terminals P1 and P (+) C
- Page 38 and 39: • Fan power supply switching conn
- Page 40 and 41: When connecting a PWM converter wit
- Page 42 and 43: Table 2.7 lists the symbols, names
- Page 44 and 45: Table 2.7 Symbols, Names and Functi
- Page 46 and 47: Table 2.7 Symbols, Names and Functi
- Page 48 and 49: Wiring for control circuit terminal
- Page 50 and 51: 2.4 Mounting and Connecting the Key
- Page 52 and 53: Never connect power supply wires to
- Page 54 and 55: Table 3.1 Overview of Keypad Functi
- Page 56 and 57: 3.3 Running Mode 3.3.1 Running or s
- Page 58 and 59: Table 3.4 Items Monitored (Continue
- Page 60 and 61: 3.4 Programming Mode Programming mo
- Page 62 and 63: Basic configuration of screens Figu
- Page 64 and 65: 3.4.3 Checking changed function cod
- Page 66 and 67: (3) Press key to establish the desi
- Page 68 and 69: Basic key operation (1) Turn the in
- Page 70 and 71: Chapter 4 Function Codes / Paramete
- Page 72 and 73: F codes: Fundamental Functions Code
- Page 74 and 75: Code Name Data setting range F37 Lo
- Page 76 and 77:
Change when running Data copying De
- Page 78 and 79:
Change when running Data copying De
- Page 80 and 81:
C codes: Control Functions of Frequ
- Page 82 and 83:
H codes: High Performance Functions
- Page 84 and 85:
Code Name Data setting range H73 To
- Page 86 and 87:
Code Name Data setting range A18 Mo
- Page 88 and 89:
J codes: Application Functions 1 Co
- Page 90 and 91:
Change when running Data copying De
- Page 92 and 93:
Inverter capacity HP 0.5 Auto-resta
- Page 94 and 95:
Table B Motor Parameters (Continued
- Page 96 and 97:
Configuring a reference frequency [
- Page 98 and 99:
• Gain and bias If F01 = 3 (the s
- Page 100 and 101:
• Specifying the initial value fo
- Page 102 and 103:
• Pulse count factor 1 (d62), Pul
- Page 104 and 105:
F03 Maximum Frequency 1 F03 specifi
- Page 106 and 107:
In vector control, current feedback
- Page 108 and 109:
• Acceleration/Deceleration patte
- Page 110 and 111:
F10 to F12 Electronic Thermal Overl
- Page 112 and 113:
F14 Restart Mode after Momentary Po
- Page 114 and 115:
If you enable the "Restart mode aft
- Page 116 and 117:
• Restart mode after momentary po
- Page 118 and 119:
Even if selecting "Trip after decel
- Page 120 and 121:
It is also possible to use an exter
- Page 122 and 123:
The table below shows the condition
- Page 124 and 125:
F29 to F31 F32, F34, F35 Analog Out
- Page 126 and 127:
• V/f characteristics The EQ7 ser
- Page 128 and 129:
Related function codes Function cod
- Page 130 and 131:
Under vector control without/with s
- Page 132 and 133:
Data for H75 Target quadrants Patte
- Page 134 and 135:
F42 Drive Control Selection 1 H68 (
- Page 136 and 137:
F43, F44 Current Limiter (Mode sele
- Page 138 and 139:
• Allowable average loss (F51) Th
- Page 140 and 141:
4.2.2 E codes (Extension Terminal F
- Page 142 and 143:
Terminal function assignment and da
- Page 144 and 145:
• When the motor speed decreases
- Page 146 and 147:
Example of Operation Time Scheme Al
- Page 148 and 149:
When the PID control is disabled: T
- Page 150 and 151:
Circuit Diagram and Configuration M
- Page 152 and 153:
Examples of Sequence Circuits 1) St
- Page 154 and 155:
• Enable battery operation -- BAT
- Page 156 and 157:
Precautions (1) The battery power s
- Page 158 and 159:
Function code data Active ON Active
- Page 160 and 161:
• Universal DO -- U-DO (Function
- Page 162 and 163:
• Enable input OFF -- EN OFF (Fun
- Page 164 and 165:
E34, E35 Overload Early Warning/Cur
- Page 166 and 167:
• Display coefficients for PID da
- Page 168 and 169:
E44 LED Monitor (Display when stopp
- Page 170 and 171:
E54 Frequency Detection 3 (Level) (
- Page 172 and 173:
E64 Saving of Digital Reference Fre
- Page 174 and 175:
4.2.3 C codes (Control functions) C
- Page 176 and 177:
C20 Jogging Frequency H54, H55 (Acc
- Page 178 and 179:
4.2.4 P codes (Motor 1 Parameters)
- Page 180 and 181:
P05, A19 Motor 1 / 2 (Online tuning
- Page 182 and 183:
P53, P54 Motor 1 (%X correction fac
- Page 184 and 185:
Chapter 6 Speed Reference Command C
- Page 186 and 187:
Analog Reference: 0 - 20mA / 4 - 20
- Page 188 and 189:
H30 Communications Link Function Se
- Page 190 and 191:
7.2 Run/Stop from External Switch /
- Page 192 and 193:
7.3 Run/Stop from Serial Communicat
- Page 194 and 195:
Chapter 8 Motor and Application Spe
- Page 196 and 197:
8.3 Torque Boost (F09, Default 0.1)
- Page 198 and 199:
When the variable torque V/f patter
- Page 200 and 201:
Chapter 9 Using PID Control for Con
- Page 202 and 203:
Feedback Signal 0 - 10V (E61 = 5) G
- Page 204 and 205:
Chapter 10 Troubleshooting 10.1 Pro
- Page 206 and 207:
Table 10.1 Abnormal States Detectab
- Page 208 and 209:
10.3 If Neither an Alarm Code Nor "
- Page 210 and 211:
Possible Causes (5) The acceleratio
- Page 212 and 213:
[ 6 ] The motor does not accelerate
- Page 214 and 215:
10.3.2 Problems with inverter setti
- Page 216 and 217:
[ 3 ] Overvoltage Problem The DC li
- Page 218 and 219:
[ 7 ] Heat sink overheat Problem Te
- Page 220 and 221:
[ 12 ] Fuse blown Problem The fuse
- Page 222 and 223:
[ 17 ] PG wire break Problem The pu
- Page 224 and 225:
[ 24 ] Tuning error Problem Auto-tu
- Page 226 and 227:
[ 28 ] Speed mismatch or excessive
- Page 228 and 229:
[ 36 ] Enable circuit failure Probl
- Page 230 and 231:
10.7 If the Inverter is Running on
- Page 232 and 233:
VT mode designed for variable torqu
- Page 234 and 235:
CT mode designed for constant torqu
- Page 236 and 237:
VT mode designed for variable torqu
- Page 238 and 239:
l Item Specifications Remarks Enabl
- Page 240 and 241:
Item Specifications Remarks Overcur
- Page 242 and 243:
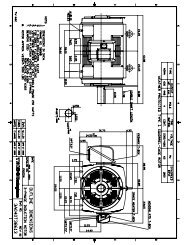
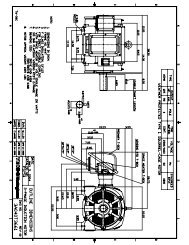
11.3 External Dimensions 11.3.1 Sta
- Page 244 and 245:
11.3.3 DC reactor (DCR) Power suppl
- Page 246 and 247:
Figure A Figure B Figure C Figure D
- Page 248:
11.3.5 Keypad (TP-G1W-J1) Drill fou