Tsunami MP.11 Installation and Management Model 5012-SUR ...
Tsunami MP.11 Installation and Management Model 5012-SUR ...
Tsunami MP.11 Installation and Management Model 5012-SUR ...

You also want an ePaper? Increase the reach of your titles
YUMPU automatically turns print PDFs into web optimized ePapers that Google loves.
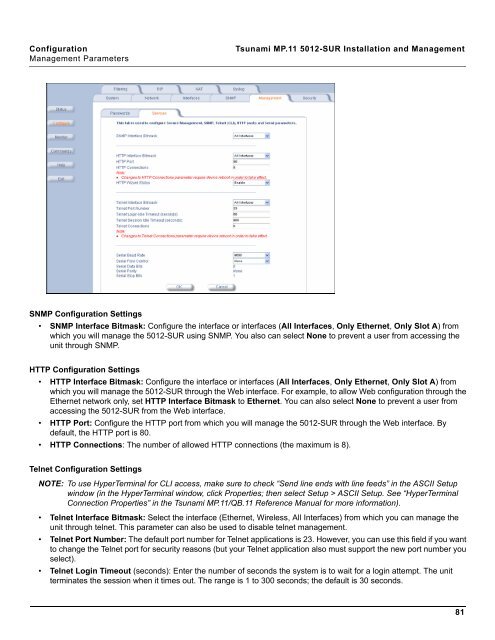
Configuration <strong>Tsunami</strong> <strong>MP.11</strong> <strong>5012</strong>-<strong>SUR</strong> <strong>Installation</strong> <strong>and</strong> <strong>Management</strong><br />
<strong>Management</strong> Parameters<br />
SNMP Configuration Settings<br />
• SNMP Interface Bitmask: Configure the interface or interfaces (All Interfaces, Only Ethernet, Only Slot A) from<br />
which you will manage the <strong>5012</strong>-<strong>SUR</strong> using SNMP. You also can select None to prevent a user from accessing the<br />
unit through SNMP.<br />
HTTP Configuration Settings<br />
• HTTP Interface Bitmask: Configure the interface or interfaces (All Interfaces, Only Ethernet, Only Slot A) from<br />
which you will manage the <strong>5012</strong>-<strong>SUR</strong> through the Web interface. For example, to allow Web configuration through the<br />
Ethernet network only, set HTTP Interface Bitmask to Ethernet. You can also select None to prevent a user from<br />
accessing the <strong>5012</strong>-<strong>SUR</strong> from the Web interface.<br />
• HTTP Port: Configure the HTTP port from which you will manage the <strong>5012</strong>-<strong>SUR</strong> through the Web interface. By<br />
default, the HTTP port is 80.<br />
• HTTP Connections: The number of allowed HTTP connections (the maximum is 8).<br />
Telnet Configuration Settings<br />
NOTE: To use HyperTerminal for CLI access, make sure to check “Send line ends with line feeds” in the ASCII Setup<br />
window (in the HyperTerminal window, click Properties; then select Setup > ASCII Setup. See “HyperTerminal<br />
Connection Properties” in the <strong>Tsunami</strong> <strong>MP.11</strong>/QB.11 Reference Manual for more information).<br />
• Telnet Interface Bitmask: Select the interface (Ethernet, Wireless, All Interfaces) from which you can manage the<br />
unit through telnet. This parameter can also be used to disable telnet management.<br />
• Telnet Port Number: The default port number for Telnet applications is 23. However, you can use this field if you want<br />
to change the Telnet port for security reasons (but your Telnet application also must support the new port number you<br />
select).<br />
• Telnet Login Timeout (seconds): Enter the number of seconds the system is to wait for a login attempt. The unit<br />
terminates the session when it times out. The range is 1 to 300 seconds; the default is 30 seconds.<br />
81