DocAve 6 Service Pack 3 Control Panel Reference Guide - AvePoint
DocAve 6 Service Pack 3 Control Panel Reference Guide - AvePoint
DocAve 6 Service Pack 3 Control Panel Reference Guide - AvePoint
You also want an ePaper? Increase the reach of your titles
YUMPU automatically turns print PDFs into web optimized ePapers that Google loves.
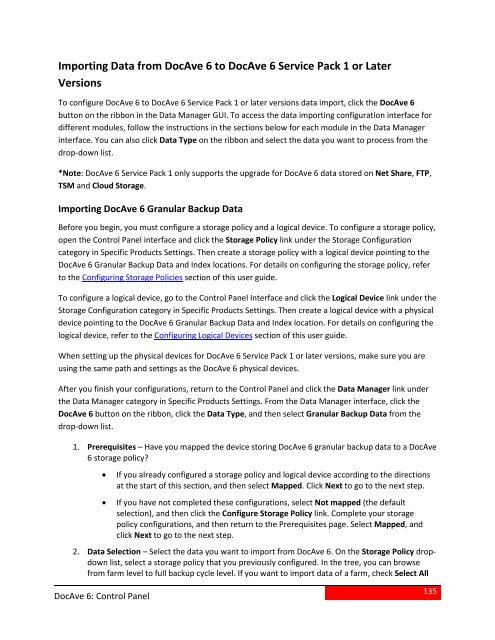
Importing Data from <strong>DocAve</strong> 6 to <strong>DocAve</strong> 6 <strong>Service</strong> <strong>Pack</strong> 1 or LaterVersionsTo configure <strong>DocAve</strong> 6 to <strong>DocAve</strong> 6 <strong>Service</strong> <strong>Pack</strong> 1 or later versions data import, click the <strong>DocAve</strong> 6button on the ribbon in the Data Manager GUI. To access the data importing configuration interface fordifferent modules, follow the instructions in the sections below for each module in the Data Managerinterface. You can also click Data Type on the ribbon and select the data you want to process from thedrop-down list.*Note: <strong>DocAve</strong> 6 <strong>Service</strong> <strong>Pack</strong> 1 only supports the upgrade for <strong>DocAve</strong> 6 data stored on Net Share, FTP,TSM and Cloud Storage.Importing <strong>DocAve</strong> 6 Granular Backup DataBefore you begin, you must configure a storage policy and a logical device. To configure a storage policy,open the <strong>Control</strong> <strong>Panel</strong> interface and click the Storage Policy link under the Storage Configurationcategory in Specific Products Settings. Then create a storage policy with a logical device pointing to the<strong>DocAve</strong> 6 Granular Backup Data and Index locations. For details on configuring the storage policy, referto the Configuring Storage Policies section of this user guide.To configure a logical device, go to the <strong>Control</strong> <strong>Panel</strong> Interface and click the Logical Device link under theStorage Configuration category in Specific Products Settings. Then create a logical device with a physicaldevice pointing to the <strong>DocAve</strong> 6 Granular Backup Data and Index location. For details on configuring thelogical device, refer to the Configuring Logical Devices section of this user guide.When setting up the physical devices for <strong>DocAve</strong> 6 <strong>Service</strong> <strong>Pack</strong> 1 or later versions, make sure you areusing the same path and settings as the <strong>DocAve</strong> 6 physical devices.After you finish your configurations, return to the <strong>Control</strong> <strong>Panel</strong> and click the Data Manager link underthe Data Manager category in Specific Products Settings. From the Data Manager interface, click the<strong>DocAve</strong> 6 button on the ribbon, click the Data Type, and then select Granular Backup Data from thedrop-down list.1. Prerequisites – Have you mapped the device storing <strong>DocAve</strong> 6 granular backup data to a <strong>DocAve</strong>6 storage policy?• If you already configured a storage policy and logical device according to the directionsat the start of this section, and then select Mapped. Click Next to go to the next step.• If you have not completed these configurations, select Not mapped (the defaultselection), and then click the Configure Storage Policy link. Complete your storagepolicy configurations, and then return to the Prerequisites page. Select Mapped, andclick Next to go to the next step.2. Data Selection – Select the data you want to import from <strong>DocAve</strong> 6. On the Storage Policy dropdownlist, select a storage policy that you previously configured. In the tree, you can browsefrom farm level to full backup cycle level. If you want to import data of a farm, check Select All<strong>DocAve</strong> 6: <strong>Control</strong> <strong>Panel</strong>135


