DocAve 6 Service Pack 3 Control Panel Reference Guide - AvePoint
DocAve 6 Service Pack 3 Control Panel Reference Guide - AvePoint
DocAve 6 Service Pack 3 Control Panel Reference Guide - AvePoint

You also want an ePaper? Increase the reach of your titles
YUMPU automatically turns print PDFs into web optimized ePapers that Google loves.
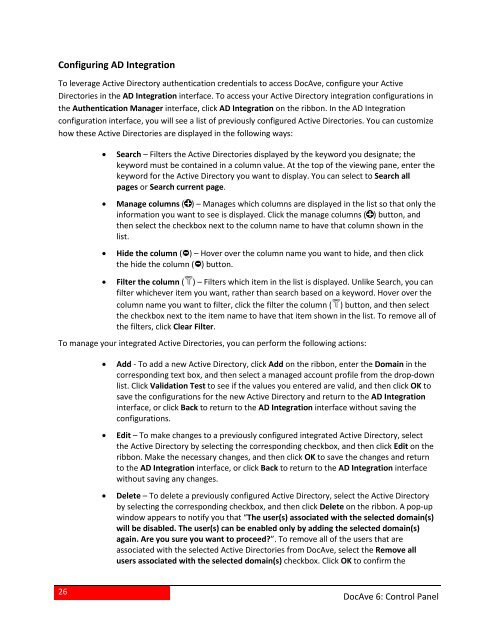
Configuring AD IntegrationTo leverage Active Directory authentication credentials to access <strong>DocAve</strong>, configure your ActiveDirectories in the AD Integration interface. To access your Active Directory integration configurations inthe Authentication Manager interface, click AD Integration on the ribbon. In the AD Integrationconfiguration interface, you will see a list of previously configured Active Directories. You can customizehow these Active Directories are displayed in the following ways:• Search – Filters the Active Directories displayed by the keyword you designate; thekeyword must be contained in a column value. At the top of the viewing pane, enter thekeyword for the Active Directory you want to display. You can select to Search allpages or Search current page.• Manage columns ( ) – Manages which columns are displayed in the list so that only theinformation you want to see is displayed. Click the manage columns ( ) button, andthen select the checkbox next to the column name to have that column shown in thelist.• Hide the column ( ) – Hover over the column name you want to hide, and then clickthe hide the column ( ) button.• Filter the column ( ) – Filters which item in the list is displayed. Unlike Search, you canfilter whichever item you want, rather than search based on a keyword. Hover over thecolumn name you want to filter, click the filter the column ( ) button, and then selectthe checkbox next to the item name to have that item shown in the list. To remove all ofthe filters, click Clear Filter.To manage your integrated Active Directories, you can perform the following actions:• Add - To add a new Active Directory, click Add on the ribbon, enter the Domain in thecorresponding text box, and then select a managed account profile from the drop-downlist. Click Validation Test to see if the values you entered are valid, and then click OK tosave the configurations for the new Active Directory and return to the AD Integrationinterface, or click Back to return to the AD Integration interface without saving theconfigurations.• Edit – To make changes to a previously configured integrated Active Directory, selectthe Active Directory by selecting the corresponding checkbox, and then click Edit on theribbon. Make the necessary changes, and then click OK to save the changes and returnto the AD Integration interface, or click Back to return to the AD Integration interfacewithout saving any changes.• Delete – To delete a previously configured Active Directory, select the Active Directoryby selecting the corresponding checkbox, and then click Delete on the ribbon. A pop-upwindow appears to notify you that “The user(s) associated with the selected domain(s)will be disabled. The user(s) can be enabled only by adding the selected domain(s)again. Are you sure you want to proceed?”. To remove all of the users that areassociated with the selected Active Directories from <strong>DocAve</strong>, select the Remove allusers associated with the selected domain(s) checkbox. Click OK to confirm the26<strong>DocAve</strong> 6: <strong>Control</strong> <strong>Panel</strong>