- Page 1 and 2: DocAve® 6 Control PanelReference G
- Page 3 and 4: Reviewing Installation History of U
- Page 5 and 6: Exporting Health Analyzer Report ..
- Page 7 and 8: About Control PanelThe DocAve Contr
- Page 9 and 10: Before You BeginRefer to the sectio
- Page 11 and 12: Figure 2: DocAve module launch wind
- Page 13 and 14: System SettingsGeneral System Setti
- Page 15 and 16: ii. Destination - Specify the direc
- Page 17 and 18: Activating the Manager ServicesSele
- Page 19 and 20: Refer to the corresponding user gui
- Page 21 and 22: • Activate - Click Activate on th
- Page 23 and 24: • Network Security - Configure th
- Page 25 and 26: Authentication ManagerUse Authentic
- Page 27 and 28: deletion, or click Cancel to return
- Page 29 and 30: 5. Finish - Provides you with three
- Page 31 and 32: Security Trimming UsersIf you are u
- Page 33 and 34: ooinform the end-users about this i
- Page 35 and 36: *Note: If the edited permission lev
- Page 37 and 38: Editing User Groups• Web Applicat
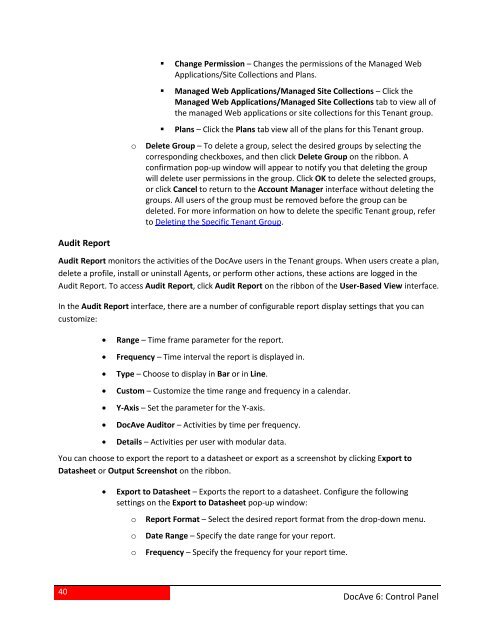
- Page 39: oRemove User from Group - To remove
- Page 43 and 44: 7. Click Change Permission on the r
- Page 45 and 46: oadd the users, or click Cancel to
- Page 47 and 48: oViewing User DetailsAlternatively,
- Page 49 and 50: delete the selected users, or click
- Page 51 and 52: Viewing License InformationThe Lice
- Page 53 and 54: oSelect the Interval checkbox to ha
- Page 55 and 56: DocAve updates. To do so, click Upd
- Page 57 and 58: Managing UpdatesTo manage available
- Page 59 and 60: *Note: Only hotfixes can be uninsta
- Page 61 and 62: The following settings can be confi
- Page 63 and 64: User Notification SettingsCertain D
- Page 65 and 66: .oooDetailed report level(s) - Set
- Page 67 and 68: ooooand then select Day(s), Week(s)
- Page 69 and 70: ooThe __ __of every __ month(s) - S
- Page 71 and 72: In each of the tabs, you will see t
- Page 73 and 74: You can adjust how the rows are dis
- Page 75 and 76: Registered SharePoint SitesUse Regi
- Page 77 and 78: In the Manage Site Collection inter
- Page 79 and 80: *Note: If any site collections fail
- Page 81 and 82: If there are site collections that
- Page 83 and 84: Agent Proxy SettingsUse Agent Proxy
- Page 85 and 86: *Note: If the security profile you
- Page 87 and 88: Click Edit on the ribbon to edit th
- Page 89 and 90: • Deployment Method - Currently t
- Page 91 and 92:
• SP2010EndUserGranularRestore.ws
- Page 93 and 94:
activate the solution. You can also
- Page 95 and 96:
Atmos, EMC Centera, GoogleDrive, HD
- Page 97 and 98:
o*Note: Platform Backup & Restore d
- Page 99 and 100:
oooAccess Key ID - Enter the corres
- Page 101 and 102:
Caringo StorageIn the Create Physic
- Page 103 and 104:
Configuring Proxy LocatorTo configu
- Page 105 and 106:
oAdvanced - Specify the following e
- Page 107 and 108:
• RetryCount - Customize the reco
- Page 109 and 110:
• Storage Type Configuration - Co
- Page 111 and 112:
If you do not configure this parame
- Page 113 and 114:
Click OK to save the configurations
- Page 115 and 116:
• If you enter SingleSession=fals
- Page 117 and 118:
Managing Logical Devicesthe checkbo
- Page 119 and 120:
5. Configure Folder Structure - Thi
- Page 121 and 122:
3. Media Service - Select the Media
- Page 123 and 124:
Once you have selected a logical de
- Page 125 and 126:
Importing Data from DocAve 5 to Doc
- Page 127 and 128:
After you finish your configuration
- Page 129 and 130:
• Have you configured a DocAve 6
- Page 131 and 132:
the logical device configuration an
- Page 133 and 134:
• Last Imported Time - If you che
- Page 135 and 136:
Importing Data from DocAve 6 to Doc
- Page 137 and 138:
Complete the following steps to imp
- Page 139 and 140:
When setting up the physical device
- Page 141 and 142:
ibbon will configure the logical de
- Page 143 and 144:
*Note: If you want to change the lo
- Page 145 and 146:
.Select a managed account profile f
- Page 147 and 148:
Click OK to save the configurations
- Page 149 and 150:
In the Domain Mapping configuration
- Page 151 and 152:
To change the configurations of a u
- Page 153 and 154:
Language MappingTo access Language
- Page 155 and 156:
• Manage columns ( ) - Manages wh
- Page 157 and 158:
c.Column Mapping - Configure more c
- Page 159 and 160:
To see the configurations of a cont
- Page 161 and 162:
Configuring Template MappingsTo cre
- Page 163 and 164:
List Name MappingTo access List Nam
- Page 165 and 166:
Plan GroupPlan Group provides an in
- Page 167 and 168:
Configure the following settings:
- Page 169 and 170:
In the Summary table, you can view
- Page 171 and 172:
Non-SharePoint Migration plans is M
- Page 173 and 174:
Health AnalyzerHealth Analyzer scan
- Page 175 and 176:
• Hide the column ( ) - Hover ove
- Page 177 and 178:
• By month2. Schedule Settings -
- Page 179 and 180:
Exporting Health Analyzer ReportUse
- Page 181 and 182:
Rule Condition Value Resulthttp://t
- Page 183 and 184:
Rule Condition Value ResultDoes Not
- Page 185 and 186:
Rule Condition Value ResultBl?gThe
- Page 187 and 188:
Custom Property:NumberRule Conditio
- Page 189 and 190:
Rule Condition Value ResultDoes Not
- Page 191 and 192:
Rule Condition Value ResultMatches
- Page 193 and 194:
Rule Condition Value ResultBl?gThe
- Page 195 and 196:
Custom Property:NumberRule Conditio
- Page 197 and 198:
Rule Condition Value ResultMatches
- Page 199 and 200:
Rule Condition Value ResultNumber
- Page 201 and 202:
Rule Condition Value Result3B1BC74A
- Page 203 and 204:
Rule Condition Value Result
- Page 205 and 206:
DocAve 6: Control PanelRule Conditi
- Page 207 and 208:
Rule Condition Value ResultTa?kAll
- Page 209 and 210:
of the column must be entered inbra
- Page 211 and 212:
Rule Condition Value ResultWorkflow
- Page 213 and 214:
Rule Condition Value ResultRegular
- Page 215 and 216:
Rule Condition Value ResultExpressi
- Page 217 and 218:
Rule Condition Value Resultinternal
- Page 219 and 220:
Attachment LevelRule Condition Valu
- Page 221 and 222:
Appendix B: Template Name and Templ
- Page 223 and 224:
Appendix C: Accessing Control Panel
- Page 225 and 226:
ADFS IntegrationCloseADXFunction Na
- Page 227 and 228:
Current LogonAccount (s)Authenticat
- Page 229 and 230:
SaveCloseSXFunction Name and Hot Ke
- Page 231 and 232:
Function Name and Hot KeyCloseXScan
- Page 233 and 234:
Retrieve VersionUpgradeRepairCloseV
- Page 235 and 236:
Mapping ManagerTo access the hot ke
- Page 237 and 238:
TemplateMappingGroupMappingFunction
- Page 239:
Notices and Copyright InformationNo


