- Page 1 and 2:
DocuPrint C5005 dUser Guide
- Page 3:
PrefaceThank you for purchasing the
- Page 6 and 7:
3 Printing. . . . . . . . . . . . .
- Page 8 and 9:
8 Contents7 Maintenance . . . . . .
- Page 10 and 11:
Types of ManualsSetup GuideQuick Re
- Page 12 and 13:
Conventions1. In this guide, person
- Page 14 and 15:
Electrical SafetyThis product shall
- Page 16 and 17:
OthersTo keep this product in a goo
- Page 18 and 19:
Never touch the exposed connectorsa
- Page 20 and 21:
EnvironmentRegulation• For enviro
- Page 22 and 23:
Permission to use, copy, modify, an
- Page 24 and 25:
---Portions Copyright (c) 1992-1996
- Page 26 and 27:
Illegal Copies and PrintoutsCopying
- Page 28 and 29:
• SMB : Used when printing using
- Page 30 and 31:
1.2 Connecting a cableConnect the p
- Page 32 and 33:
Network ConnectionUse 1000BASE-T (W
- Page 34 and 35:
2. Open the front cover.3. Press th
- Page 36 and 37:
1.4 Setting the Network Environment
- Page 38 and 39:
13. Press the < > button to display
- Page 40 and 41:
1.5 Enabling PortsSet all ports you
- Page 42 and 43:
• Setting Up a Web BrowserWhen us
- Page 44 and 45:
*1 These settings can only be set u
- Page 46 and 47:
1.7 Installing a Print DriverTo pri
- Page 48 and 49:
No. Name Description10 Tray 5 (Bypa
- Page 50 and 51:
Inside1273456No. Name Description1
- Page 52 and 53:
No. Name Description13 US 2/3 Hole
- Page 54 and 55:
Control Panel1234516151413678910111
- Page 56 and 57:
Control Panel DisplayThe display sh
- Page 58 and 59:
• When the optional finisher is i
- Page 60 and 61:
2.3 Circuit BreakerThe printer is p
- Page 62 and 63:
2.4 Setting/Exiting the Energy Save
- Page 64 and 65:
Checking the Status of a Print JobT
- Page 66 and 67:
Message [Done] appears if the print
- Page 68 and 69:
Set Printer Information Manually1.
- Page 70 and 71:
3 PrintingThis chapter describes va
- Page 72 and 73:
3.2 Printing on EnvelopesThis secti
- Page 74 and 75:
5. Select file size in the [Origina
- Page 76 and 77:
3.3 Printing on Custom Size or Long
- Page 78 and 79:
2. Click the [Device Settings] tab.
- Page 80 and 81:
Printing on Custom Size PaperThe fo
- Page 82 and 83:
4. For [Paper Tray], select [Automa
- Page 84 and 85:
3. The [Paper/Output] tab appears.F
- Page 86 and 87:
8. Press the < > or button to sele
- Page 88 and 89:
3. For [Job Type], select [Sample S
- Page 90 and 91:
9. Enter the number of copies using
- Page 92 and 93:
4. Click [Setup].The [Delayed Print
- Page 94 and 95:
3.8 Private Charge PrintPrivate Cha
- Page 96 and 97:
3.9 Charge PrintCharge Print is ava
- Page 98 and 99:
9. Press the < > or button to sele
- Page 100 and 101:
Printing PDF Files Using CentreWare
- Page 102 and 103:
Sending DocuWorks Files Using Lpr C
- Page 104 and 105:
E-mail Environment Settings (Printe
- Page 106 and 107:
Item Setting Description AvailableS
- Page 108 and 109:
Item Setting Description AvailableS
- Page 110 and 111:
The [Ready to print] screen appears
- Page 112 and 113:
• Paper for 2-Sided PrintingThe f
- Page 114 and 115:
Semi Standard PaperIn addition to t
- Page 116 and 117:
Paper NameSizeBasis Weight(gsm)Pape
- Page 118 and 119:
Limited PaperYou can use the follow
- Page 120 and 121:
Storing and Handling PaperPaper sto
- Page 122 and 123:
3. Adjust the paper guides to the s
- Page 124 and 125:
Loading paper into Trays 1 through
- Page 126 and 127:
Paper Sizes/Paper Type for Trays 1
- Page 128 and 129:
5. Unscrew the screw of the front g
- Page 130 and 131:
5. Press the < > or button to sele
- Page 132 and 133:
9. Press the < > button until the d
- Page 134 and 135:
Note• Bypass tray is set to [No A
- Page 136 and 137:
5 Control Panel Settings5.1 Overvie
- Page 138 and 139:
Changing the SettingsBasic Procedur
- Page 140 and 141:
5.2 Common Menus SettingThis sectio
- Page 142 and 143:
SettingDescription2 Sided Printing
- Page 144 and 145:
[XPS]Sets XPS related settings.Note
- Page 146 and 147:
SettingDescriptionCollated Sets whe
- Page 148 and 149:
SettingDescriptionPJLAdobe Protocol
- Page 150 and 151:
SettingConnect Time-OutTBCP FilterD
- Page 152 and 153:
[SMB]Network/PortSMBSMBPort StatusS
- Page 154 and 155:
SettingDescriptionDNSAdded PortNumb
- Page 156 and 157:
SettingPrint ModePJLAuto Eject Time
- Page 158 and 159:
SettingTBCP FilterDescriptionSets w
- Page 160 and 161:
SettingPort StatusDescriptionSets w
- Page 162 and 163:
IPv4SettingsSettingIP Address,Subne
- Page 164 and 165:
[EP Proxy Server]Important• This
- Page 166 and 167:
[Ethernet]Network/PortEthernetEther
- Page 168 and 169:
[SNTP Settings]Network/PortSNTP Set
- Page 170 and 171:
[System Settings]The [System Settin
- Page 172 and 173:
[Low Power Timer]Note• Refer to
- Page 174 and 175:
[2 Sided Report]System Settings2 Si
- Page 176 and 177:
[Machine Clock]Note• The date and
- Page 178 and 179:
[When Jam Occurs]System SettingsWhe
- Page 180 and 181:
[Auto Job Promote]Note• This item
- Page 182 and 183:
[Authentication]System SettingsAuth
- Page 184 and 185:
ChargePrintSettingReceiveControlPro
- Page 186 and 187:
[Extra Center Tray]System SettingsE
- Page 188 and 189:
SettingDescriptionTransferImageLog-
- Page 190 and 191:
[Printer Settings]The [Printer Sett
- Page 192 and 193:
SettingDescriptionTray 6 Sets the t
- Page 194 and 195:
SettingBond, Plain, PlainS2, Recycl
- Page 196 and 197:
[Image Quality]Printer SettingsImag
- Page 198 and 199:
[Custom Paper Name]Printer Settings
- Page 200 and 201:
[CtrTrayUp-Offset]Printer SettingsC
- Page 202 and 203:
[DefaultPaperSize]Printer SettingsD
- Page 204 and 205:
Paper size groupInch seriesLoading
- Page 206 and 207:
[Allocate Memory] (See *2 on P. 214
- Page 208 and 209:
[Image Quality]Adjusts the printer
- Page 210 and 211:
[Voltage Offset]Note• For more in
- Page 212 and 213:
[Init/Delete Data]The [Init/Delete
- Page 214 and 215:
[Language]SettingsLanguageSettingLa
- Page 216 and 217:
CAUTION• If you need to pull out
- Page 218 and 219:
2. Remove the jammed paper.Note•
- Page 220 and 221:
Paper Jams in Tray 6 (HCF B1)The fo
- Page 222 and 223:
2. Remove the jammed paper.Note•
- Page 224 and 225:
• If paper is jammed in the Fusin
- Page 226 and 227:
Paper Jams in Top Left Cover DThe f
- Page 228 and 229:
Paper Jams in Duplex Module Cover B
- Page 230 and 231:
• Paper Jams in the Finisher Tran
- Page 232 and 233:
3. Turn the knob 1 to the left and
- Page 234 and 235:
2. Move the handle 2b to the right.
- Page 236 and 237:
Paper Jams at H in the Finisher1. O
- Page 238 and 239:
3. Remove the jammed paper if there
- Page 240 and 241:
6.2 Stapler FaultsA staple jam may
- Page 242 and 243:
5. Pull up the metal part of the st
- Page 244 and 245:
Staple Jams in Finisher-C1 with Boo
- Page 246 and 247:
When Staple Jams occurs in Booklet
- Page 248 and 249:
6.3 Hardware Problems (Power Failur
- Page 250 and 251:
SymptomThe printer does not print.C
- Page 252 and 253:
SymptomPrinting can be rubbed off w
- Page 254 and 255:
SymptomText is garbled.Printed outp
- Page 256 and 257:
5. Slowly slide the cleaning bars b
- Page 258 and 259:
6.7 Error Messages and Error CodesE
- Page 260 and 261:
Close Cover N(N: A, B, C or D)Close
- Page 262 and 263:
Open Finisher FrontDoor and replace
- Page 264 and 265:
MessagePaper JamOpen Finisher Front
- Page 266 and 267:
MessageReady ReplaceFuser AssemblyS
- Page 268 and 269:
MessageRemove obstructionbetween Bo
- Page 270 and 271:
Error CodesError codes are six-digi
- Page 272 and 273:
Error CodeCause/Remedy016-506 Image
- Page 274 and 275:
Error CodeCause/Remedy016-556 Conne
- Page 276 and 277:
Error CodeCause/Remedy016-721 An er
- Page 278 and 279:
Error CodeCause/Remedy016-760 An er
- Page 280 and 281:
Error CodeCause/Remedy018-575 The s
- Page 282 and 283:
Error CodeCause/Remedy021-509 An er
- Page 284 and 285:
Error CodeCause/Remedy026-730 The p
- Page 286 and 287:
Error CodeCause/Remedy116-740 An ar
- Page 288 and 289:
SymptomClicking [Apply] does not re
- Page 290 and 291:
Other IPv6 ProblemsSymptomOperation
- Page 292 and 293:
7 Maintenance7.1 Replacing Consumab
- Page 294 and 295:
Replacing Toner CartridgesThe print
- Page 296 and 297:
6. Close the front cover.Note• If
- Page 298 and 299:
2. Rotate the release lever of the
- Page 300 and 301:
14. Rotate the release lever clockw
- Page 302 and 303:
3. Lower the cover.Note• You can
- Page 304 and 305:
13. Carefully place the old waste t
- Page 306 and 307:
5. Insert the front side of the new
- Page 308 and 309:
4. Pinch both sides of the empty st
- Page 310 and 311:
7. Return the unit to the original
- Page 312 and 313:
5. Close the finisher transport cov
- Page 314 and 315:
Replacing the Fusing UnitThe follow
- Page 316 and 317:
Resetting the CounterAfter replacin
- Page 318 and 319:
5. Remove the new IBT belt cleaner
- Page 320 and 321:
3. Take out the Suction Filter R12.
- Page 322 and 323:
Replacing the 200K Maintenance KitT
- Page 324 and 325:
4. Take out the Paper Feed Rolls (3
- Page 326 and 327:
7.2 Printing Reports/ListsThis sect
- Page 328 and 329:
Report/List Name(Name on the Contro
- Page 330 and 331:
7.3 Checking the Meter ReadingThe p
- Page 332 and 333:
Initializing [Meter Report (Print J
- Page 334 and 335:
9. Press the < > button to display
- Page 336 and 337:
7.5 Monitoring/Managing the Printer
- Page 338 and 339:
Item Setting DescriptionGeneral Set
- Page 340 and 341:
7.7 Checking Machine Serial NumberT
- Page 342 and 343:
3. On the [Configuration] tab, clic
- Page 344 and 345:
Feature Description Refer toInitial
- Page 346 and 347:
6. For [Source IP Mask], specify th
- Page 348 and 349:
SettingWatermark / BackgroundContra
- Page 350 and 351:
Print Universal Unique IDUUID is an
- Page 352 and 353:
Layout Templatepreset1preset2preset
- Page 354 and 355:
Outputting the Audit LogAudit Log d
- Page 356 and 357:
7.10 Configuring Encryption Setting
- Page 358 and 359:
Configuring HTTP Communication Encr
- Page 360 and 361:
Note• If you reboot CentreWare In
- Page 362 and 363:
3. On the menu on the left, click [
- Page 364 and 365:
3. On the menu on the left, click [
- Page 366 and 367:
Auditron Administration FeatureWhen
- Page 368 and 369: 7. On the screen that appears, conf
- Page 370 and 371: 3. On the [Configuration] tab, clic
- Page 372 and 373: Note• You can select multiple sma
- Page 374 and 375: Performing CalibrationPrinting a Ca
- Page 376 and 377: 3. Starting from the [•] mark on
- Page 378 and 379: Inputting Density ValuesUse CentreW
- Page 380 and 381: 7.13 Adjusting the Image Transfer V
- Page 382 and 383: 7.14 Adjusting the Paper RegiThis e
- Page 384 and 385: 384 7 Maintenance23. When the setti
- Page 386 and 387: 7.16 Moving the PrinterUse the foll
- Page 388 and 389: ItemsContinuous print speed *1Descr
- Page 390 and 391: ItemsDescriptionContinuous print sp
- Page 392 and 393: ItemsDescriptionPaper TypeBypass Tr
- Page 394 and 395: Supported protocolPowerItemsDescrip
- Page 396 and 397: ItemsDescriptionWeightSpace Require
- Page 398 and 399: Left Top Tray (optional)ItemsDescri
- Page 400 and 401: European PCL • CG Times• CG Tim
- Page 402 and 403: A.3 Life of Consumables and Regular
- Page 404 and 405: A.4 Obtaining Product InformationOb
- Page 406 and 407: Memory capacity1-sidedMemory capaci
- Page 408 and 409: 5. Loosen the three screws on the b
- Page 410 and 411: A.6 Installing the HDD Extension Ki
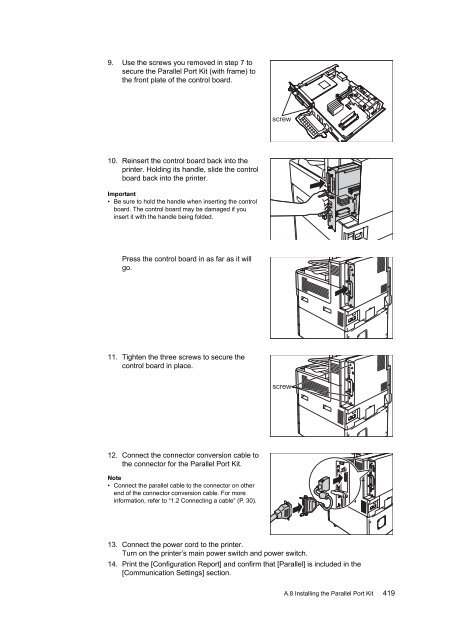
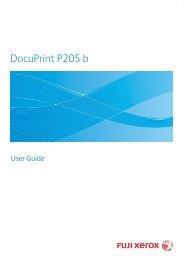
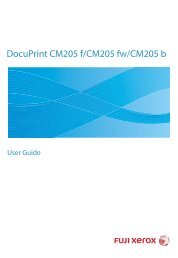
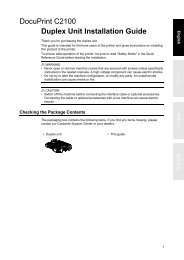
- Page 412 and 413: 9. Reinsert the control board back
- Page 414 and 415: 5. Loosen the three screws on the c
- Page 416 and 417: 17. Press the < > or button to sel
- Page 420 and 421: Refer to• List printing procedure
- Page 422 and 423: A.9 Installing the Gigabit Ethernet
- Page 424 and 425: 10. Reinsert the control board back
- Page 426 and 427: 6. Pull out the handle on the contr
- Page 428 and 429: 5. Loosen the three screws on the c
- Page 430 and 431: A.11 Notes and RestrictionsNotes an
- Page 432 and 433: Printing from Macintosh via USB Con
- Page 434 and 435: CSRF Protection for CenterWare Inte
- Page 436 and 437: Pv6 Connection Notes and Limitation
- Page 438 and 439: The settings in the following categ
- Page 440 and 441: • From a security perspective, th
- Page 442 and 443: A.12 Glossary[10BASE-T]A 10 Mbps Et
- Page 444 and 445: [Interface]The point where two thin
- Page 446 and 447: [Resolution]Indicates the detail of
- Page 448 and 449: Demo Print . . . . . . . . . . . .
- Page 450 and 451: Registering Custom Size Paper . . .
- Page 452 and 453: Control Panel Panel Menu TreeMenu T
- Page 454 and 455: From B (previous page)([Network / P
- Page 456 and 457: DSystem Settings Alert Tone off,
- Page 458 and 459: FPrinter SettingsSubstitute Tray•
- Page 460 and 461: IImage Quality Adjust Gradation Tex
- Page 462: DocuPrint C5005 d User GuideFuji Xe