Adept Quattro s650H Robot
Adept Quattro s650H Robot User's Guide - Asimo.pl
Adept Quattro s650H Robot User's Guide - Asimo.pl
- No tags were found...

You also want an ePaper? Increase the reach of your titles
YUMPU automatically turns print PDFs into web optimized ePapers that Google loves.
R<br />
Chapter 1 - Introduction<br />
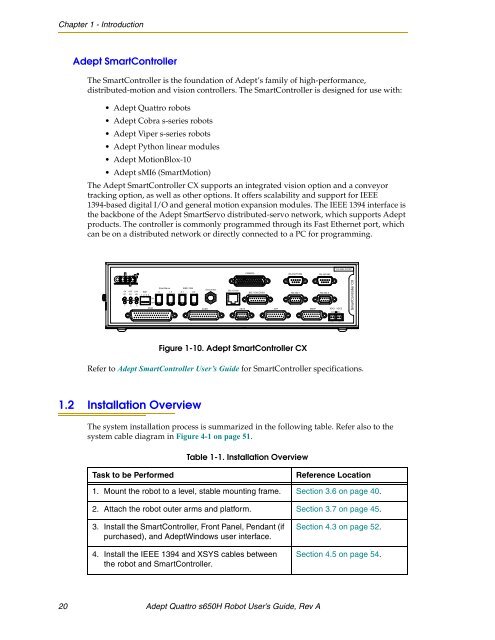
<strong>Adept</strong> SmartController<br />
The SmartController is the foundation of <strong>Adept</strong>’s family of high-performance,<br />
distributed-motion and vision controllers. The SmartController is designed for use with:<br />
• <strong>Adept</strong> <strong>Quattro</strong> robots<br />
• <strong>Adept</strong> Cobra s-series robots<br />
• <strong>Adept</strong> Viper s-series robots<br />
• <strong>Adept</strong> Python linear modules<br />
• <strong>Adept</strong> MotionBlox-10<br />
•<strong>Adept</strong> sMI6 (SmartMotion)<br />
The <strong>Adept</strong> SmartController CX supports an integrated vision option and a conveyor<br />
tracking option, as well as other options. It offers scalability and support for IEEE<br />
1394-based digital I/O and general motion expansion modules. The IEEE 1394 interface is<br />
the backbone of the <strong>Adept</strong> SmartServo distributed-servo network, which supports <strong>Adept</strong><br />
products. The controller is commonly programmed through its Fast Ethernet port, which<br />
can be on a distributed network or directly connected to a PC for programming.<br />
*S/N 3562-XXXXX*<br />
CAMERA<br />
RS-232/TERM<br />
RS-422/485<br />
OK HPE LAN<br />
SF ES HD<br />
1 2 3<br />
SmartServo<br />
IEEE-1394<br />
SW1 1.1 1.2 2.1 2.2<br />
1 2 3 4<br />
ON<br />
OFF<br />
XDIO<br />
XUSR<br />
Device Net<br />
Eth 10/100<br />
XSYS<br />
BELT ENCODER<br />
XFP<br />
RS-232-1<br />
XMCP<br />
RS-232-2<br />
XDC1 XDC2<br />
SmartController CX<br />
24V<br />
5A<br />
-+ -+<br />
Figure 1-10. <strong>Adept</strong> SmartController CX<br />
Refer to <strong>Adept</strong> SmartController User’s Guide for SmartController specifications.<br />
1.2 Installation Overview<br />
The system installation process is summarized in the following table. Refer also to the<br />
system cable diagram in Figure 4-1 on page 51.<br />
Table 1-1. Installation Overview<br />
Task to be Performed<br />
Reference Location<br />
1. Mount the robot to a level, stable mounting frame. Section 3.6 on page 40.<br />
2. Attach the robot outer arms and platform. Section 3.7 on page 45.<br />
3. Install the SmartController, Front Panel, Pendant (if<br />
purchased), and <strong>Adept</strong>Windows user interface.<br />
4. Install the IEEE 1394 and XSYS cables between<br />
the robot and SmartController.<br />
Section 4.3 on page 52.<br />
Section 4.5 on page 54.<br />
20 <strong>Adept</strong> <strong>Quattro</strong> <strong>s650H</strong> <strong>Robot</strong> User’s Guide, Rev A