Adept Quattro s650H Robot
Adept Quattro s650H Robot User's Guide - Asimo.pl
Adept Quattro s650H Robot User's Guide - Asimo.pl
- No tags were found...

Create successful ePaper yourself
Turn your PDF publications into a flip-book with our unique Google optimized e-Paper software.
Chapter 3 - <strong>Robot</strong> Installation<br />
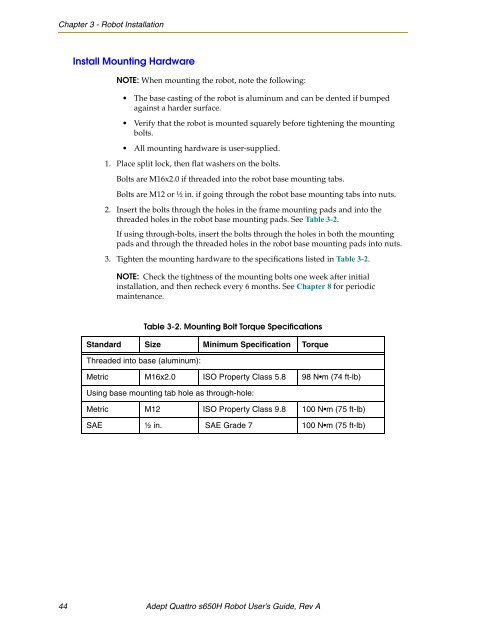
Install Mounting Hardware<br />
NOTE: When mounting the robot, note the following:<br />
• The base casting of the robot is aluminum and can be dented if bumped<br />
against a harder surface.<br />
• Verify that the robot is mounted squarely before tightening the mounting<br />
bolts.<br />
• All mounting hardware is user-supplied.<br />
1. Place split lock, then flat washers on the bolts.<br />
Bolts are M16x2.0 if threaded into the robot base mounting tabs.<br />
Bolts are M12 or ½ in. if going through the robot base mounting tabs into nuts.<br />
2. Insert the bolts through the holes in the frame mounting pads and into the<br />
threaded holes in the robot base mounting pads. See Table 3-2.<br />
If using through-bolts, insert the bolts through the holes in both the mounting<br />
pads and through the threaded holes in the robot base mounting pads into nuts.<br />
3. Tighten the mounting hardware to the specifications listed in Table 3-2.<br />
NOTE: Check the tightness of the mounting bolts one week after initial<br />
installation, and then recheck every 6 months. See Chapter 8 for periodic<br />
maintenance.<br />
Table 3-2. Mounting Bolt Torque Specifications<br />
Standard Size Minimum Specification Torque<br />
Threaded into base (aluminum):<br />
Metric M16x2.0 ISO Property Class 5.8 98 N•m (74 ft-lb)<br />
Using base mounting tab hole as through-hole:<br />
Metric M12 ISO Property Class 9.8 100 N•m (75 ft-lb)<br />
SAE ½ in. SAE Grade 7 100 N•m (75 ft-lb)<br />
44 <strong>Adept</strong> <strong>Quattro</strong> <strong>s650H</strong> <strong>Robot</strong> User’s Guide, Rev A