Adept Quattro s650H Robot
Adept Quattro s650H Robot User's Guide - Asimo.pl
Adept Quattro s650H Robot User's Guide - Asimo.pl
- No tags were found...

You also want an ePaper? Increase the reach of your titles
YUMPU automatically turns print PDFs into web optimized ePapers that Google loves.
Chapter 3 - <strong>Robot</strong> Installation<br />
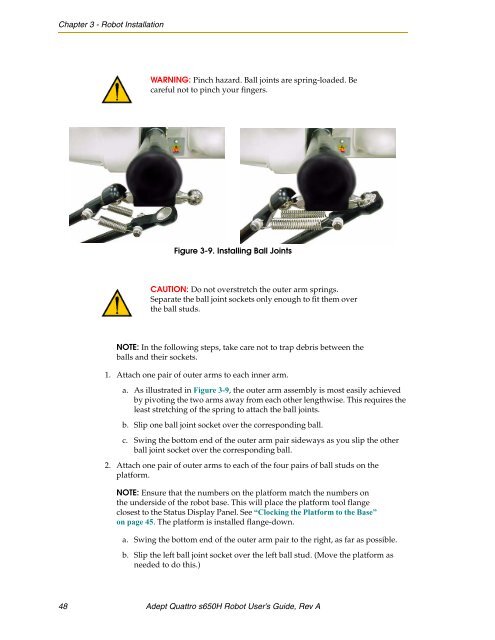
WARNING: Pinch hazard. Ball joints are spring-loaded. Be<br />
careful not to pinch your fingers.<br />
Figure 3-9. Installing Ball Joints<br />
CAUTION: Do not overstretch the outer arm springs.<br />
Separate the ball joint sockets only enough to fit them over<br />
the ball studs.<br />
NOTE: In the following steps, take care not to trap debris between the<br />
balls and their sockets.<br />
1. Attach one pair of outer arms to each inner arm.<br />
a. As illustrated in Figure 3-9, the outer arm assembly is most easily achieved<br />
by pivoting the two arms away from each other lengthwise. This requires the<br />
least stretching of the spring to attach the ball joints.<br />
b. Slip one ball joint socket over the corresponding ball.<br />
c. Swing the bottom end of the outer arm pair sideways as you slip the other<br />
ball joint socket over the corresponding ball.<br />
2. Attach one pair of outer arms to each of the four pairs of ball studs on the<br />
platform.<br />
NOTE: Ensure that the numbers on the platform match the numbers on<br />
the underside of the robot base. This will place the platform tool flange<br />
closest to the Status Display Panel. See “Clocking the Platform to the Base”<br />
on page 45. The platform is installed flange-down.<br />
a. Swing the bottom end of the outer arm pair to the right, as far as possible.<br />
b. Slip the left ball joint socket over the left ball stud. (Move the platform as<br />
needed to do this.)<br />
48 <strong>Adept</strong> <strong>Quattro</strong> <strong>s650H</strong> <strong>Robot</strong> User’s Guide, Rev A