- Page 1 and 2:
6RXUFH ,QWHJULW\ (QWHUSULVH (GLWLRQ
- Page 3 and 4:
Table of Contents Chapters 1 Welcom
- Page 5 and 6:
Table of Contents Working With Subp
- Page 7 and 8:
Table of Contents Controlling Sandb
- Page 9 and 10:
Table of Contents Appendixes A View
- Page 11 and 12:
Welcome to Source Integrity Enterpr
- Page 13 and 14:
About This Guide Chapter 9: “Vie
- Page 15 and 16:
Related Documentation PDF files are
- Page 17 and 18:
Assumptions Items in documentation
- Page 19 and 20:
Professional Services The hours of
- Page 21 and 22:
Where To Go From Here To Do This
- Page 23 and 24:
Understanding Source Integrity 2 KE
- Page 25 and 26:
File and Object Histories File and
- Page 27 and 28:
What Is a Project Member? What Is a
- Page 29 and 30:
Project Checkpointing The member h
- Page 31 and 32:
Working With Variants and Developme
- Page 33 and 34:
Getting Started Using Source Integr
- Page 35 and 36:
NOTE Installing the Integrity Clien
- Page 37 and 38:
NOTE Installing the Integrity Clien
- Page 39 and 40:
Configuring Environment Variables f
- Page 41 and 42:
Understanding Access Control Lists
- Page 43 and 44:
Before You Start the Integrity Clie
- Page 45 and 46:
IMPORTANT Starting the Source Integ
- Page 47 and 48:
NOTE Logging In to Source Integrity
- Page 49 and 50:
7 To accept the log in information,
- Page 51 and 52:
General Preferences Setting Prefere
- Page 53 and 54:
Connection Preferences Setting Pref
- Page 55 and 56:
To configure proxy preferences in t
- Page 57 and 58:
TIP Setting Preferences Select the
- Page 59 and 60:
Command Options Modify options for
- Page 61 and 62:
Command Options Apply Change Packag
- Page 63 and 64:
Command Options Setting Preferences
- Page 65 and 66:
Command Options Import Members Auth
- Page 67 and 68:
Command Options Setting Preferences
- Page 69 and 70:
Command Options Resynchronize Chang
- Page 71 and 72:
View Preferences Setting Preference
- Page 73 and 74:
View Options Setting Preferences Ch
- Page 75 and 76:
View Options Setting Preferences Lo
- Page 77 and 78:
View Options Setting Preferences Sa
- Page 79 and 80:
Difference Tool Preferences Setting
- Page 81 and 82:
For complete information on using t
- Page 83 and 84:
Closing the Client 3 Do one of the
- Page 85 and 86:
Source Integrity Interfaces 4 KEY T
- Page 87 and 88:
Toolbar Source Integrity Graphical
- Page 89 and 90:
Quick Access Keys Source Integrity
- Page 91 and 92:
To add a column in the graphical us
- Page 93 and 94:
Source Integrity Graphical User Int
- Page 95 and 96:
To select the icon file, do one of
- Page 97 and 98:
Source Integrity Graphical User Int
- Page 99 and 100:
Source Integrity Graphical User Int
- Page 101 and 102:
Source Integrity Graphical User Int
- Page 103 and 104:
Window Type Opened Associated Envir
- Page 105 and 106:
Application Window Source Integrity
- Page 107 and 108:
Using Filters Source Integrity Web
- Page 109 and 110:
Command Prompts Member Name Argumen
- Page 111 and 112:
Application Window MKS Visual Diffe
- Page 113 and 114:
View Panes MKS Visual Difference In
- Page 115 and 116:
Preferences MKS Visual Difference I
- Page 117 and 118:
MKS Visual Merge Interface 3 To cha
- Page 119 and 120:
Title Bar MKS Visual Merge Interfac
- Page 121 and 122:
Preferences Scrolling in the view p
- Page 123 and 124:
MKS Visual Merge Interface 3 To cha
- Page 125 and 126:
Project and Sandbox Operations KEY
- Page 127 and 128:
Importing a Project Working With Pr
- Page 129 and 130:
Dropping a Project IMPORTANT Workin
- Page 131 and 132:
Opening or Viewing a Project Workin
- Page 133 and 134:
TIP Working With Projects You can a
- Page 135 and 136:
Adding a Subproject 4 Click OK. Wor
- Page 137 and 138:
Adding a Shared Subproject Working
- Page 139 and 140:
Working With Subprojects 3 In the P
- Page 141 and 142:
Configuring a Subproject Working Wi
- Page 143 and 144:
Dropping a Subproject Working With
- Page 145 and 146:
Working With Sandboxes Creating a S
- Page 147 and 148:
Working With Sandboxes Make Sandbo
- Page 149 and 150:
Sharing Sandboxes NOTE The master p
- Page 151 and 152:
Working With Sandboxes must have r
- Page 153 and 154:
Dropping a Sandbox 3 To finish and
- Page 155 and 156:
Viewing Which Sandbox Locked a Memb
- Page 157 and 158:
Working With Sandboxes Preventing C
- Page 159 and 160:
Removing a Development Path Working
- Page 161 and 162:
Working With Sandboxes merge a mem
- Page 163 and 164:
Member Operations 6 KEY TERMS: memb
- Page 165 and 166:
Managing Project Members The Non-Me
- Page 167 and 168:
Adding Members to a Project NOTE Ma
- Page 169 and 170:
2 Do one of the following: Select
- Page 171 and 172:
Managing Project Members In the Re
- Page 173 and 174:
To add members in the Web interface
- Page 175 and 176:
Managing Project Members Confirm c
- Page 177 and 178:
Managing Project Members 3 Members
- Page 179 and 180:
Importing Members Managing Project
- Page 181 and 182:
Managing Project Members 6 To add t
- Page 183 and 184:
NOTE Managing Project Members You c
- Page 185 and 186:
Managing Project Members 3 Choose t
- Page 187 and 188:
Performing Member Operations Chang
- Page 189 and 190:
To check out a member in the graphi
- Page 191 and 192:
Performing Member Operations 3 Clic
- Page 193 and 194:
Check Out Dialog Box Tab Revision t
- Page 195 and 196:
Performing Member Operations Change
- Page 197 and 198:
Performing Member Operations You ca
- Page 199 and 200:
NOTE Performing Member Operations T
- Page 201 and 202:
NOTE Performing Member Operations T
- Page 203 and 204:
Check In Dialog Box Options Perform
- Page 205 and 206:
2 Select Member > Rename. Performin
- Page 207 and 208:
Resyncing Members Performing Member
- Page 209 and 210:
Performing Member Operations If you
- Page 211 and 212:
You can apply the defer option to t
- Page 213 and 214:
Cancelling Deferred Operations Resy
- Page 215 and 216:
Resyncing Pending Revisions Compari
- Page 217 and 218:
Using Keywords Using Keywords A key
- Page 219 and 220:
Using Keywords graphical user inter
- Page 221 and 222:
à Using Keywords $Log$ The revisio
- Page 223 and 224: Using Change Packages and Reviews 7
- Page 225 and 226: Operations That Add Entries to a Ch
- Page 227 and 228: Creating a Change Package 4 As part
- Page 229 and 230: 4 Click OK. Adding Entries to a Cha
- Page 231 and 232: Managing Change Packages To manage
- Page 233 and 234: Managing Change Packages If you wan
- Page 235 and 236: 4 Enter one of the following into t
- Page 237 and 238: Do one of the following: Managing C
- Page 239 and 240: Managing Change Packages View the
- Page 241 and 242: Managing Change Packages To view a
- Page 243 and 244: Editing a Change Package Managing C
- Page 245 and 246: Closing a Change Package The Edit C
- Page 247 and 248: TIP Managing Change Packages If onl
- Page 249 and 250: To submit change package in the gra
- Page 251 and 252: CP States Change Package Review Pro
- Page 253 and 254: Change Package Review Process accep
- Page 255 and 256: Reviewing Changes Accepting a Chang
- Page 257 and 258: Rejecting a Change Package Change P
- Page 259 and 260: Opening Change Packages CP Review N
- Page 261 and 262: The Review Log panel appears. Viewi
- Page 263 and 264: Managing Change Package Entries 3 F
- Page 265 and 266: Viewing CP Entry Member Differences
- Page 267 and 268: Viewing and Editing Projects, Sandb
- Page 269 and 270: The General tab displays the follow
- Page 271 and 272: 7 To accept any changes you have ma
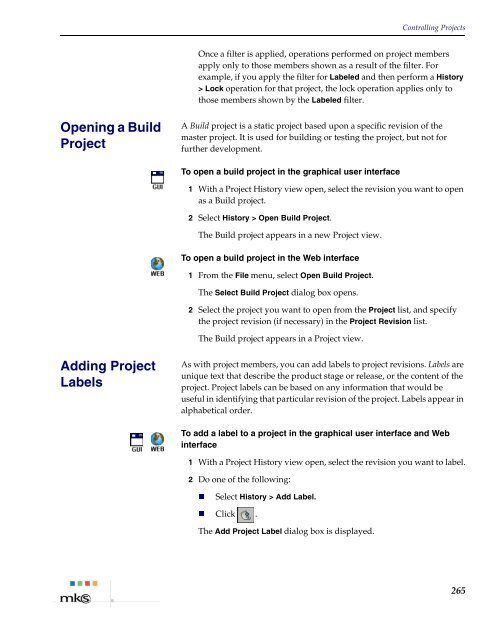
- Page 273: Viewing a Project History TIP Contr
- Page 277 and 278: Promoting a Project TIP Controlling
- Page 279 and 280: Checkpointing a Project TIP Control
- Page 281 and 282: Restoring a Project NOTE Controllin
- Page 283 and 284: Controlling Projects By default, So
- Page 285 and 286: Viewing Project Differences Control
- Page 287 and 288: 4 With the required versions select
- Page 289 and 290: Controlling Projects Viewing Differ
- Page 291 and 292: Viewing Project Attributes From a S
- Page 293 and 294: Taking Sandbox Snapshots 3 In the V
- Page 295 and 296: Controlling Sandboxes 4 Create a de
- Page 297 and 298: Controlling Members State is a one
- Page 299 and 300: NOTE Controlling Members As part of
- Page 301 and 302: NOTE The variable cannot include th
- Page 303 and 304: Updating a Member’s Revision Cont
- Page 305 and 306: Controlling Members Member Branch
- Page 307 and 308: Adding Labels to Members Controllin
- Page 309 and 310: Promoting Members Controlling Membe
- Page 311 and 312: Freezing Members Controlling Member
- Page 313 and 314: Generating Reports About the Report
- Page 315 and 316: Changes Grouped by Author (Summary)
- Page 317 and 318: Creating a Report Project Member Hi
- Page 319 and 320: Viewing and Editing Member Historie
- Page 321 and 322: NOTE Viewing a Member History If th
- Page 323 and 324: Viewing and Editing Archive Informa
- Page 325 and 326:
Viewing and Editing Revision Inform
- Page 327 and 328:
NOTE Viewing an Annotated Revision
- Page 329 and 330:
TIP Viewing and Editing Revision La
- Page 331 and 332:
Deleting Revision Labels TIP Viewin
- Page 333 and 334:
2 Do one of the following: Select
- Page 335 and 336:
Locking Revisions To lock a revisio
- Page 337 and 338:
Locking Multiple Revisions Locking
- Page 339 and 340:
Managing Revision Locks Member Nam
- Page 341 and 342:
Deleting Revisions Comparing Revisi
- Page 343 and 344:
Comparing Revisions Both revisions
- Page 345 and 346:
Working With Pending Revisions Work
- Page 347 and 348:
Branching and Merging Revisions KEY
- Page 349 and 350:
Branching Revisions 3 Click the des
- Page 351 and 352:
Making Locked Members Writable To m
- Page 353 and 354:
Merging Branched Revisions Merging
- Page 355 and 356:
Merging Branched Revisions 6 To che
- Page 357 and 358:
Merging Branched Revisions Cancel
- Page 359 and 360:
Merging Branched Revisions 4 Specif
- Page 361 and 362:
Merging Branched Revisions 3 Under
- Page 363 and 364:
Merging Revisions 2 Do one of the f
- Page 365 and 366:
4 Click OK to continue. Merging Rev
- Page 367 and 368:
5 Complete the required changes by
- Page 369 and 370:
Editing Merge Results Merging Revis
- Page 371 and 372:
Working With MKS Visual Merge Mergi
- Page 373 and 374:
Merging Revisions 2 Save the merge
- Page 375 and 376:
Merging Revisions 2 Enter the file
- Page 377 and 378:
Resolving Merges How would you lik
- Page 379 and 380:
Resolving Merges 5 Enter the file n
- Page 381 and 382:
The Integrity Manager Integration K
- Page 383 and 384:
How the Integration Works Only iss
- Page 385 and 386:
Creating a Change Package for an Is
- Page 387 and 388:
Viewing a Change Package’s Issue
- Page 389 and 390:
Finding Change Packages Using a Que
- Page 391 and 392:
Advanced Change Package Operations
- Page 393 and 394:
Change Package Commands Change Pack
- Page 395 and 396:
Change Package Feature Overview man
- Page 397 and 398:
Apply that resolution change packag
- Page 399 and 400:
How Apply CP Works Using the Apply
- Page 401 and 402:
Apply CP Backfill List main.c Auror
- Page 403 and 404:
main.c Aurora_Project 1.3 CP 22:1 U
- Page 405 and 406:
Backfill Option (GUI) Back Revision
- Page 407 and 408:
CP 21:1 CP 22:1 CP 23:1 Aurora_Proj
- Page 409 and 410:
3 To add change packages to the App
- Page 411 and 412:
Tab Table Columns Change Package En
- Page 413 and 414:
Apply CP General Command Option Usi
- Page 415 and 416:
Using the Apply CP Command 11 To ac
- Page 417 and 418:
Key Resync CP Concepts NOTE Using t
- Page 419 and 420:
Resync CP Backfill List Using the R
- Page 421 and 422:
Using the Resync CP Command To pick
- Page 423 and 424:
Working on a Variant Resync CP Back
- Page 425 and 426:
utility.c Master Project 1.4 utilit
- Page 427 and 428:
Archive for patch.c Using the Resyn
- Page 429 and 430:
3 To add change packages to the App
- Page 431 and 432:
Tab Table Columns Using the Resync
- Page 433 and 434:
Resync CP General Command Options U
- Page 435 and 436:
Resync CP Advanced Command Options
- Page 437 and 438:
Using the Resync CP Command Under t
- Page 439 and 440:
Working With a Resolution CP when a
- Page 441 and 442:
How Resolution CPs Work Working Wit
- Page 443 and 444:
Working With a Resolution CP Submi
- Page 445 and 446:
Working With a Resolution CP 4 Sele
- Page 447 and 448:
Using the Resync By CP Command Whil
- Page 449 and 450:
Sandbox - Developer 1 main.c 1.1 CP
- Page 451 and 452:
$ 3 3 ( 1 ' , ; Views Annotated Rev
- Page 453 and 454:
Change Package View Change Package
- Page 455 and 456:
Graphical History View (GUI) Graphi
- Page 457 and 458:
Graphical History View (GUI) Select
- Page 459 and 460:
Graphical History View (GUI) A chec
- Page 461 and 462:
Member History View Member History
- Page 463 and 464:
Member History View The Member Hist
- Page 465 and 466:
Non-Members View Non-Members View
- Page 467 and 468:
Project View Project Views (GUI) TI
- Page 469 and 470:
Project View Locked displays a mem
- Page 471 and 472:
Project History View For informatio
- Page 473 and 474:
Project Differences View The View P
- Page 475 and 476:
Registered Projects View The Genera
- Page 477 and 478:
Registered Sandboxes View Registere
- Page 479 and 480:
Sandbox View Sandbox View For infor
- Page 481 and 482:
Sandbox Information View Sandbox In
- Page 483 and 484:
$ 3 3 ( 1 ' , ; Glossary of Terms B
- Page 485 and 486:
Glossary of Terms command line inte
- Page 487 and 488:
Glossary of Terms pending operation
- Page 489 and 490:
Glossary of Terms shared sandbox So
- Page 491 and 492:
Index A access control list describ
- Page 493 and 494:
configuration management 14 configu
- Page 495 and 496:
graphical history view 445 member h
- Page 497 and 498:
editing in Visual Merge 363 reverti
- Page 499 and 500:
merge results in Visual Difference
- Page 501 and 502:
Visual Difference 100 editing merge


