- Page 1 and 2:
ED [DCS USER MANUAL] DCS USER MANUA
- Page 3 and 4:
ED [DCS USER MANUAL] Place Airplane
- Page 5 and 6:
ED [DCS USER MANUAL] Dedicated to o
- Page 7 and 8:
ED [DCS USER MANUAL] INSTANT ACTION
- Page 9 and 10:
ED [DCS USER MANUAL] LOGBOOK From t
- Page 11 and 12:
ED [DCS USER MANUAL] NAME. When
- Page 13 and 14:
ED [DCS USER MANUAL] OPTIONS 12 DCS
- Page 15 and 16:
ED [DCS USER MANUAL] System Options
- Page 17 and 18:
ED [DCS USER MANUAL] RESOLUTION. Se
- Page 19 and 20:
ED [DCS USER MANUAL] Controls Setti
- Page 21 and 22: ED [DCS USER MANUAL] Save Input Pro
- Page 23 and 24: ED [DCS USER MANUAL] From the ADD S
- Page 25 and 26: ED [DCS USER MANUAL] Input conflict
- Page 27 and 28: ED [DCS USER MANUAL] User Curve sca
- Page 29 and 30: ED [DCS USER MANUAL] Game Avi
- Page 31 and 32: ED [DCS USER MANUAL] Cursor coordin
- Page 33 and 34: ED [DCS USER MANUAL] G-Effect.
- Page 35 and 36: ED [DCS USER MANUAL] Below the slid
- Page 37 and 38: ED [DCS USER MANUAL] Central Posit
- Page 39 and 40: ED [DCS USER MANUAL] TRAINING 38 DC
- Page 41 and 42: ED [DCS USER MANUAL] Aircraft Tabs
- Page 43 and 44: ED [DCS USER MANUAL] MISSION Using
- Page 45 and 46: ED [DCS USER MANUAL] Mission Detail
- Page 47 and 48: ED [DCS USER MANUAL] REPLAY 46 DCS
- Page 49 and 50: ED [DCS USER MANUAL] Briefing Brows
- Page 51 and 52: ED [DCS USER MANUAL] CREATE FAST MI
- Page 53 and 54: ED [DCS USER MANUAL] Hard. The mis
- Page 55 and 56: ED [DCS USER MANUAL] Random. Rando
- Page 57 and 58: ED [DCS USER MANUAL] MISSION EDITOR
- Page 59 and 60: ED [DCS USER MANUAL] Navigating the
- Page 61 and 62: ED [DCS USER MANUAL] At the bottom
- Page 63 and 64: ED [DCS USER MANUAL] EXIT. Pressing
- Page 65 and 66: ED [DCS USER MANUAL] Once a Track f
- Page 67 and 68: ED [DCS USER MANUAL] ALL. All unit
- Page 69 and 70: ED [DCS USER MANUAL] Second class a
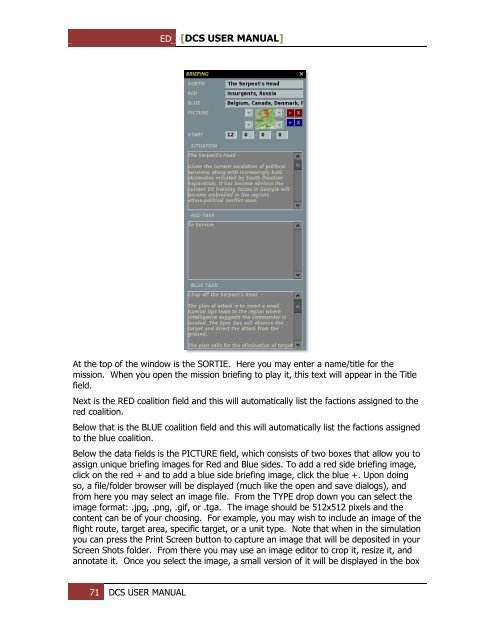
- Page 71: ED [DCS USER MANUAL] The below sect
- Page 75 and 76: ED [DCS USER MANUAL] THICKNESS.
- Page 77 and 78: ED [DCS USER MANUAL] Using the dyna
- Page 79 and 80: ED [DCS USER MANUAL] Upon selecting
- Page 81 and 82: ED [DCS USER MANUAL] use this optio
- Page 83 and 84: ED [DCS USER MANUAL] withi
- Page 85 and 86: ED [DCS USER MANUAL] UNIT A
- Page 87 and 88: ED [DCS USER MANUAL] Trigger Action
- Page 89 and 90: ED [DCS USER MANUAL] you can
- Page 91 and 92: ED [DCS USER MANUAL] The cockpit tr
- Page 93 and 94: ED [DCS USER MANUAL] Value - sets
- Page 95 and 96: ED [DCS USER MANUAL] COCKPIT PARAM
- Page 97 and 98: ED [DCS USER MANUAL] Flag - set
- Page 99 and 100: ED [DCS USER MANUAL] To set the act
- Page 101 and 102: ED [DCS USER MANUAL] For the action
- Page 103 and 104: ED [DCS USER MANUAL] To set the act
- Page 105 and 106: ED [DCS USER MANUAL] DELETE button.
- Page 107 and 108: ED [DCS USER MANUAL] Task Planning
- Page 109 and 110: ED [DCS USER MANUAL] Numerous Enrou
- Page 111 and 112: ED [DCS USER MANUAL] Example 1 User
- Page 113 and 114: ED [DCS USER MANUAL] Example 3 User
- Page 115 and 116: ED [DCS USER MANUAL] Example 5 User
- Page 117 and 118: ED [DCS USER MANUAL] Example 6 User
- Page 119 and 120: ED [DCS USER MANUAL] To correct
- Page 121 and 122: ED [DCS USER MANUAL] NAME. In the N
- Page 123 and 124:
ED [DCS USER MANUAL] buttons. The l
- Page 125 and 126:
ED [DCS USER MANUAL] Russia NATO Un
- Page 127 and 128:
ED [DCS USER MANUAL] NAME. For each
- Page 129 and 130:
ED [DCS USER MANUAL] Payload mode T
- Page 131 and 132:
ED [DCS USER MANUAL] FUEL (sl
- Page 133 and 134:
ED [DCS USER MANUAL] The INU Fix Po
- Page 135 and 136:
ED [DCS USER MANUAL] within the nex
- Page 137 and 138:
ED [DCS USER MANUAL] Scale Modes SC
- Page 139 and 140:
ED [DCS USER MANUAL] Advanced Actio
- Page 141 and 142:
ED [DCS USER MANUAL] Example of act
- Page 143 and 144:
ED [DCS USER MANUAL] Triggered Acti
- Page 145 and 146:
ED [DCS USER MANUAL] All of the sta
- Page 147 and 148:
ED [DCS USER MANUAL] The LAST WP fu
- Page 149 and 150:
ED [DCS USER MANUAL] search for the
- Page 151 and 152:
ED [DCS USER MANUAL]
- Page 153 and 154:
ED [DCS USER MANUAL] Attack Map Obj
- Page 155 and 156:
ED [DCS USER MANUAL] Bombing Runway
- Page 157 and 158:
ED [DCS USER MANUAL] Race-Track pat
- Page 159 and 160:
ED [DCS USER MANUAL] Refueling Set
- Page 161 and 162:
ED [DCS USER MANUAL] Escort Air gro
- Page 163 and 164:
ED [DCS USER MANUAL] The following
- Page 165 and 166:
ED [DCS USER MANUAL] 3. CAS and AFA
- Page 167 and 168:
ED [DCS USER MANUAL] Like the Searc
- Page 169 and 170:
ED [DCS USER MANUAL] PRIORITY. This
- Page 171 and 172:
ED [DCS USER MANUAL] Run the Lua sc
- Page 173 and 174:
ED [DCS USER MANUAL] Invisible Set
- Page 175 and 176:
ED [DCS USER MANUAL] Reaction to Th
- Page 177 and 178:
ED [DCS USER MANUAL] Never use - do
- Page 179 and 180:
ED [DCS USER MANUAL] Ground crew su
- Page 181 and 182:
ED [DCS USER MANUAL] NAME. In the N
- Page 183 and 184:
ED [DCS USER MANUAL] Cargo (commerc
- Page 185 and 186:
ED [DCS USER MANUAL] START TIME. Th
- Page 187 and 188:
ED [DCS USER MANUAL] Enroute Tasks
- Page 189 and 190:
ED [DCS USER MANUAL] NAME. In the N
- Page 191 and 192:
ED [DCS USER MANUAL] Engineers Self
- Page 193 and 194:
ED [DCS USER MANUAL] Below the Moda
- Page 195 and 196:
ED [DCS USER MANUAL] many barrels p
- Page 197 and 198:
ED [DCS USER MANUAL] Note: The FAC:
- Page 199 and 200:
ED [DCS USER MANUAL] Set Frequency
- Page 201 and 202:
ED [DCS USER MANUAL] Place Static O
- Page 203 and 204:
ED [DCS USER MANUAL] Place Initial
- Page 205 and 206:
ED [DCS USER MANUAL] Create Area Tr
- Page 207 and 208:
ED [DCS USER MANUAL] Create Unit Te
- Page 209 and 210:
ED [DCS USER MANUAL] Area Trigger Z
- Page 211 and 212:
ED [DCS USER MANUAL] Unit List The
- Page 213 and 214:
ED [DCS USER MANUAL] View Debriefin
- Page 215 and 216:
ED [DCS USER MANUAL] CAMPAIGN 214 D
- Page 217 and 218:
ED [DCS USER MANUAL] Select Campaig
- Page 219 and 220:
ED [DCS USER MANUAL] CAMPAIGN BUILD
- Page 221 and 222:
ED [DCS USER MANUAL] The assigned v
- Page 223 and 224:
ED [DCS USER MANUAL] ENCYCLOPEDIA T
- Page 225 and 226:
ED [DCS USER MANUAL] EXIT Exit by p
- Page 227 and 228:
ED [DCS USER MANUAL] MULTIPLAYER AT
- Page 229 and 230:
ED [DCS USER MANUAL] After completi
- Page 231 and 232:
ED [DCS USER MANUAL] New Server For
- Page 233 and 234:
ED [DCS USER MANUAL] The Options sc
- Page 235 and 236:
ED [DCS USER MANUAL] other mission
- Page 237 and 238:
ED [DCS USER MANUAL] Units. Numb
- Page 239 and 240:
ED [DCS USER MANUAL] In Mission Com