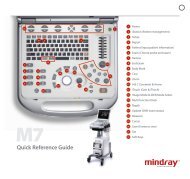
Datascope - Mindray
Datascope - Mindray
Datascope - Mindray

You also want an ePaper? Increase the reach of your titles
YUMPU automatically turns print PDFs into web optimized ePapers that Google loves.
Installation Guide Installation Checkout Procedure<br />
15. Oxygen Sensor Calibration<br />
NOTE: Oxygen Sensor Calibration can be performed in all<br />
ventilation modes.<br />
NOTE: See ‘‘Periodic Maintenance Schedule of Service Activities’’<br />
on page 6-2 for when to calibrate the oxygen sensor.<br />
a. Allow the breathing system to warm up and reach thermal equilibrium<br />
(approximately 30-60 minutes).<br />
b. Press the MENU key and then use the Navigator Knob to scroll to the<br />
Calibrate menu tab (see FIGURE 2-13). Select the Start Calibration button.<br />
FIGURE 2-13 Calibrate Menu Tab<br />
c. After the Start Calibration button has been selected, the screen shown in<br />
FIGURE 2-14 or FIGURE 2-16will be displayed, instructing the user to remove the<br />
oxygen sensor from the Breathing System and expose it to room air for at least 3<br />
minutes before proceeding. The O 2 sensor voltage is displayed during the<br />
calibration. This is the amplified O 2 cell voltage at the A/D converter for the oxygen<br />
sensor.<br />
NOTE: The O 2 sensor voltage is not displayed for UI versions 2.24<br />
and lower.<br />
d. Flush the O 2 sensor with air from the auxiliary output for 5-10 seconds to ensure that<br />
no O 2 bubbles are trapped in the sensor.<br />
NOTE: Do not shake the O 2 sensor during calibration.<br />
NOTE: Keep the O 2 sensor in a vertical position, connector side up,<br />
during calibration.<br />
NOTE: Place the O 2 sensor on top of the heated block during<br />
calibration to minimize the temperature difference from<br />
within the heated block.<br />
AS3000 Service Manual 0070-10-0683 2 - 17