Datascope - Mindray
Datascope - Mindray
Datascope - Mindray

You also want an ePaper? Increase the reach of your titles
YUMPU automatically turns print PDFs into web optimized ePapers that Google loves.
Installation Guide Installation Checkout Procedure<br />
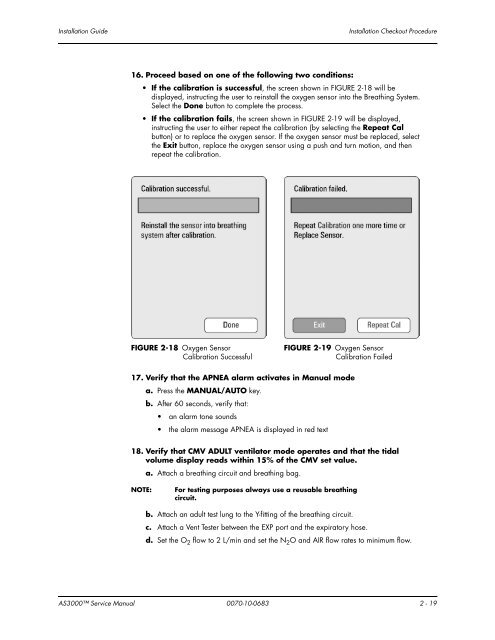
16. Proceed based on one of the following two conditions:<br />
If the calibration is successful, the screen shown in FIGURE 2-18 will be<br />
displayed, instructing the user to reinstall the oxygen sensor into the Breathing System.<br />
Select the Done button to complete the process.<br />
If the calibration fails, the screen shown in FIGURE 2-19 will be displayed,<br />
instructing the user to either repeat the calibration (by selecting the Repeat Cal<br />
button) or to replace the oxygen sensor. If the oxygen sensor must be replaced, select<br />
the Exit button, replace the oxygen sensor using a push and turn motion, and then<br />
repeat the calibration.<br />
FIGURE 2-18 Oxygen Sensor<br />
Calibration Successful<br />
17. Verify that the APNEA alarm activates in Manual mode<br />
a. Press the MANUAL/AUTO key.<br />
b. After 60 seconds, verify that:<br />
an alarm tone sounds<br />
the alarm message APNEA is displayed in red text<br />
FIGURE 2-19 Oxygen Sensor<br />
Calibration Failed<br />
18. Verify that CMV ADULT ventilator mode operates and that the tidal<br />
volume display reads within 15% of the CMV set value.<br />
a. Attach a breathing circuit and breathing bag.<br />
NOTE: For testing purposes always use a reusable breathing<br />
circuit.<br />
b. Attach an adult test lung to the Y-fitting of the breathing circuit.<br />
c. Attach a Vent Tester between the EXP port and the expiratory hose.<br />
d. Set the O2 flow to 2 L/min and set the N2O and AIR flow rates to minimum flow.<br />
AS3000 Service Manual 0070-10-0683 2 - 19