Getting Started

You also want an ePaper? Increase the reach of your titles
YUMPU automatically turns print PDFs into web optimized ePapers that Google loves.
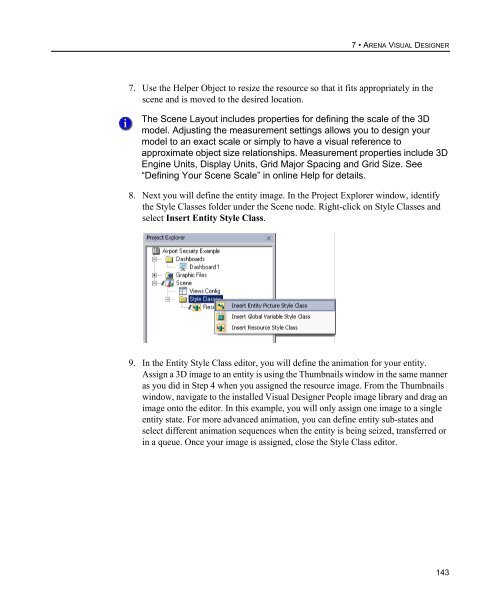
7 • ARENA VISUAL DESIGNER<br />
7. Use the Helper Object to resize the resource so that it fits appropriately in the<br />
scene and is moved to the desired location.<br />
The Scene Layout includes properties for defining the scale of the 3D<br />
model. Adjusting the measurement settings allows you to design your<br />
model to an exact scale or simply to have a visual reference to<br />
approximate object size relationships. Measurement properties include 3D<br />
Engine Units, Display Units, Grid Major Spacing and Grid Size. See<br />
“Defining Your Scene Scale” in online Help for details.<br />
8. Next you will define the entity image. In the Project Explorer window, identify<br />
the Style Classes folder under the Scene node. Right-click on Style Classes and<br />
select Insert Entity Style Class.<br />
9. In the Entity Style Class editor, you will define the animation for your entity.<br />
Assign a 3D image to an entity is using the Thumbnails window in the same manner<br />
as you did in Step 4 when you assigned the resource image. From the Thumbnails<br />
window, navigate to the installed Visual Designer People image library and drag an<br />
image onto the editor. In this example, you will only assign one image to a single<br />
entity state. For more advanced animation, you can define entity sub-states and<br />
select different animation sequences when the entity is being seized, transferred or<br />
in a queue. Once your image is assigned, close the Style Class editor.<br />
143