
Create successful ePaper yourself
Turn your PDF publications into a flip-book with our unique Google optimized e-Paper software.
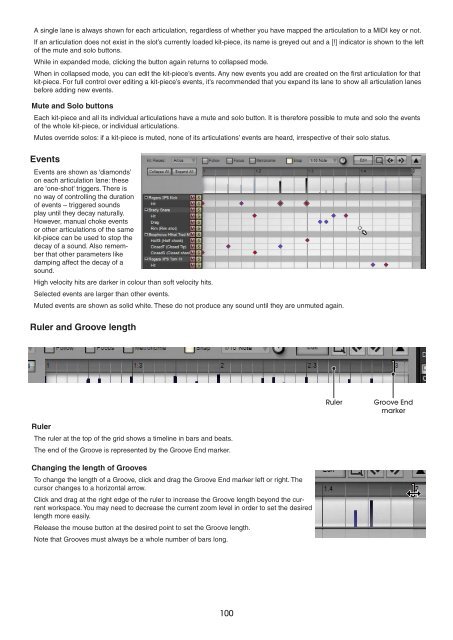
A single lane is always shown for each articulation, regardless of whether you have mapped the articulation to a MIDI key or not.<br />
If an articulation does not exist in the slot’s currently loaded kit-piece, its name is greyed out and a [!] indicator is shown to the left<br />
of the mute and solo buttons.<br />
While in expanded mode, clicking the button again returns to collapsed mode.<br />
When in collapsed mode, you can edit the kit-piece’s events. Any new events you add are created on the first articulation for that<br />
kit-piece. For full control over editing a kit-piece’s events, it’s recommended that you expand its lane to show all articulation lanes<br />
before adding new events.<br />
Mute and Solo buttons<br />
Each kit-piece and all its individual articulations have a mute and solo button. It is therefore possible to mute and solo the events<br />
of the whole kit-piece, or individual articulations.<br />
Mutes override solos: if a kit-piece is muted, none of its articulations’ events are heard, irrespective of their solo status.<br />
Events<br />
Events are shown as ‘diamonds’<br />
on each articulation lane: these<br />
are ‘one-shot’ triggers. There is<br />
no way of controlling the duration<br />
of events – triggered sounds<br />
play until they decay naturally.<br />
However, manual choke events<br />
or other articulations of the same<br />
kit-piece can be used to stop the<br />
decay of a sound. Also remember<br />
that other parameters like<br />
damping affect the decay of a<br />
sound.<br />
High velocity hits are darker in colour than soft velocity hits.<br />
Selected events are larger than other events.<br />
Muted events are shown as solid white. These do not produce any sound until they are unmuted again.<br />
Ruler and Groove length<br />
Ruler<br />
The ruler at the top of the grid shows a timeline in bars and beats.<br />
The end of the Groove is represented by the Groove End marker.<br />
Changing the length of Grooves<br />
To change the length of a Groove, click and drag the Groove End marker left or right. The<br />
cursor changes to a horizontal arrow.<br />
Click and drag at the right edge of the ruler to increase the Groove length beyond the current<br />
workspace. You may need to decrease the current zoom level in order to set the desired<br />
length more easily.<br />
Release the mouse button at the desired point to set the Groove length.<br />
Note that Grooves must always be a whole number of bars long.<br />
100<br />
Ruler Groove End<br />
marker