
You also want an ePaper? Increase the reach of your titles
YUMPU automatically turns print PDFs into web optimized ePapers that Google loves.
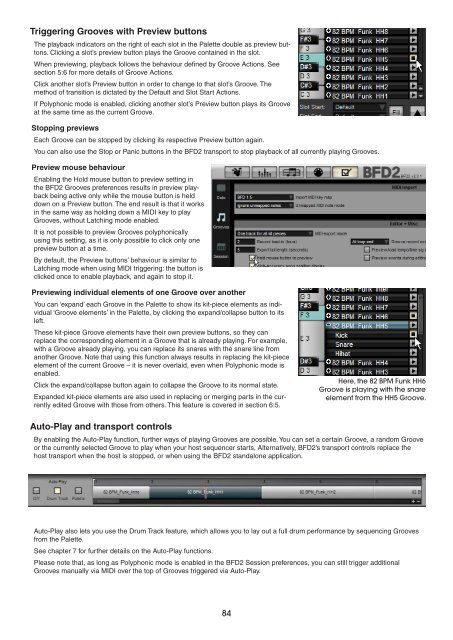
Triggering Grooves with Preview buttons<br />
The playback indicators on the right of each slot in the Palette double as preview buttons.<br />
Clicking a slot’s preview button plays the Groove contained in the slot.<br />
When previewing, playback follows the behaviour defined by Groove Actions. See<br />
section 5:6 for more details of Groove Actions.<br />
Click another slot’s Preview button in order to change to that slot’s Groove. The<br />
method of transition is dictated by the Default and Slot Start Actions.<br />
If Polyphonic mode is enabled, clicking another slot’s Preview button plays its Groove<br />
at the same time as the current Groove.<br />
Stopping previews<br />
Each Groove can be stopped by clicking its respective Preview button again.<br />
You can also use the Stop or Panic buttons in the BFD2 transport to stop playback of all currently playing Grooves.<br />
Preview mouse behaviour<br />
Enabling the Hold mouse button to preview setting in<br />
the BFD2 Grooves preferences results in preview playback<br />
being active only while the mouse button is held<br />
down on a Preview button. The end result is that it works<br />
in the same way as holding down a MIDI key to play<br />
Grooves, without Latching mode enabled.<br />
It is not possible to preview Grooves polyphonically<br />
using this setting, as it is only possible to click only one<br />
preview button at a time.<br />
By default, the Preview buttons’ behaviour is similar to<br />
Latching mode when using MIDI triggering: the button is<br />
clicked once to enable playback, and again to stop it.<br />
Previewing individual elements of one Groove over another<br />
You can ‘expand’ each Groove in the Palette to show its kit-piece elements as individual<br />
‘Groove elements’ in the Palette, by clicking the expand/collapse button to its<br />
left.<br />
These kit-piece Groove elements have their own preview buttons, so they can<br />
replace the corresponding element in a Groove that is already playing. For example,<br />
with a Groove already playing, you can replace its snares with the snare line from<br />
another Groove. Note that using this function always results in replacing the kit-piece<br />
element of the current Groove – it is never overlaid, even when Polyphonic mode is<br />
enabled.<br />
Click the expand/collapse button again to collapse the Groove to its normal state.<br />
Expanded kit-piece elements are also used in replacing or merging parts in the currently<br />
edited Groove with those from others. This feature is covered in section 6:5.<br />
Auto-Play and transport controls<br />
By enabling the Auto-Play function, further ways of playing Grooves are possible. You can set a certain Groove, a random Groove<br />
or the currently selected Groove to play when your host sequencer starts, Alternatively, BFD2’s transport controls replace the<br />
host transport when the host is stopped, or when using the BFD2 standalone application.<br />
Auto-Play also lets you use the Drum Track feature, which allows you to lay out a full drum performance by sequencing Grooves<br />
from the Palette.<br />
See chapter 7 for further details on the Auto-Play functions.<br />
Here, the BPM Funk HH<br />
Groove is playing with the snare<br />
element from the HH Groove.<br />
Please note that, as long as Polyphonic mode is enabled in the BFD2 Session preferences, you can still trigger additional<br />
Grooves manually via MIDI over the top of Grooves triggered via Auto-Play.