
Create successful ePaper yourself
Turn your PDF publications into a flip-book with our unique Google optimized e-Paper software.
Chapter 3. Creating Your Own Sounds<br />
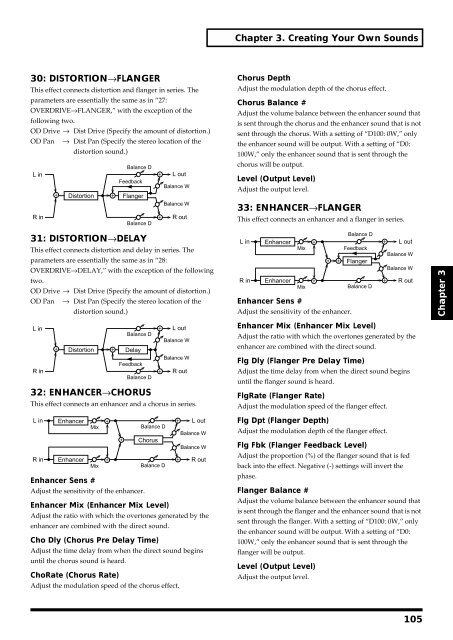
30: DISTORTION→FLANGER<br />
This effect connects distortion and flanger in series. The<br />
parameters are essentially the same as in “27:<br />
OVERDRIVE→FLANGER,” with the exception of the<br />
following two.<br />
OD Drive → Dist Drive (Specify the amount of distortion.)<br />
OD Pan → Dist Pan (Specify the stereo location of the<br />
distortion sound.)<br />
fig.3-75<br />
Balance D<br />
L in<br />
Distortion<br />
R in<br />
Feedback<br />
31: DISTORTION→DELAY<br />
L out<br />
Balance W<br />
Flanger<br />
Balance W<br />
R out<br />
Balance D<br />
This effect connects distortion and delay in series. The<br />
parameters are essentially the same as in “28:<br />
OVERDRIVE→DELAY,” with the exception of the following<br />
two.<br />
OD Drive → Dist Drive (Specify the amount of distortion.)<br />
OD Pan → Dist Pan (Specify the stereo location of the<br />
distortion sound.)<br />
Chorus Depth<br />
Adjust the modulation depth of the chorus effect.<br />
Chorus Balance #<br />
Adjust the volume balance between the enhancer sound that<br />
is sent through the chorus and the enhancer sound that is not<br />
sent through the chorus. With a setting of “D100: 0W,” only<br />
the enhancer sound will be output. With a setting of “D0:<br />
100W,” only the enhancer sound that is sent through the<br />
chorus will be output.<br />
Level (Output Level)<br />
Adjust the output level.<br />
33: ENHANCER→FLANGER<br />
This effect connects an enhancer and a flanger in series.<br />
fig.3-78<br />
Balance D<br />
L in Enhancer<br />
L out<br />
Mix<br />
Feedback<br />
Balance W<br />
Flanger<br />
Balance W<br />
R in Enhancer<br />
R out<br />
Mix<br />
Balance D<br />
Enhancer Sens #<br />
Adjust the sensitivity of the enhancer.<br />
Chapter 3<br />
fig.3-76<br />
L in<br />
L out<br />
Balance D<br />
Balance W<br />
Distortion<br />
Delay<br />
Balance W<br />
Feedback<br />
R in<br />
R out<br />
Balance D<br />
32: ENHANCER→CHORUS<br />
This effect connects an enhancer and a chorus in series.<br />
fig.3-77<br />
L in Enhancer<br />
L out<br />
Mix<br />
Balance D<br />
Balance W<br />
Chorus<br />
Balance W<br />
R in Enhancer<br />
R out<br />
Mix<br />
Balance D<br />
Enhancer Sens #<br />
Adjust the sensitivity of the enhancer.<br />
Enhancer Mix (Enhancer Mix Level)<br />
Adjust the ratio with which the overtones generated by the<br />
enhancer are combined with the direct sound.<br />
Cho Dly (Chorus Pre Delay Time)<br />
Adjust the time delay from when the direct sound begins<br />
until the chorus sound is heard.<br />
ChoRate (Chorus Rate)<br />
Adjust the modulation speed of the chorus effect.<br />
Enhancer Mix (Enhancer Mix Level)<br />
Adjust the ratio with which the overtones generated by the<br />
enhancer are combined with the direct sound.<br />
Flg Dly (Flanger Pre Delay Time)<br />
Adjust the time delay from when the direct sound begins<br />
until the flanger sound is heard.<br />
FlgRate (Flanger Rate)<br />
Adjust the modulation speed of the flanger effect.<br />
Flg Dpt (Flanger Depth)<br />
Adjust the modulation depth of the flanger effect.<br />
Flg Fbk (Flanger Feedback Level)<br />
Adjust the proportion (%) of the flanger sound that is fed<br />
back into the effect. Negative (-) settings will invert the<br />
phase.<br />
Flanger Balance #<br />
Adjust the volume balance between the enhancer sound that<br />
is sent through the flanger and the enhancer sound that is not<br />
sent through the flanger. With a setting of “D100: 0W,” only<br />
the enhancer sound will be output. With a setting of “D0:<br />
100W,” only the enhancer sound that is sent through the<br />
flanger will be output.<br />
Level (Output Level)<br />
Adjust the output level.<br />
105