
You also want an ePaper? Increase the reach of your titles
YUMPU automatically turns print PDFs into web optimized ePapers that Google loves.
Chapter 6. Getting the Full Potential of the XP-30<br />
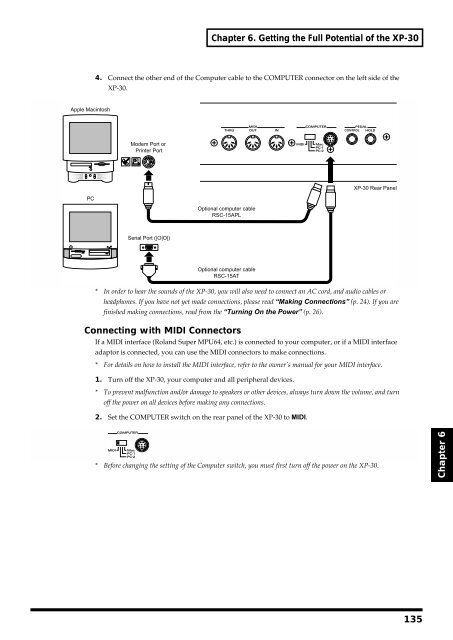
fig.6-05.e<br />
4. Connect the other end of the Computer cable to the COMPUTER connector on the left side of the<br />
XP-30.<br />
Apple Macintosh<br />
Modem Port or<br />
Printer Port<br />
XP-30 Rear Panel<br />
PC<br />
Optional computer cable<br />
RSC-15APL<br />
Serial Port (|O|O|)<br />
Optional computer cable<br />
RSC-15AT<br />
* In order to hear the sounds of the XP-30, you will also need to connect an AC cord, and audio cables or<br />
headphones. If you have not yet made connections, please read “Making Connections” (p. 24). If you are<br />
finished making connections, read from the “Turning On the Power” (p. 26).<br />
Connecting with MIDI Connectors<br />
If a MIDI interface (<strong>Roland</strong> Super MPU64, etc.) is connected to your computer, or if a MIDI interface<br />
adaptor is connected, you can use the MIDI connectors to make connections.<br />
* For details on how to install the MIDI interface, refer to the owner’s manual for your MIDI interface.<br />
1. Turn off the XP-30, your computer and all peripheral devices.<br />
* To prevent malfunction and/or damage to speakers or other devices, always turn down the volume, and turn<br />
off the power on all devices before making any connections.<br />
2. Set the COMPUTER switch on the rear panel of the XP-30 to MIDI.<br />
fig.6-06<br />
* Before changing the setting of the Computer switch, you must first turn off the power on the XP-30.<br />
Chapter 6<br />
135