
You also want an ePaper? Increase the reach of your titles
YUMPU automatically turns print PDFs into web optimized ePapers that Google loves.
Chapter 3. Creating Your Own Sounds<br />
Multi-Effects Types<br />
(EFX Parameter)<br />
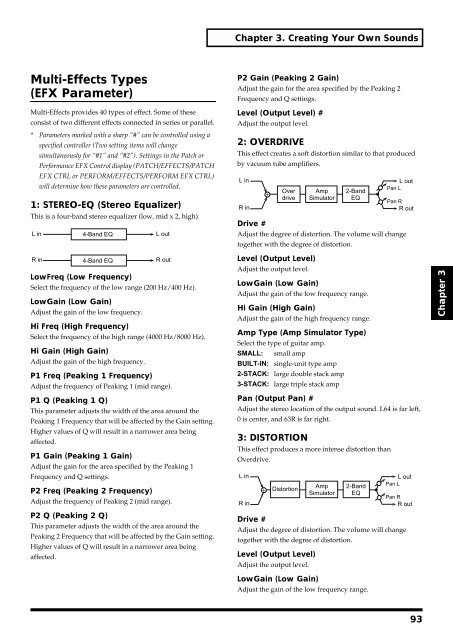
Multi-Effects provides 40 types of effect. Some of these<br />
consist of two different effects connected in series or parallel.<br />
* Parameters marked with a sharp “#” can be controlled using a<br />
specified controller (Two setting items will change<br />
simultaneously for “#1” and “#2”). Settings in the Patch or<br />
Performance EFX Control display (PATCH/EFFECTS/PATCH<br />
EFX CTRL or PERFORM/EFFECTS/PERFORM EFX CTRL)<br />
will determine how these parameters are controlled.<br />
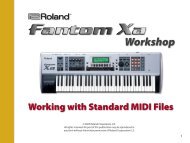
1: STEREO-EQ (Stereo Equalizer)<br />
This is a four-band stereo equalizer (low, mid x 2, high).<br />
fig.3-48<br />
L in<br />
4-Band EQ<br />
L out<br />
P2 Gain (Peaking 2 Gain)<br />
Adjust the gain for the area specified by the Peaking 2<br />
Frequency and Q settings.<br />
Level (Output Level) #<br />
Adjust the output level.<br />
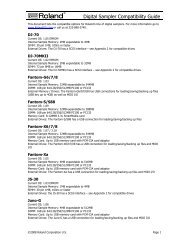
2: OVERDRIVE<br />
This effect creates a soft distortion similar to that produced<br />
by vacuum tube amplifiers.<br />
fig.3-49<br />
L in<br />
R in<br />
Over<br />
drive<br />
Amp<br />
Simulator<br />
2-Band<br />
EQ<br />
L out<br />
Pan L<br />
Pan R<br />
R out<br />
Drive #<br />
Adjust the degree of distortion. The volume will change<br />
together with the degree of distortion.<br />
R in<br />
4-Band EQ<br />
R out<br />
LowFreq (Low Frequency)<br />
Select the frequency of the low range (200 Hz/400 Hz).<br />
LowGain (Low Gain)<br />
Adjust the gain of the low frequency.<br />
Hi Freq (High Frequency)<br />
Select the frequency of the high range (4000 Hz/8000 Hz).<br />
Hi Gain (High Gain)<br />
Adjust the gain of the high frequency.<br />
P1 Freq (Peaking 1 Frequency)<br />
Adjust the frequency of Peaking 1 (mid range).<br />
P1 Q (Peaking 1 Q)<br />
This parameter adjusts the width of the area around the<br />
Peaking 1 Frequency that will be affected by the Gain setting.<br />
Higher values of Q will result in a narrower area being<br />
affected.<br />
P1 Gain (Peaking 1 Gain)<br />
Adjust the gain for the area specified by the Peaking 1<br />
Frequency and Q settings.<br />
P2 Freq (Peaking 2 Frequency)<br />
Adjust the frequency of Peaking 2 (mid range).<br />
P2 Q (Peaking 2 Q)<br />
This parameter adjusts the width of the area around the<br />
Peaking 2 Frequency that will be affected by the Gain setting.<br />
Higher values of Q will result in a narrower area being<br />
affected.<br />
Level (Output Level)<br />
Adjust the output level.<br />
LowGain (Low Gain)<br />
Adjust the gain of the low frequency range.<br />
Hi Gain (High Gain)<br />
Adjust the gain of the high frequency range.<br />
Amp Type (Amp Simulator Type)<br />
Select the type of guitar amp.<br />
SMALL: small amp<br />
BUILT-IN: single-unit type amp<br />
2-STACK: large double stack amp<br />
3-STACK: large triple stack amp<br />
Pan (Output Pan) #<br />
Adjust the stereo location of the output sound. L64 is far left,<br />
0 is center, and 63R is far right.<br />
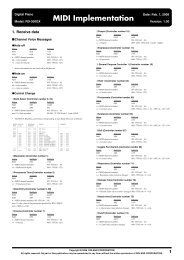
3: DISTORTION<br />
This effect produces a more intense distortion than<br />
Overdrive.<br />
fig.3-50<br />
L in<br />
R in<br />
Distortion<br />
Drive #<br />
Adjust the degree of distortion. The volume will change<br />
together with the degree of distortion.<br />
Level (Output Level)<br />
Adjust the output level.<br />
Amp<br />
Simulator<br />
2-Band<br />
EQ<br />
L out<br />
Pan L<br />
Pan R<br />
R out<br />
Chapter 3<br />
LowGain (Low Gain)<br />
Adjust the gain of the low frequency range.<br />
93