- Page 1 and 2: OWNER’S MANUAL Thank you, and con
- Page 3 and 4: Used for instructions intended to a
- Page 5 and 6: Important Notes In addition to the
- Page 7 and 8: Contents Main Features.............
- Page 9 and 10: Contents Setting Effects for a Rhyt
- Page 11 and 12: Main Features ■ High-Performance
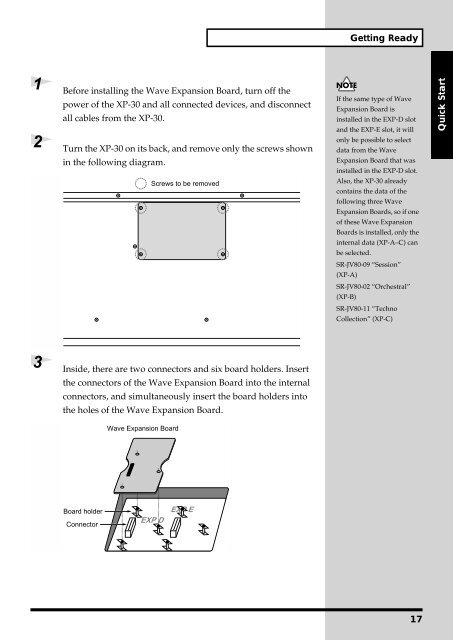
- Page 13 and 14: Front and Rear Panel F G [INC], [DE
- Page 15: Quick Start Quick Start 15
- Page 19 and 20: Getting Ready 9 Press [EXP D] or [E
- Page 21 and 22: Getting Ready 1 Éteindre le XP-30
- Page 23 and 24: Getting Ready 9 Appuyer sur [EXP D]
- Page 25 and 26: Getting Ready 2 Connect supplied AC
- Page 27 and 28: Getting Ready Reset to Default Fact
- Page 29 and 30: Listening to the Demo Song ■ Prof
- Page 31 and 32: Playing the Sounds Selecting Wave E
- Page 33 and 34: Playing the Sounds 5 Turn the VALUE
- Page 35 and 36: Playing the Sounds ■ Hold Pedal I
- Page 37 and 38: Playing the Sounds 3 Play a chord.
- Page 39 and 40: Chapter 2 Chapter 1 Advanced Use Ch
- Page 41 and 42: Chapter 1. Overview of the XP-30 Pa
- Page 43 and 44: Chapter 1. Overview of the XP-30 GM
- Page 45 and 46: Chapter 1. Overview of the XP-30 Mo
- Page 47 and 48: Chapter 2. Playing Playing in Patch
- Page 49 and 50: Chapter 2. Playing The following ca
- Page 51 and 52: Chapter 2. Playing Changing Sound C
- Page 53 and 54: Chapter 2. Playing 6. Make sure tha
- Page 55 and 56: Chapter 2. Playing Playing in Rhyth
- Page 57 and 58: Chapter 2. Playing Playing in Regga
- Page 59 and 60: Chapter 2. Playing 1. Press [SYSTEM
- Page 61 and 62: Chapter 3. Creating Your Own Sounds
- Page 63 and 64: Chapter 3. Creating Your Own Sounds
- Page 65 and 66: Chapter 3. Creating Your Own Sounds
- Page 67 and 68:
Chapter 3. Creating Your Own Sounds
- Page 69 and 70:
Chapter 3. Creating Your Own Sounds
- Page 71 and 72:
Chapter 3. Creating Your Own Sounds
- Page 73 and 74:
Chapter 3. Creating Your Own Sounds
- Page 75 and 76:
Chapter 3. Creating Your Own Sounds
- Page 77 and 78:
Chapter 3. Creating Your Own Sounds
- Page 79 and 80:
Chapter 3. Creating Your Own Sounds
- Page 81 and 82:
Chapter 3. Creating Your Own Sounds
- Page 83 and 84:
Chapter 3. Creating Your Own Sounds
- Page 85 and 86:
Chapter 3. Creating Your Own Sounds
- Page 87 and 88:
Chapter 3. Creating Your Own Sounds
- Page 89 and 90:
Chapter 3. Creating Your Own Sounds
- Page 91 and 92:
Chapter 3. Creating Your Own Sounds
- Page 93 and 94:
Chapter 3. Creating Your Own Sounds
- Page 95 and 96:
Chapter 3. Creating Your Own Sounds
- Page 97 and 98:
Chapter 3. Creating Your Own Sounds
- Page 99 and 100:
Chapter 3. Creating Your Own Sounds
- Page 101 and 102:
Chapter 3. Creating Your Own Sounds
- Page 103 and 104:
Chapter 3. Creating Your Own Sounds
- Page 105 and 106:
Chapter 3. Creating Your Own Sounds
- Page 107 and 108:
Chapter 3. Creating Your Own Sounds
- Page 109 and 110:
Chapter 3. Creating Your Own Sounds
- Page 111 and 112:
Chapter 3. Creating Your Own Sounds
- Page 113 and 114:
Chapter 3. Creating Your Own Sounds
- Page 115 and 116:
Chapter 4. Memory Settings (Utility
- Page 117 and 118:
Chapter 4. Memory Settings (Utility
- Page 119 and 120:
Chapter 4. Memory Settings (Utility
- Page 121 and 122:
Chapter 4. Memory Settings (Utility
- Page 123 and 124:
Chapter 4. Memory Settings (Utility
- Page 125 and 126:
Chapter 5. Using the XP-30 as the G
- Page 127 and 128:
Chapter 5. Using the XP-30 as the G
- Page 129 and 130:
Chapter 6. Getting the Full Potenti
- Page 131 and 132:
Chapter 6. Getting the Full Potenti
- Page 133 and 134:
Chapter 6. Getting the Full Potenti
- Page 135 and 136:
Chapter 6. Getting the Full Potenti
- Page 137 and 138:
Chapter 6. Getting the Full Potenti
- Page 139 and 140:
Appendices Appendices 139
- Page 141 and 142:
Troubleshooting - Does the MIDI sen
- Page 143 and 144:
Quick Reference of Procedures The X
- Page 145 and 146:
Quick Reference of Procedures Adjus
- Page 147 and 148:
Parameter List ■ Patch Parameters
- Page 149 and 150:
Parameter List PITCH Group (p. 79)
- Page 151 and 152:
Parameter List PART Group (p. 87) D
- Page 153 and 154:
Parameter List ■ GM Mode Paramete
- Page 155 and 156:
Parameter List 12: TREMOLO-CHORUS (
- Page 157 and 158:
Parameter List 29: DISTORTION→CHO
- Page 159 and 160:
Parameter List MIDI Group (p. 112)
- Page 161 and 162:
Waveform List INT-B (Internal B) No
- Page 163 and 164:
Waveform List ● XP-A Menu Wavefor
- Page 165 and 166:
Waveform List XP-C (WAVE EXPANSION
- Page 167 and 168:
Waveform List 156 OHH MENU 176 CLAP
- Page 169 and 170:
Patch List PR-B (Preset B Group) No
- Page 171 and 172:
Patch List XP-A (WAVE EXPANSION A:
- Page 173 and 174:
Patch List XP-C (WAVE EXPANSION C:
- Page 175 and 176:
Patch List Original B.P.M. 120 Orig
- Page 177 and 178:
Rhythm Set List Note No. 35 C2 36 3
- Page 179 and 180:
Rhythm Set List XP-A (WAVE EXPANSIO
- Page 181 and 182:
Performance List USER (User Group)
- Page 183 and 184:
MIDI Implementation Model: XP-30 (6
- Page 185 and 186:
MIDI Implementation ❍Effect 1 (Re
- Page 187 and 188:
MIDI Implementation ● Universal R
- Page 189 and 190:
MIDI Implementation ❍General Purp
- Page 191 and 192:
MIDI Implementation | 00 33 | 0000
- Page 193 and 194:
MIDI Implementation ● 1-2-2.Perfo
- Page 195 and 196:
MIDI Implementation |————
- Page 197 and 198:
MIDI Implementation *1 INT, , EXP *
- Page 199 and 200:
MIDI Implementation 4. Supplementar
- Page 201 and 202:
MIDI Implementation ● Type33: ENH
- Page 203 and 204:
MIDI Implementation ■ Decimal/Hex
- Page 205 and 206:
MIDI Implementation ■ Scale Tune
- Page 207 and 208:
Specifications XP-30: 64 Voice Expa
- Page 209 and 210:
Index Symbols [+OCT] ..............
- Page 211 and 212:
Index K Key assign mode ...........
- Page 213 and 214:
Index S Save ......................
- Page 215 and 216:
For EU Countries Apparatus containi